|
Site Search
If you found the information useful, consider to make a donation:
| |
written by Rene K. Mueller, Copyright (c) 2005, 2006, 2007, 2008, 2009, last updated Sat, January 3, 2015
UpdatesFri, December 18, 2009: Last update, moved to France and describe with a bit longer entry
.
Sun, July 6, 2008: Photos from the take down, which I finally put up - with these the yurt diary also ends
.
Sun, April 20, 2008: Last days, concluding total wood usage for winter season 2007/2008, and larger skylights grids finished
.
Sat, April 5, 2008: Skylight grids further refined, with some photos.
.
Sat, March 22, 2008: Various skylight supporting grids with willow bows made, with photos and an illustration
.
Mon, March 10, 2008: Milder days, storm aftermath with a few thoughts how to prepare for a storm
.
Sat, January 5, 2008: Added PVC to seal brittle older PE wall cover - concluding longlivity of PE for yurt usage after apprx. 24 months
.
Sat, December 22, 2007: December solstice, past days trying to dry the insulation which got wet before winter returned
.
Mon, October 29, 2007: Roof thermal insulation put up, roof extension over the door and also a door frame extension covering junctions.
.
Tue, October 23, 2007: Replacing door without taking down the yurt, and putting up the thermal insulation of the wall.
.
Thu, September 6, 2007: Cooler weather, higher temperature range in the yurt, attaching stove pipe again, and looking at compost as heat source.
.
Sat, August 4, 2007: Built a quick attached room with existing lattice-wall of 12m length.
.
Sat, June 30, 2007: Kind of picked up the diary again, and updated it with various entry, weather diary, fixing small things on the yurt, meeting stone age enthusiast.
.
Sat, April 28, 2007: Yurt is taken down, and on the existing floor the geodesic dome has been moved with a preliminary setup.
.
Tue, January 2, 2007: Visiting Chris Aeppli and his 7.5m yurt and new photos of the interior.
.
Thu, December 14, 2006: Skeleton of travel yurt finished, first erection
.
Sun, November 26, 2006: Finishing thermal insulation setup, new PE rain cover - ready for winter 2006/2007.
.
Sun, November 5, 2006: Further updates on progress thermal insulation with straw filled jute blankets
.
Sun, October 22, 2006: More updates on progress of new place and its setup
.
Mon, October 9, 2006: After couple of weeks I updated the diary with new entries (Fall Approaching, New Place Found, Preparing Moving etc)
.
Sat, September 9, 2006: Visited Claudius Kern, a few photos of his two level yurt
.
Fri, July 7, 2006: More photos of door construction (vertical laths based)
.
Wed, May 31, 2006: Photos of two wheels / toonos I'm working on (not yet finished), and a couple of wonderful fotos of a sunset of the last day of May 2006
.
Fri, April 21, 2006: Updated diary with few photos of repairing skylight (dried tape replaced)
.
Mon, March 6, 2006: Interior photos and a video-clip added
.
Sat, January 7, 2006: Added more pictures, added more insulation layers.
.
Fri, November 25, 2005: More photos, first real snow, roof cover construction photos added as well
.
Tue, November 8, 2005: Updated the last days with photos, yurt erected with raincover and thermal insulation, preparing the interior
.
Sun, October 23, 2005: Added photos to the last days entries, toono, roof cover, and door construction
.
Mon, October 17, 2005: Rain cover done, toono cover finished with clear PVC, and sew main cotton roof canvas, and attached cords on wall canvas to bind them.
.
Fri, October 7, 2005: Premiere yurt put up, without cover as of now
.
Wed, October 5, 2005: Making of crown-wheel (toono) and its cover
.
Fri, September 23, 2005: Making of the khana
.
Sat, September 17, 2005: Starting the yurt diary
.
|
Welcome to my Yurt Diary.
I spent the summer 2005 in a tipi, and prepared myself a shelter for the winter 2005/2006: a yurt - which this diary started.
A friend of mine joined me to build a yurt in fall of 2005 - we acquired some material together, but actually build our own yurt separately.
As of November 2005 I moved from my tipi to the yurt, which I erected with thermal insulation. Then I prepared the interior with stove, bed, tables and infrastructure to live and work in it - I was using WC, shower, washing machine and kitchen in the nearby farming house.
As of October 2006 I moved to a new place, apprx. 500m to a neighbouring farmer with a great place, a bit exposed to winds but on the other hand a great vista. At this place I have running water (spring, cold and hot), and I'm able to use WC and washing machine from the neighbour; kitchen and shower I build now myself.
As of April 2008 I took the yurt down and no longer update this diary anymore, but keep it online.
Update October 2009: I relocated from Switzerland to France and pitched my yurt a new grounds.
It has been a wonderful experience so far to live and work in the yurt.
Some who know me personally may miss my spiritual perspective on this all, but for now I like to keep this Yurt Diary rather informative for yurt builders than for people who know me personally and like to know what I'm doing these days and so forth.
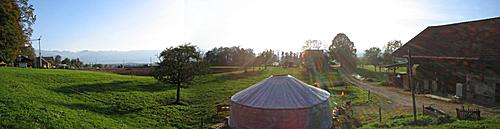
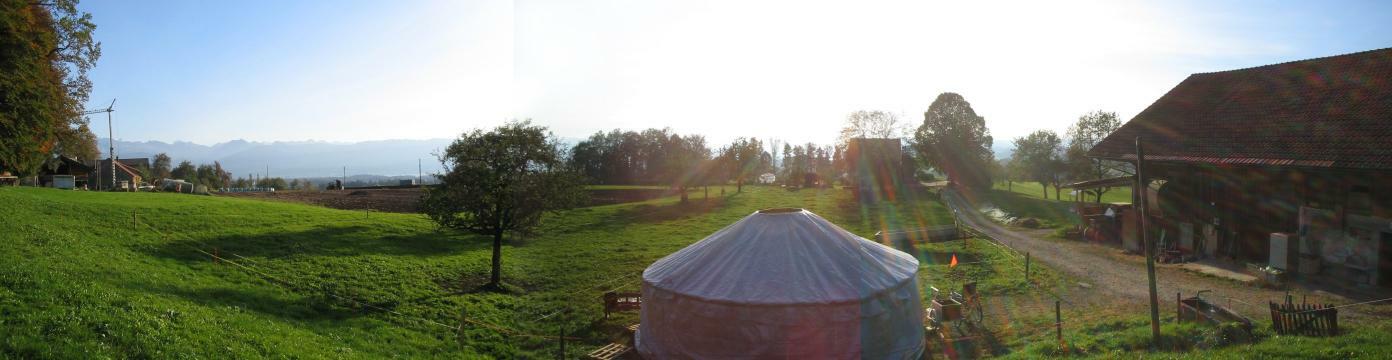
 Panorama, Oberduernten (Switzerland) 2006 |
- 2005: Oberduernten (Switzerland), in summer living in a tipi, in fall moving into the yurt
- 2006: Oberduernten (Switzerland), in fall moving to a new place nearby, upgrading yurt, and a colleague, joins me with her yurt placed nearby yet wishes not be documented here
- 2007: ditto, alone on the location and spending winter 2007/2008 still here, spring 2008 moving to a new location
- 2008: took yurt down by April 2008 and moved on
- 2009: moved to Midi Pyrenees (France), pitched the 6.4m and the 4.0m yurt as storage room
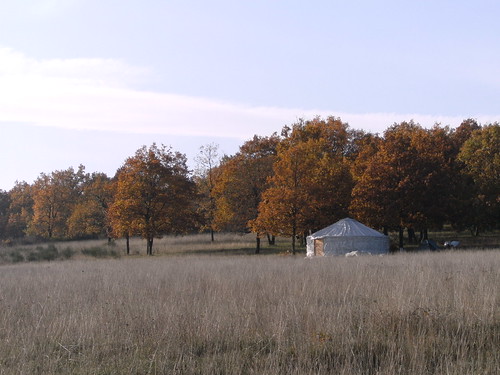
Midi Pyrenees (France) November 2009 |

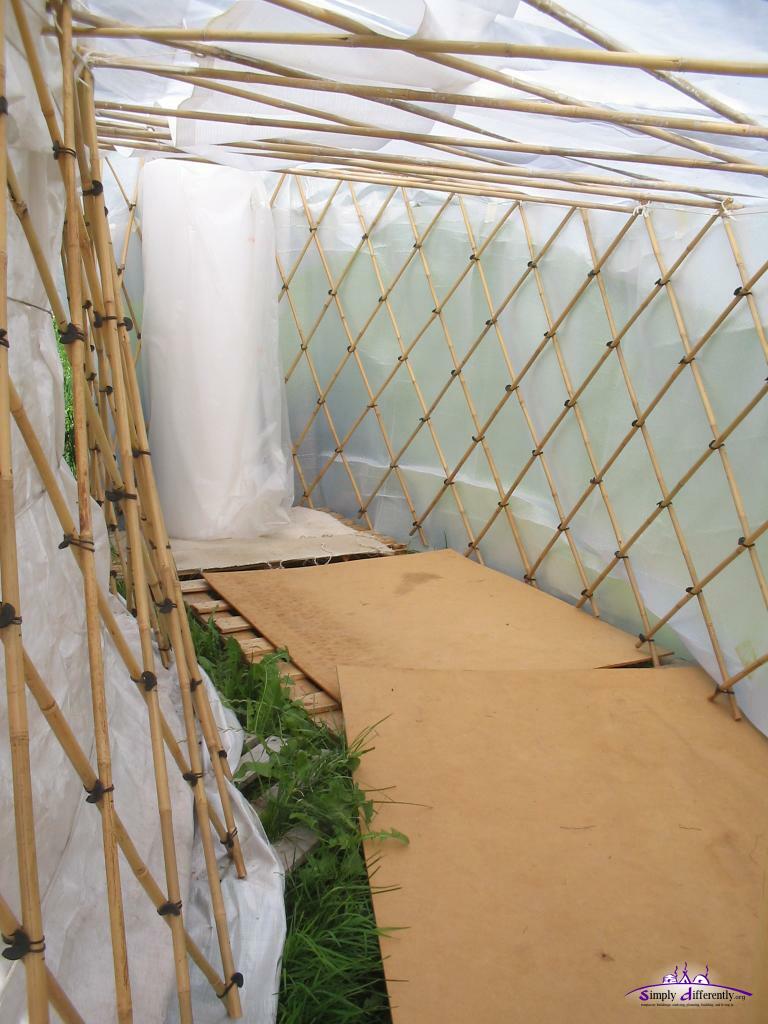
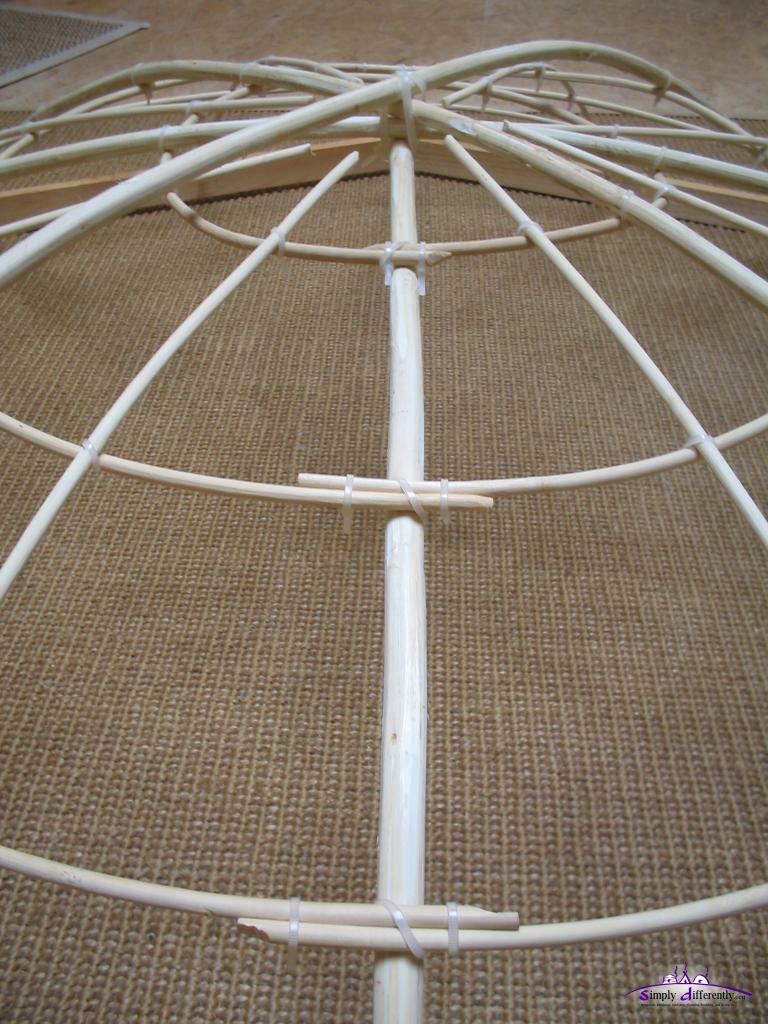
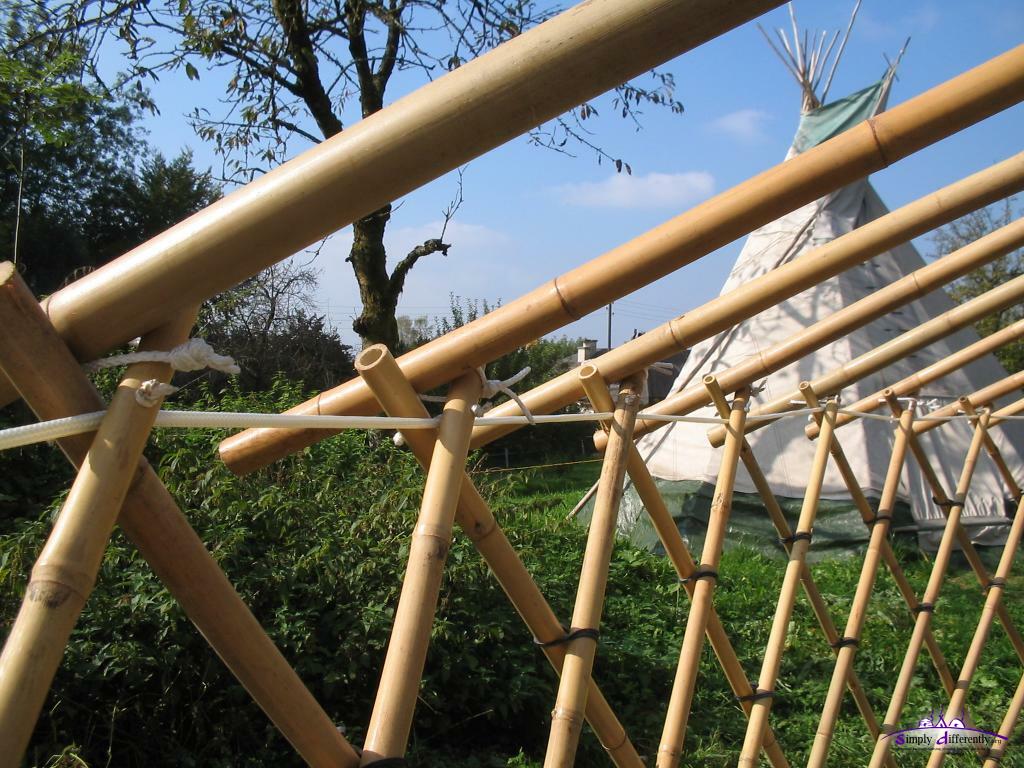
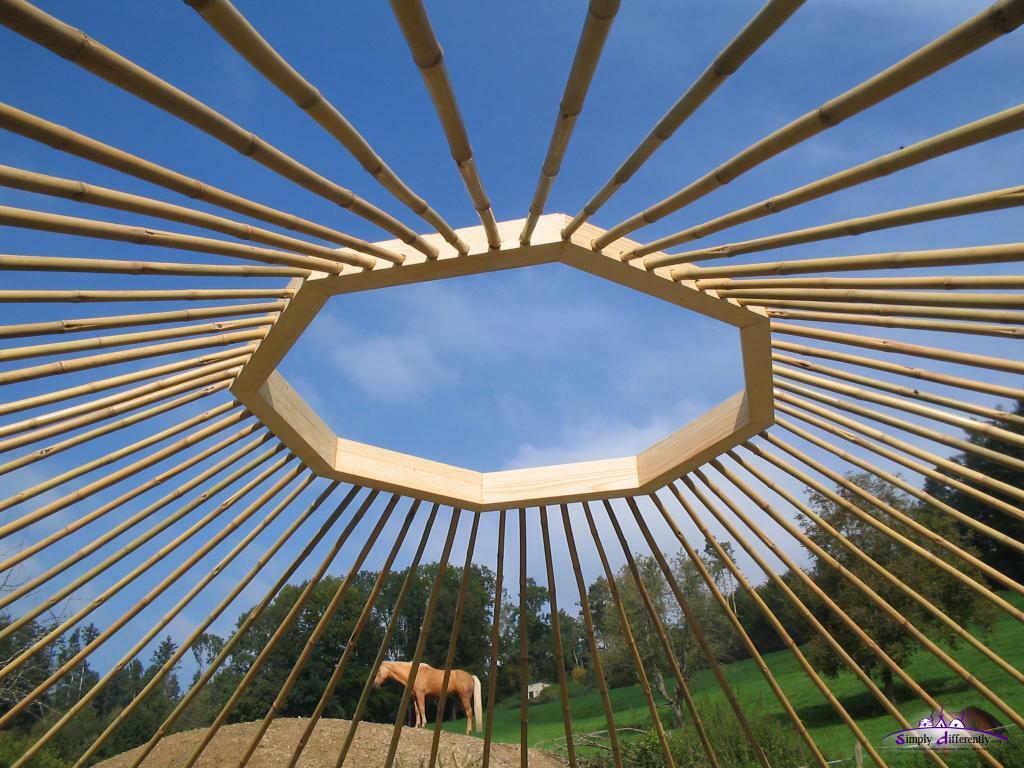
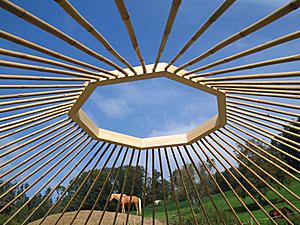
Roof Poles on Lattice Wall / Khana, Closeup |
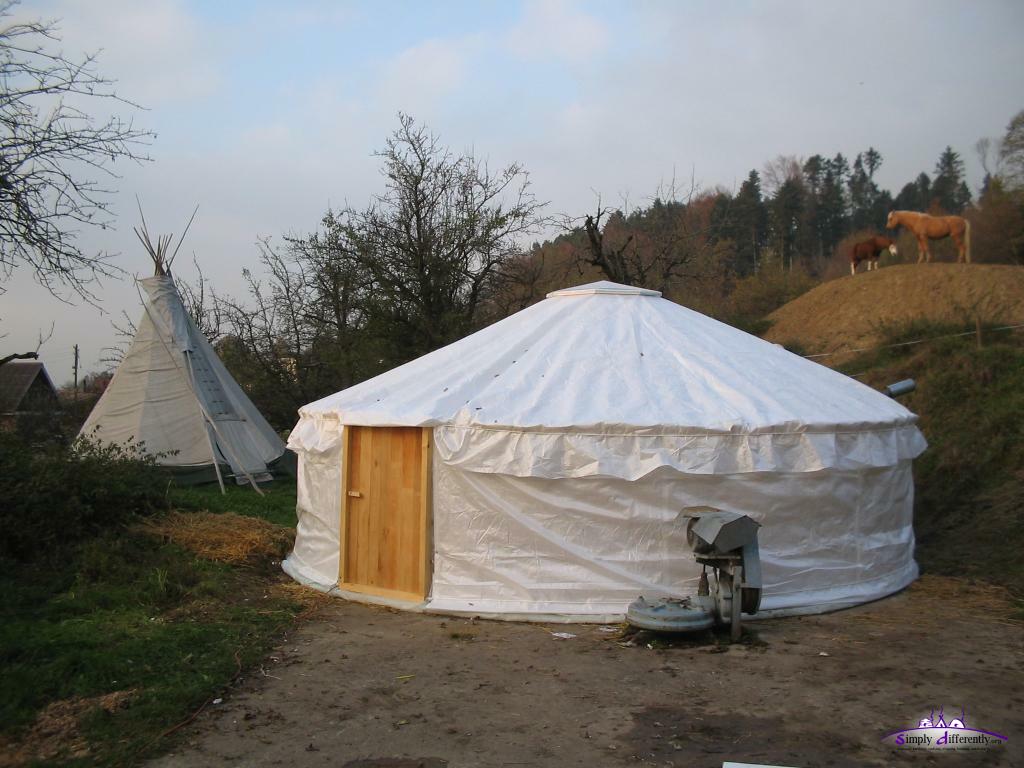
- diameter 6.40m (19.4')
- circumference 20m (67')
- 64 roof poles
- wall height 1.50m (4.5')
- wall geometry
- roof poles/junction width 31.4cm
- hole distance 21.2cm, first hole 6cm below top
- 10 holes/junctions
- roof tilt αroof apprx. 26°
- total height apprx. 2.77m (9.2')
- crown-wheel diameter 1.22m (8 segment polygon)
- area roof 38m2
- area wall 30m2
- door width 94.2cm (3 poles wide, 3 x 31.4cm), 150cm height
- wall/khana: 2 sections each 30 1/2 twin laths
Calculation done via yurt notes I collected.
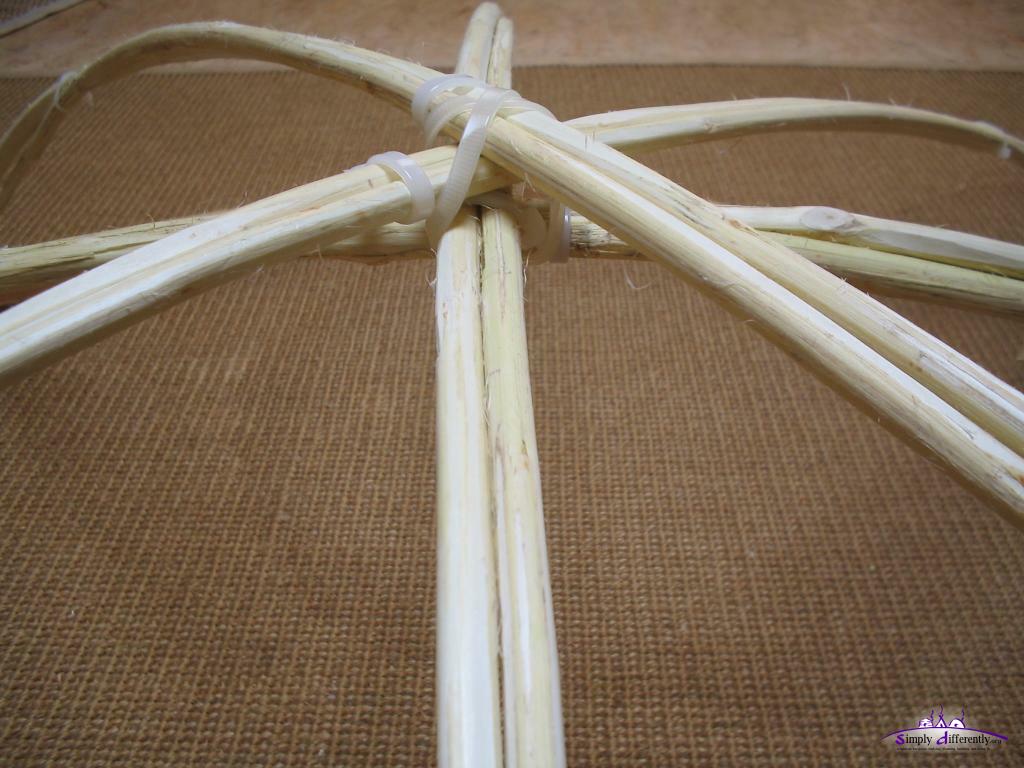
Roof Poles into Crown-Wheel / Toono |
- roof poles: 64 bamboo poles 3.05m long, diameter 2.6-2.8cm (thicker ends)
- 40 poles 2.0cm (narrow ends) and toono holes
- 24 poles 2.3cm (narrow ends) and toono holes
- for a quarter of the toono of 16 poles/holes, 10 x 2cm + 6 x 2.3cm, evenly distributed as far possible: 1+0+0+1+0+1+0+0+1+0+1+0+1+0+0
- wall poles: 142 bamboo poles, 2.12m long, diameter 2.0-2.2cm (thicker ends)
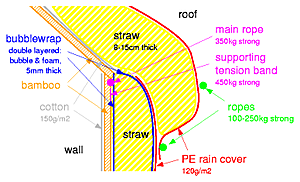
- rain canvas: polyethylen (PE), 8m x 8m (roof) and 20m x 2m (wall)
- insulation: two layers of 1cm thick bubble wrap (roof & wall)
- inner canvas: white wholesale cotton, 6m + 7.3m + 7.5m + 7.3m + 6m each 1.5m wide lanes, sewed together; 2 sections each 10m long and 1.5m height with cords sewed on each 1m.
Total cost apprx. CHF 1000 or 666 or US$ 800, apprx. 6 work days work to assemble.
- Additional insulation CHF 180 (2x two layered bubble wrap) I added later around January 2006.
- Additional straw based insulation CHF 230 (apprx. 150m jute plus 13 strawbales) apprx. 4 days of work to assemble, as of November 2006.
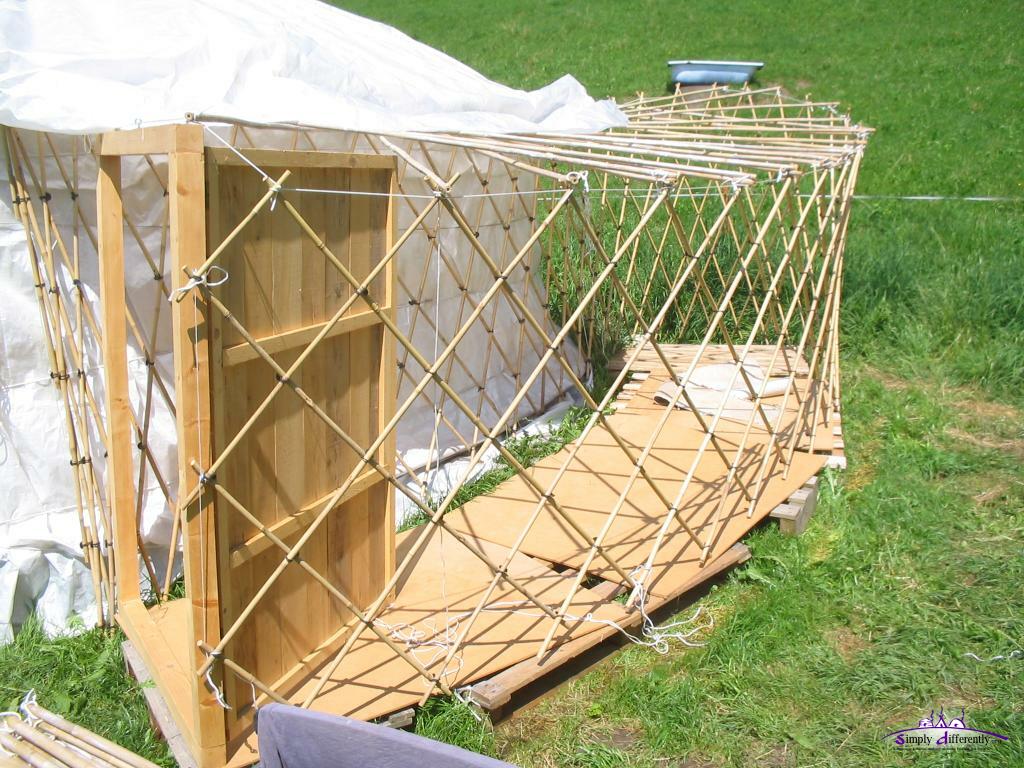
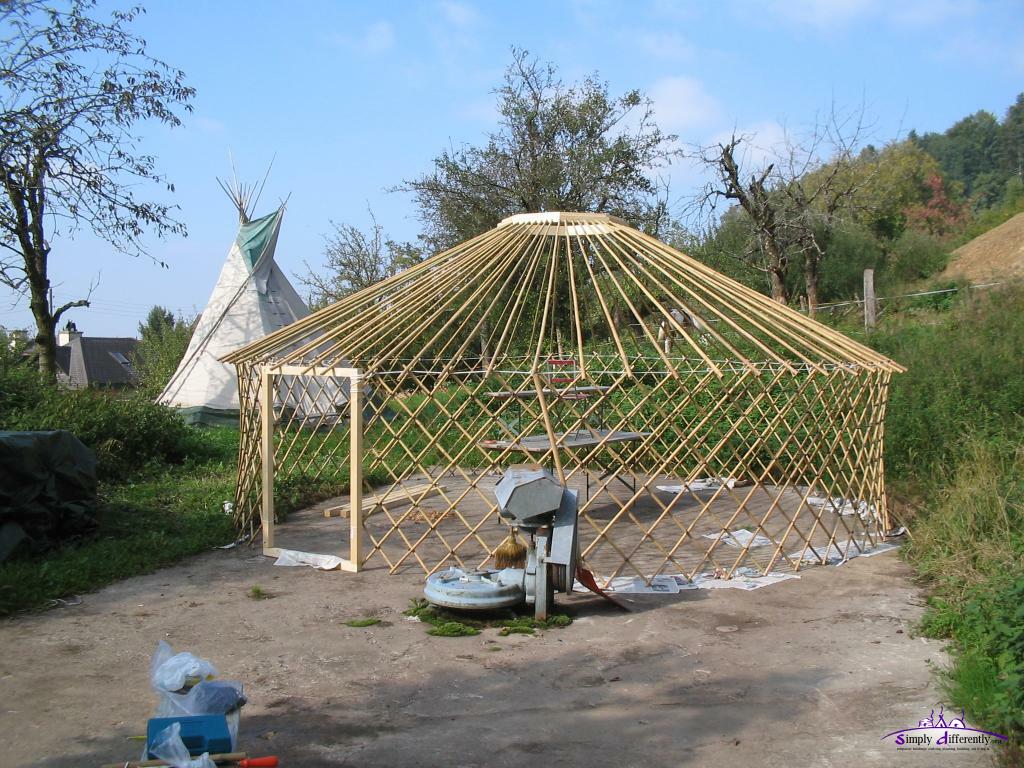
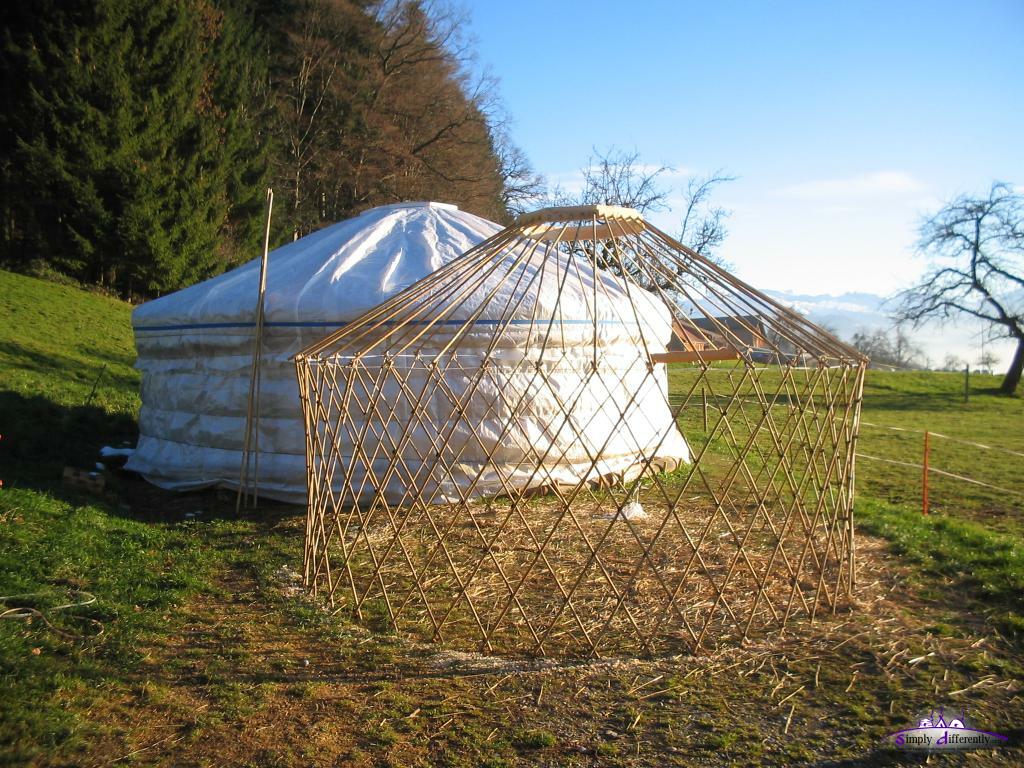
During 2006 I started to work on more yurts: 2x 6.4m, 1x 8.4m and 1x 9.5m yurt, where doors and crown-wheels are done. Due to limited space I started a small 4m travel yurt, where the skeleton is finished:
The Numbers
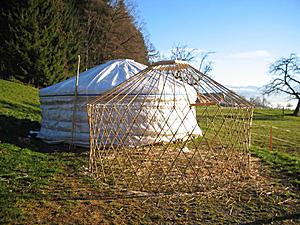
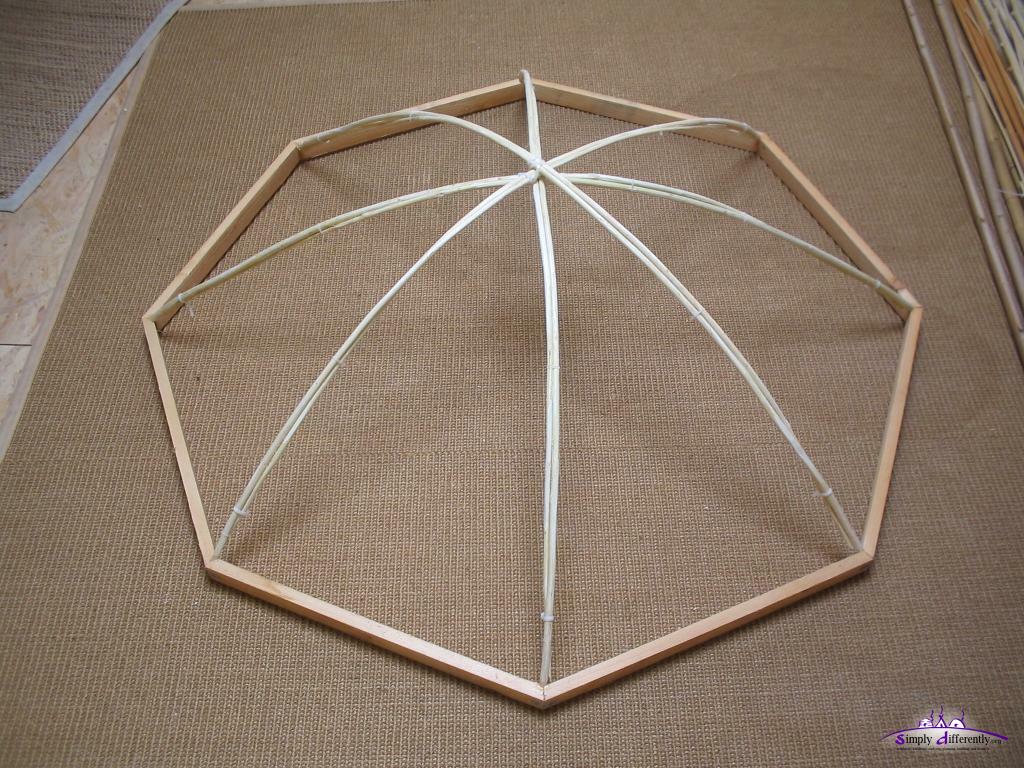
Travel Yurt Skeleton (4m) |
- diameter 4.0m (12.5')
- circumference 12.5m (37.9')
- ground area 12.56m2
- 40 roof poles (1.82m long)
- 8-segment crown-wheel 0.9m diameter (6cm thick)
- roof angle 28°
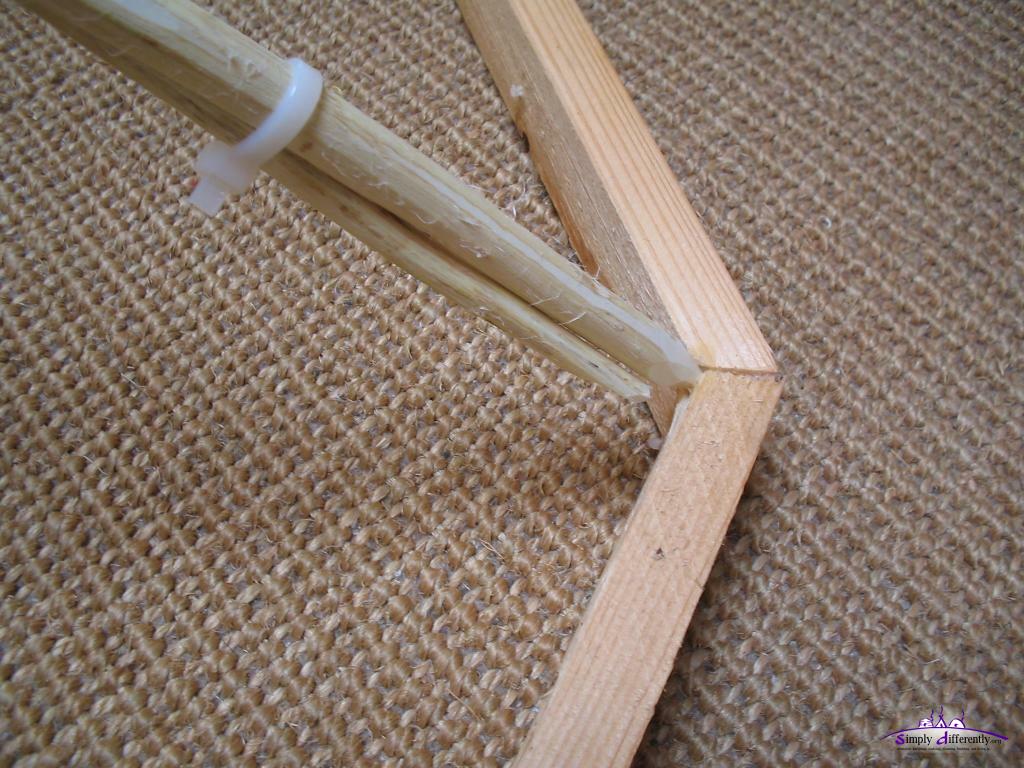
- door frame: 1.0m x 1.5m (3 poles wide)
- lattice wall:
- wall height 1.5m (using 1.82m lattice wall laths at 68° crossed)
- lath: 7 holes/junctions 28cm apart, 14cm left (2x 7cm), junctions: 7cm, 35cm, 63cm, 91cm, 119cm, 147cm, 175cm
- 1 section: 37 junctions + 3 poles on door = 40 poles
I intentionally used 1.82m long (15-18mm diameter thicker ends) bamboo sticks: 40 roof poles, apprx. 82 lattice wall laths = 122 bamboo poles. See diary entry around 14. 12. 2006 for more details and photos of the travel yurt.
It will have only a rain cover (PE) and interior cotton, and a simple door frame, where the wall cover will cover the door as well.
A summary of upgrades and lessons learned since I started in fall 2005:
I started with two layers of single layered bubble-wrap, but it was not sufficient to as thermal insulation, so I added two double layered bubble-wrap as mentioned already, which kept the daylight still enter the yurt, but the winter 2005/2006 was long and cold which you can read on the following pages.
As a consequence I was looking for other options for the next coming winter of 2006/2007 to resolve this somehow.
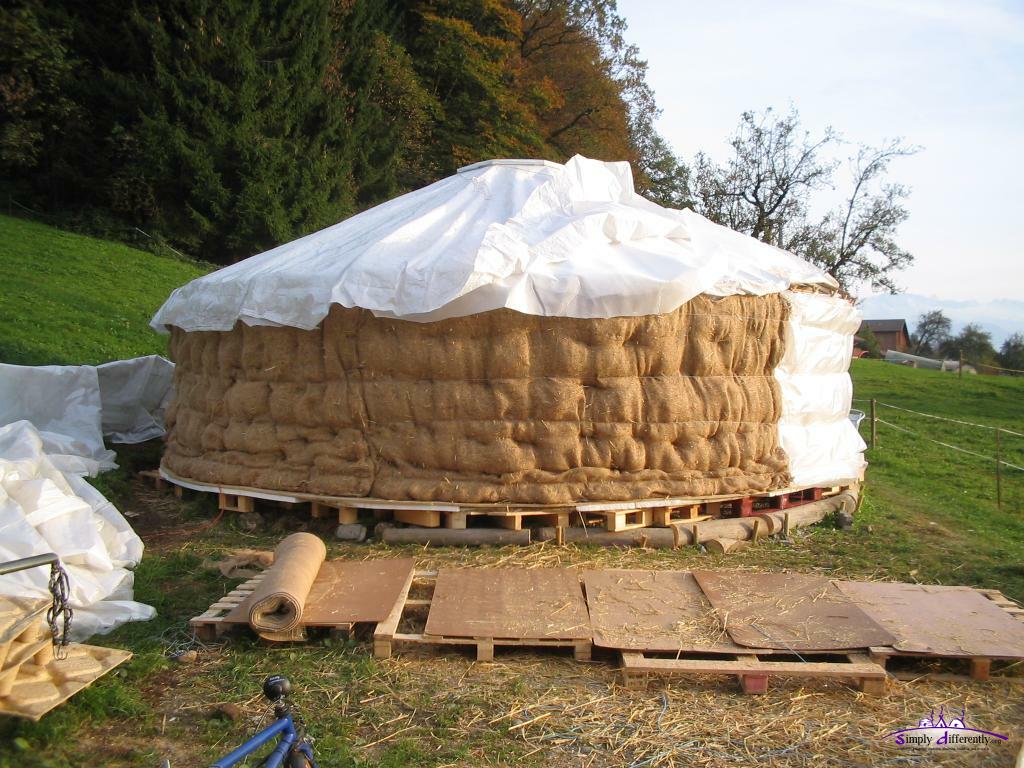
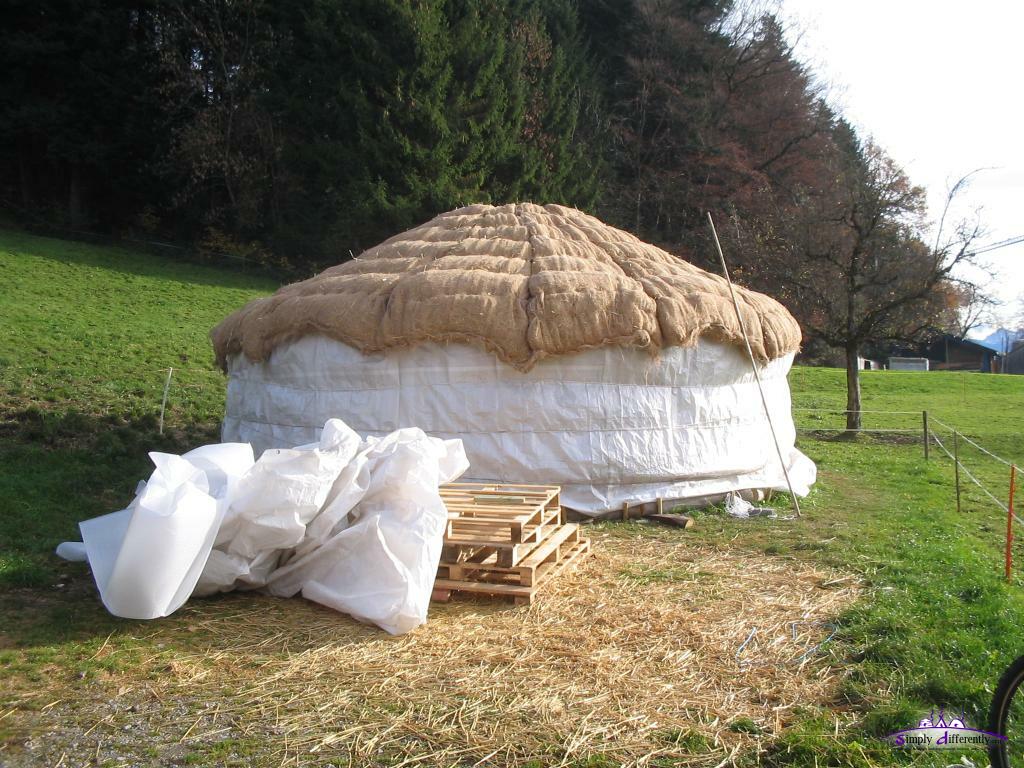
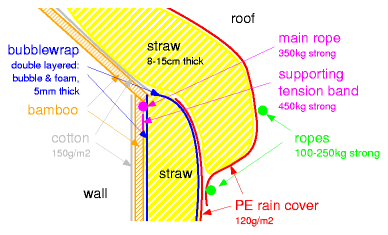
Thermal Insulation (Wall/Roof Setup Detail) Winter 2006/2007 |
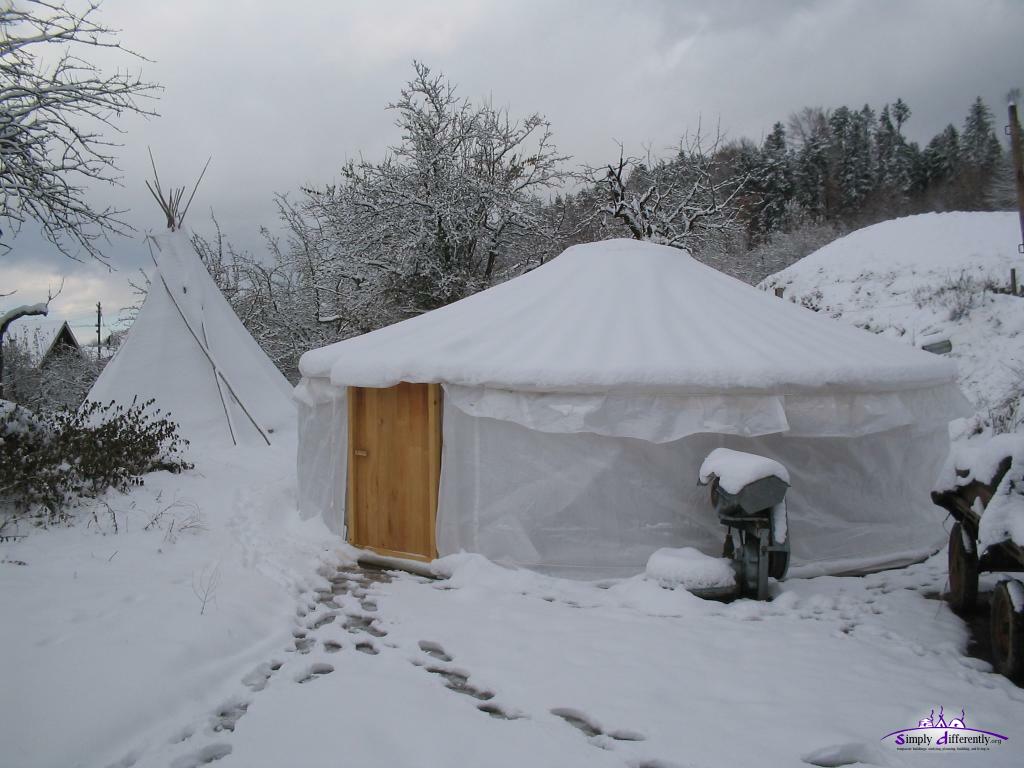
As of 2006, while moving to a new place, I discovered the roof bubblewrap totally porous already, which meant it wasn't UV resistant - I had to dispose it.
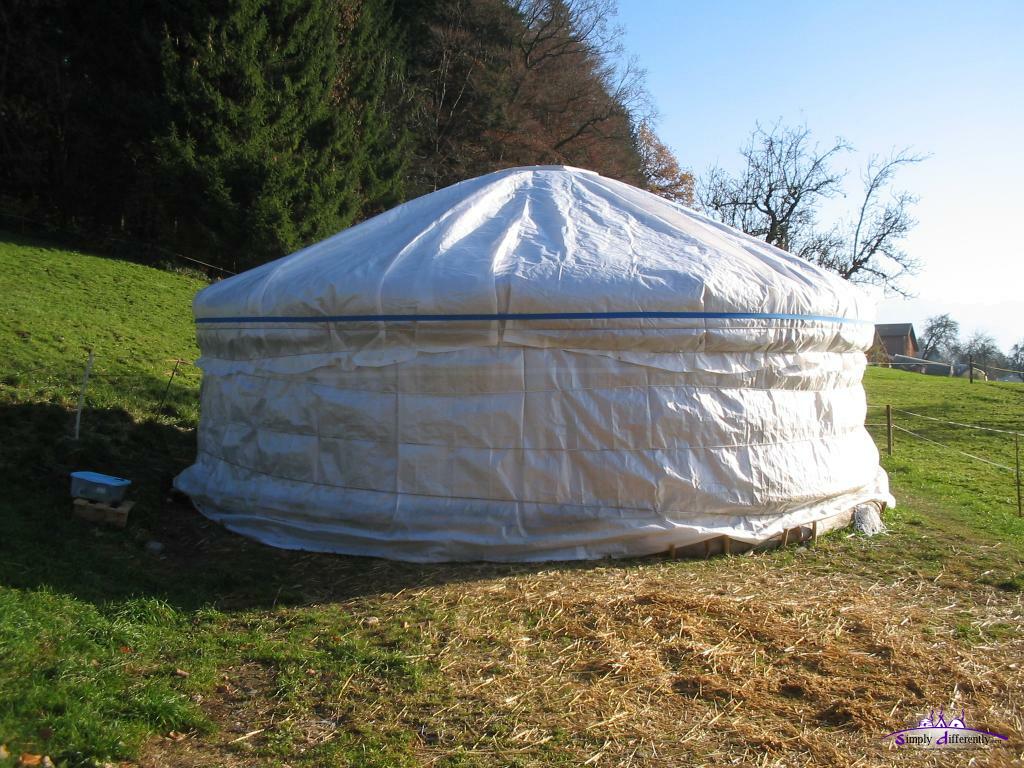
Also my PE rain cover got already after 1 year porous a bit which resulted in 30-40 tiny holes leaking rain already, both very revealing observations regarding material. I keep the PE rain cover but use additionally bubblewrap as 2nd rain cover beneath the PE cover, knowningly it won't last.
For the wintertime 2006/2007 I made blankets with jute and filled with loose and open straw, apprx. 10-15cm thick.
- wall: blankets 7x 3m long, 1.6m height
- roof: pieslice-wise setup, 12x slices, 3.0m long, 1.6m -> 0.3m wide
and expect much better thermal insulation than 4 layers of bubblewrap (2 layers of single layer & 2 layers of double layer) I had for winter 2005/2006.
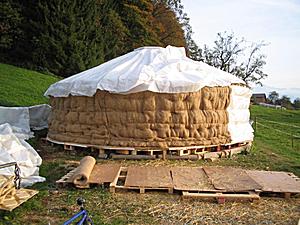 2006/11/04 14:52  All 13 segments put up ...
2006/11/25 11:59 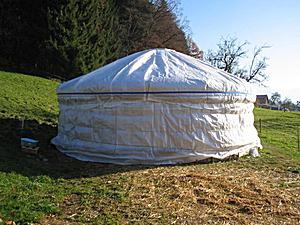 Finished straw insulation with new PE rain cover
2006/11/26 12:59
One quick upgrade I did was attaching an external room using lattice wall of the travel yurt (4m in diameter otherwise):
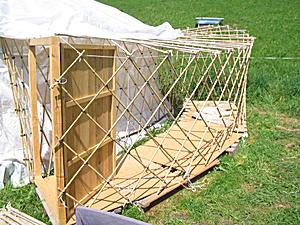 2007/08/04 12:34 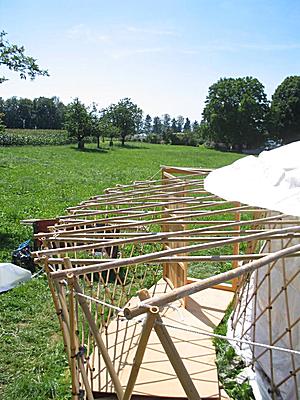 2007/08/04 12:35 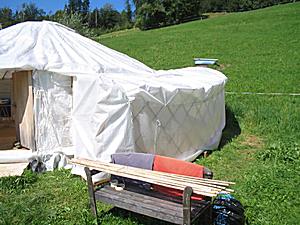 2007/08/04 13:53 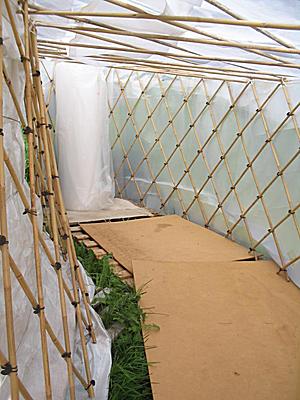 2007/08/04 13:57
and covered it with PE left-overs. The floor I did with 'one-way' palettes, with some cardboard covered.
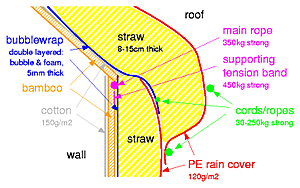
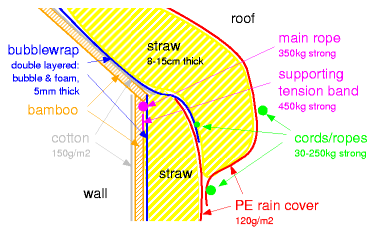
Thermal Insulation (Wall/Roof Junction Detail) of Winter 2007/2008 |
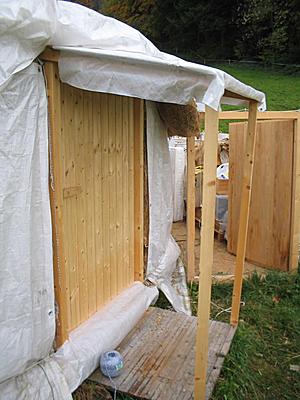
Roof Extension over Door |
It turned out a bit cumbersome when I like to work on the yurt, as I first have to partially disassemble the attached room before I can untie the yurt - so it's really a very temporary solution. Unfortunately I can't put up another yurt at the current place, otherwise I would prefere a separate yurt instead of an attached room, or find another way to attach a room where the building dependencies are significantly smaller, which is a kind contradiction given "attached room".
This year I used an additional bubblewrap layer on the roof as moisture blocker and dust blocker from the straw insulation, which gave a slightly better insulation, apprx. 0.7°C/hour drop instead of 1°C/hour drop of last year (temperature difference 15°C inside to outside).
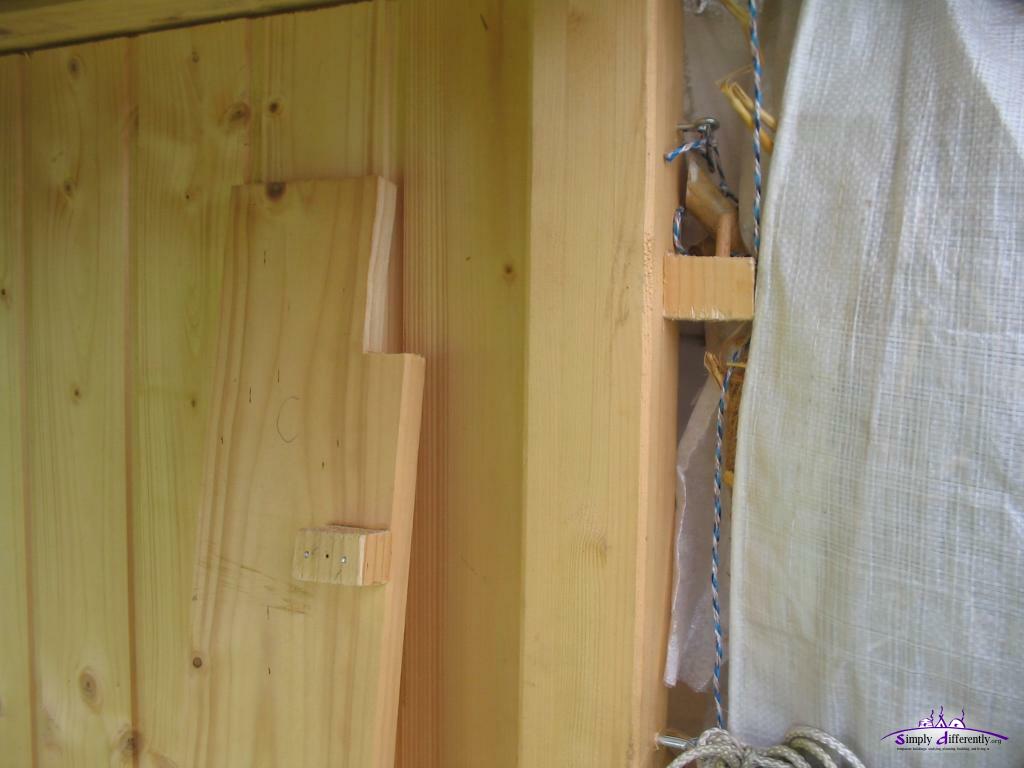
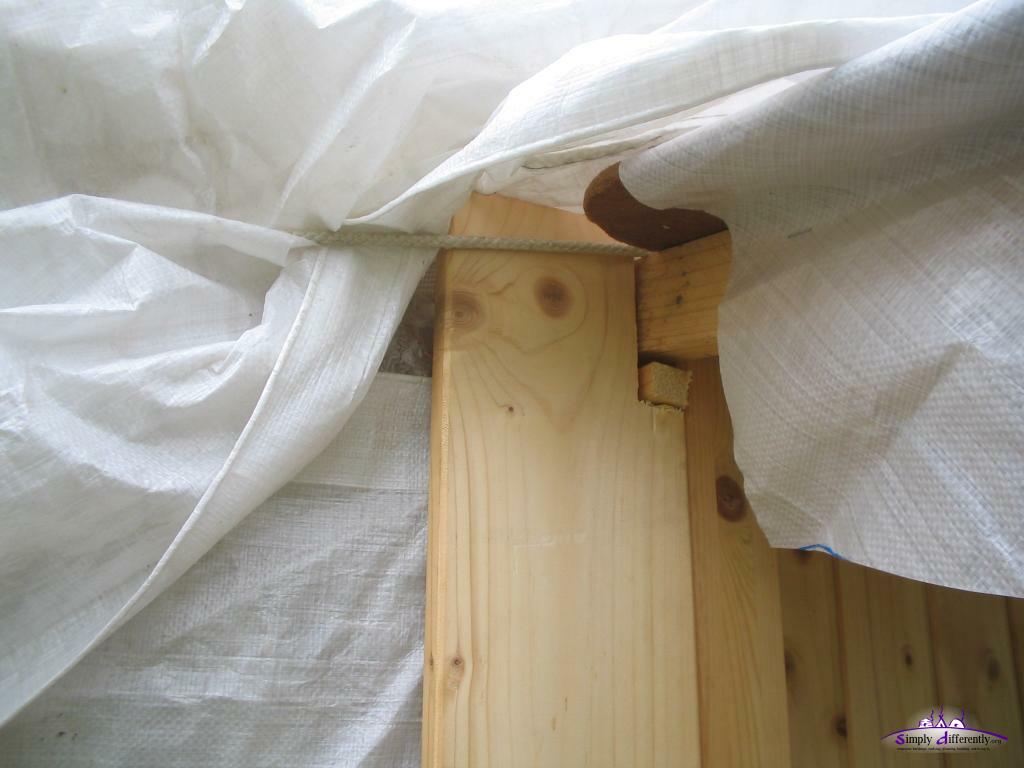
I also extended the roof for the door, in order to protect the door from rain and extend its usage this way.
Finally also I made a "classic" wider door frame, to cover up the junction where thermal insulation and rain cover approaches the door frame.
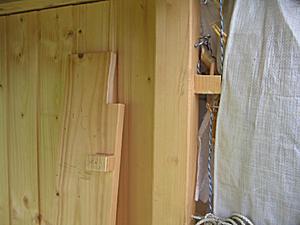 Wooden hinge on door frame / extension
2007/10/27 14:25 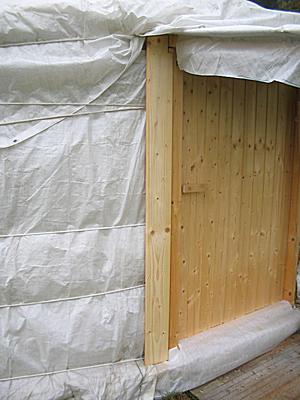 Attaching extension
2007/10/27 14:38  Extension detail (1 of 3)
2007/10/27 14:38
I also was able to conclude following by January 2008, after 27 months using PE as yurt material:
- roof PE cover (120g/m2) lasts 12-16 months, then it has significant holes leaking rain through; putting up and down and fold the roof rain cover reduces lifetime
- wall PE cover (120g/m2) lasts 24-28 months, then it becomes brittle, and becomes wet itself and leaks thereby
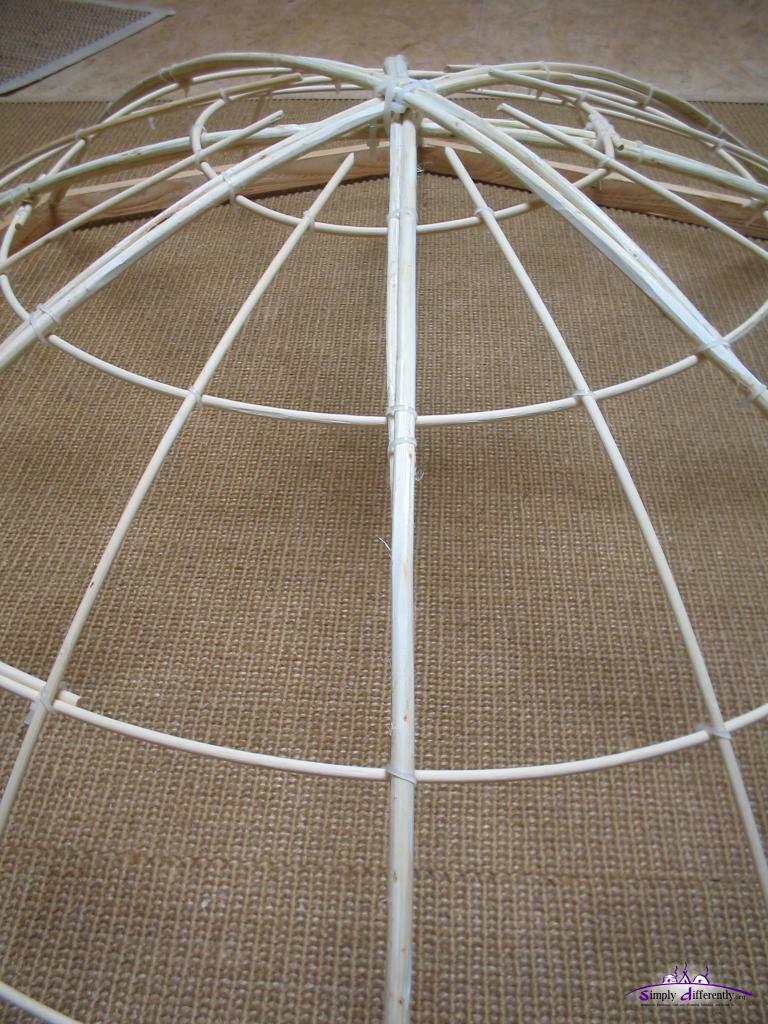
As another skylight upgrade I used willow sticks as spokes and formed a supporting star between the two layers of PVC preventing heavy snow pushing the cone inside which only happened a few times (2-3 times in the winter); often the snow slided or even melted when I was heating the yurt, but the few times it happened it was early morning when I usually didn't heat yet.
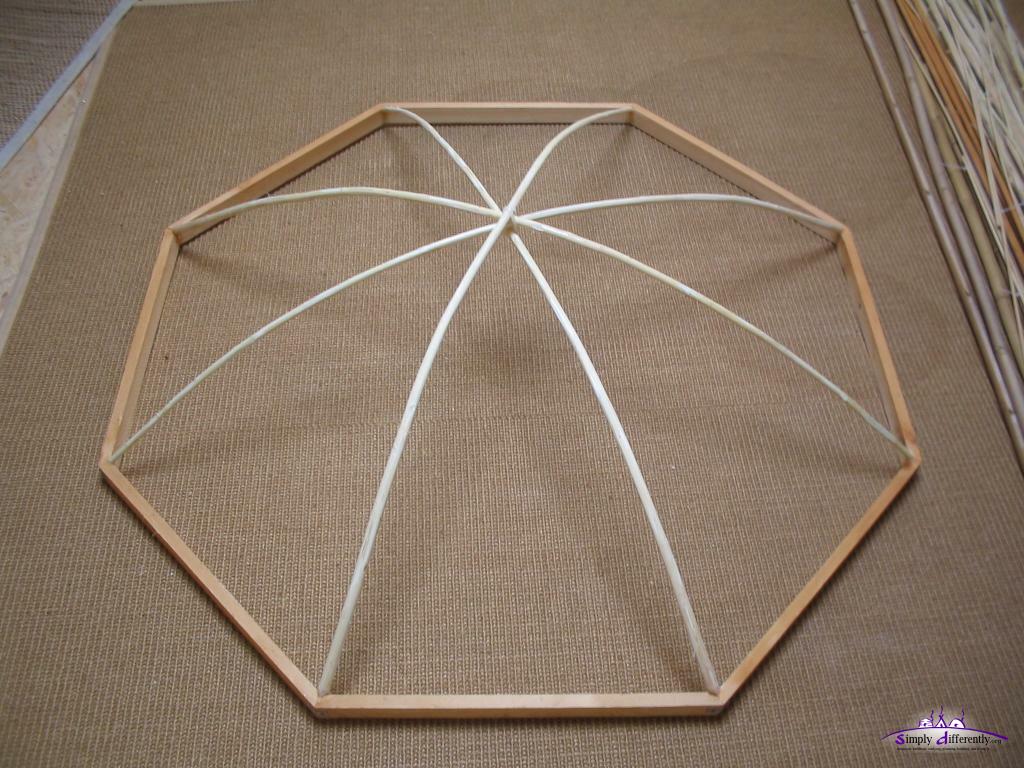
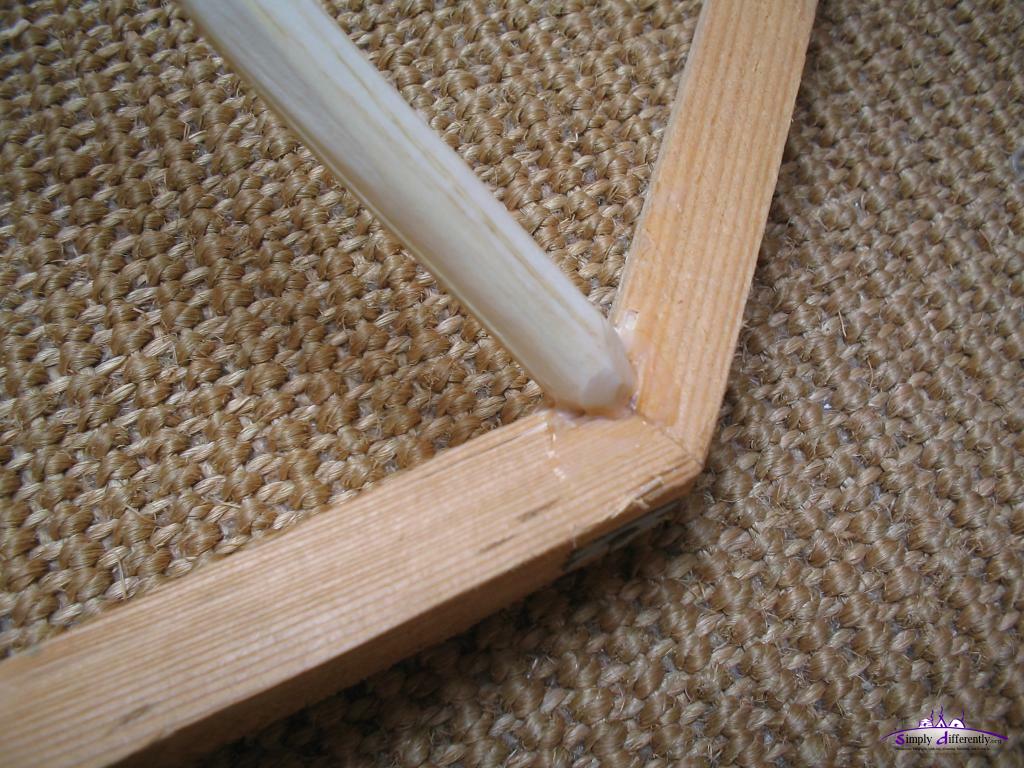
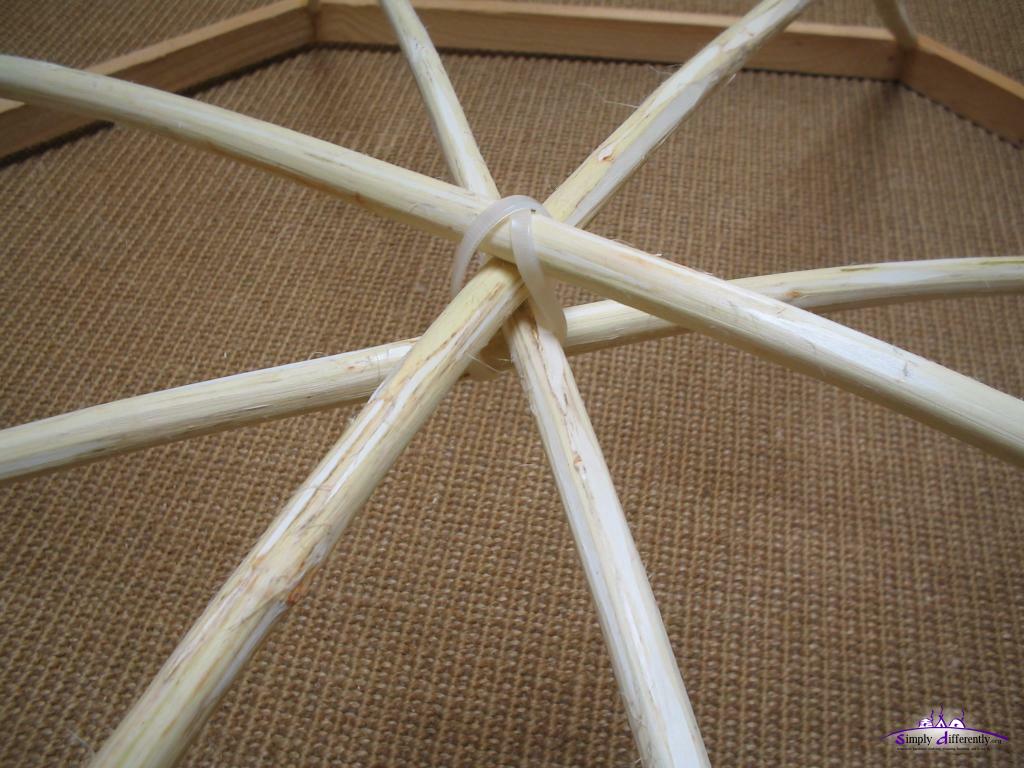
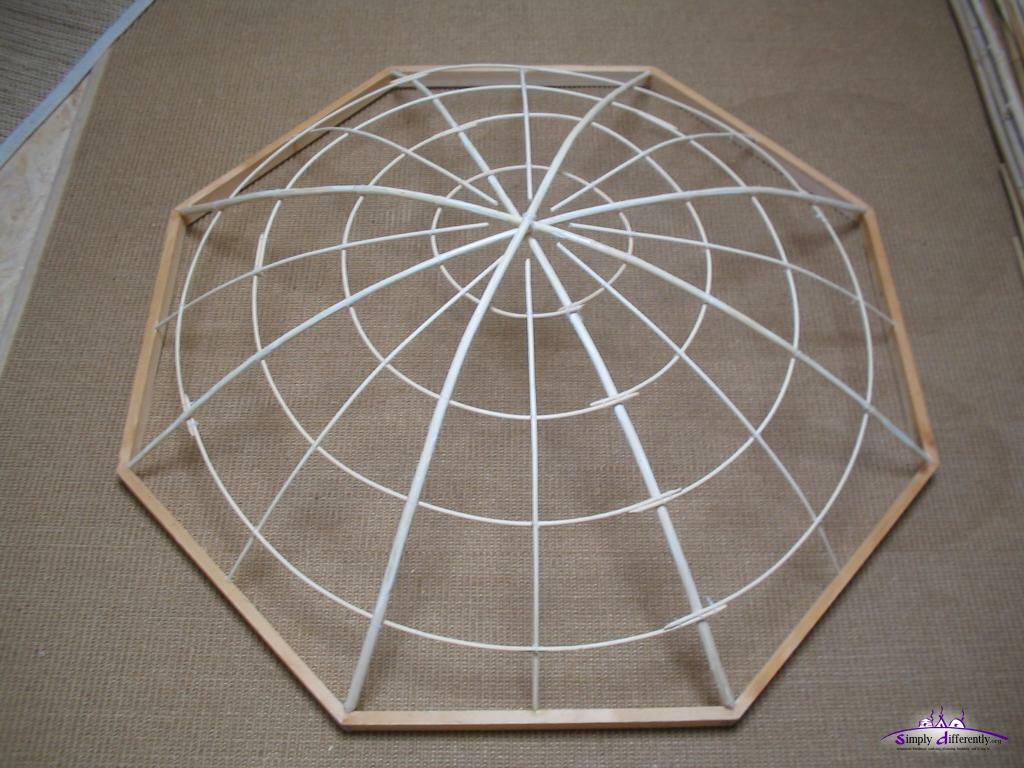
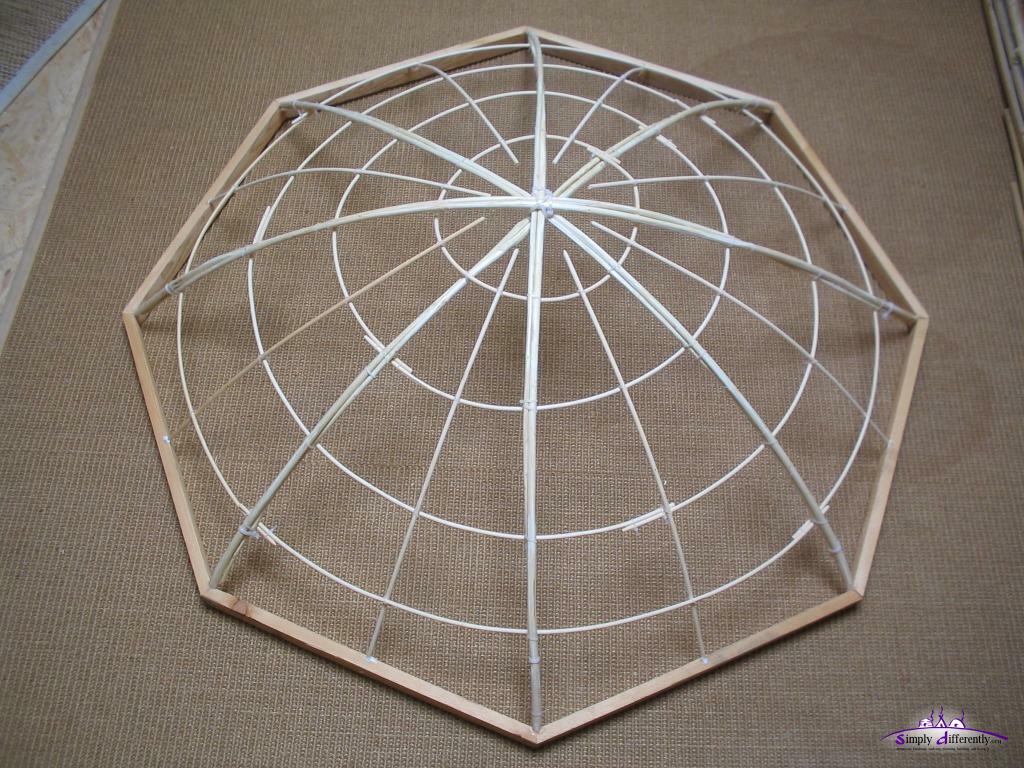
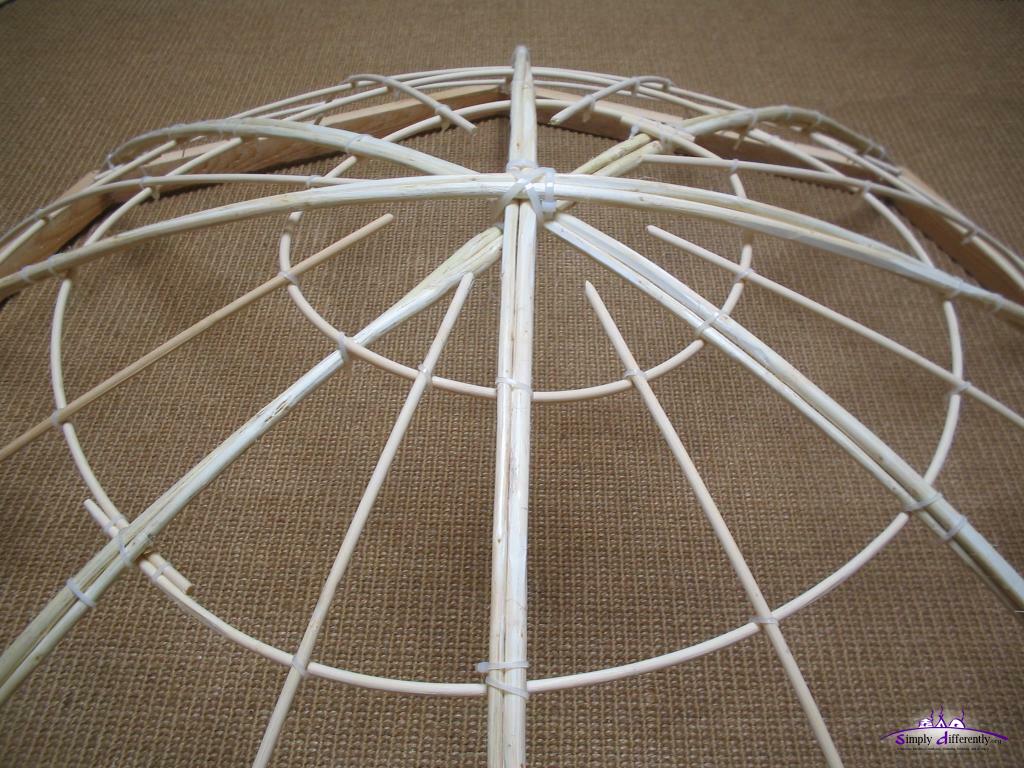
Another two skylights for two 122cm diameter crown-wheels I made using skinned willow bows:
 Skylight grid: single willow rod (diameter 122cm)
2008/03/22 12:48  Skylight grid: single willow rod, close up connection to frame
2008/03/22 12:48 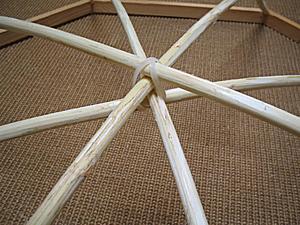 Skylight grid: single willow rod, close up center
2008/03/22 12:48 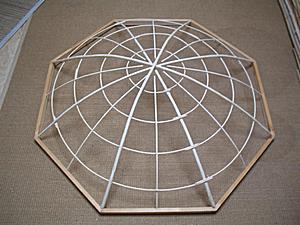 Skylight grid: single willow rods with bamboo rings & shortened subspokes
2008/04/05 12:37  Skylight grid: single willow rods with bamboo rings & shortened subspokes (closeup)
2008/04/05 12:37 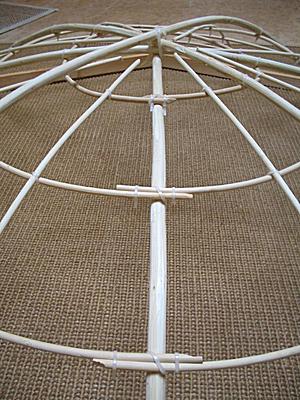 Skylight grid: single willow rods with bamboo rings & shortened subspokes (closeup)
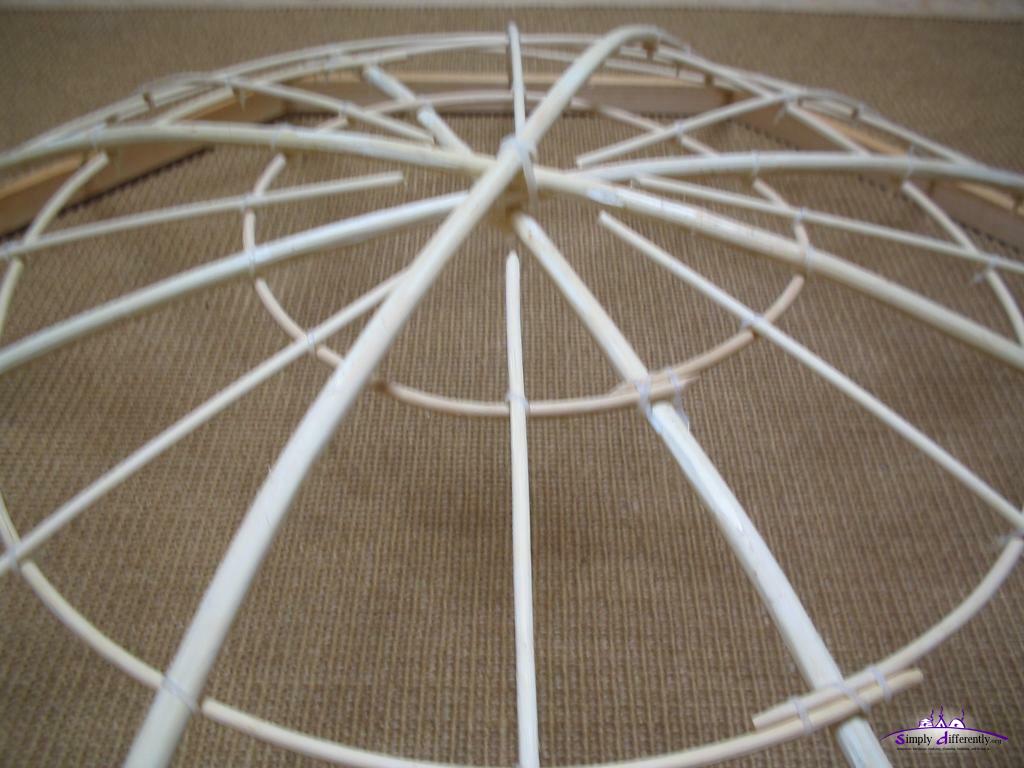
2008/04/05 12:37  Skylight grid: double willow rods under-aside-over (diameter 122cm)
2008/03/22 12:47 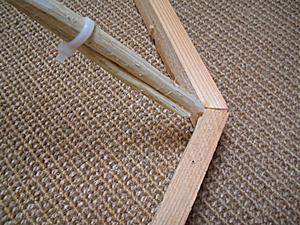 Skylight grid: double willow rods under-aside-over, close up connection to frame
2008/03/22 12:47  Skylight grid: double willow rods under-aside-over, close up center
2008/03/22 12:47 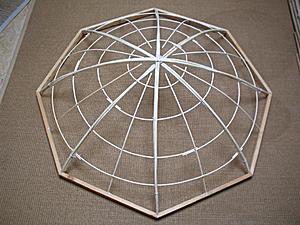 Skylight grid: dual willow rods with bamboo rings & shortened subspokes
2008/04/05 12:39 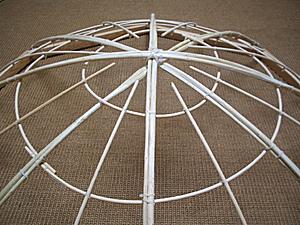 Skylight grid: dual willow rods with bamboo rings & shortened subspokes (closeup)
2008/04/05 12:39  Skylight grid: dual willow rods with bamboo rings & shortened subspokes (closeup)
2008/04/05 12:39
The bows are ~140cm long, 0.9-1.5cm single bow, 0.5-1.0cm double bow under-aside-over, and it will be covered with two layer bubble-wrap.
Continue to read my detailed diary on the following pages.
Next Page >>
Content: - Page 1: Introduction, My Location, The Yurt: Numbers & Materials, Numbers, Materials, Additional Small 4m Travel Yurt ...
- Page 2: Diary, 05. 05. 2010: Leaving, 23. 10. 2009 - 18. 12. 2009: Moved to France, Pitched the Yurt Again ...
- Page 3: 10. 3. 2008: Milder, Snow Gone, 5. 3. 2008: Little Snow, Temperature Drop, 2. 3. 2008: Fixing Skylight ...
- Page 4: 8. 1. 2008: Sunny January Day, 7. 1. 2008: Milder, Rain & Sunshine, 5. 1. 2008: Adding PVC Layer to Seal Wall Rain Cover ...
- Page 5: 27. 11. 2007: Winter - No Snow Anymore, 20. 11. 2007: Warmer Temperatures, Very Localized Climate, Wood Usage ...
- Page 6: 27. 10. 2007: Roof Extension over Door, Door Frame Extension, 26. 10. 2007: First Experience with new Thermal Insulation ...
- Page 7: 5. 9. 2007: Temperature Range, 3. 9. 2007: Attached Stove Pipe Again, 30. 8. 2007: Harvesting Bluebyrd Plums ...
- Page 8: 30. 6. 2007: Tipi & Stone Age Enthusiast, 27. 6. 2007: Cooler Weather, 21. 6. 2007: Summer/Winter Solstice ...
- Page 9: 29. 4. 2007: Fixing Door and Crown-Wheel, 28. 4. 2007: Yurt Taken Down - Dome Raised ...
- Page 10: 24. 1. 2007: Winter Arrived Finally, 18. 1. 2007: Another Stronger Storm, Still Mild & Mouse ...
- Page 11: 26. 12. 2006: Winter/Summer Solstice & Humidity, 14. 12. 2006: Skeleton of Travel Yurt Finished ...
- Page 12: 25. 11. 2006: Roof Thermal Insulation Put Up, 17. - 20. 11. 2006: Mild Days in November, Finished Roof Segments ...
- Page 13: 3. 11. 2006: First Snow Flakes, Straw Filled Blankets, 2. 11. 2006: Freezing Cold, 31. 10. 2006: Preparing Winter Setup ...
- Page 14: 18. 10. 2006: Preliminary Setup, 17. 10. 2006: Finishing Floor & Yurt Skeleton Errected ...
- Page 15: 9. 10. 2006: Sunny Fall Days, Reusing Bubblewrap, 4. 10. 2006: New Place Found, Preparing Moving ...
- Page 16: 28. 7. 2006: Bamboo Splitting, 24. 7. 2006: Hot Days, 5. 7. 2006: Door Construction, 25. 6. 2006: New Concepts & More Details on Crown-Wheels ...
- Page 17: 26. 5. 2006: New Wheels / Toono, 22. 5. 2006: New Beginnings, 30. 4. 2006: Cold Night, Warm Day ...
- Page 18: 5. 3. 2006: Spring Time, Not Yet, 27. 2. 2006: Warm Inside, 12. 2. 2006: Still Winter ...
- Page 19: 16. 12. 2005: Winter Storm with Rain, 1. 12. 2005: Cold Nights, 25. 11. 2005: Winter Arrived ...
- Page 20: 10. 11. 2005: More Photos, 7. 11. 2005: Minor Adjustments, 6. 11. 2005: First Night, 3. 11. 2005: Errected Again ...
- Page 21: 24. 10. 2005: Door Finished, 22. 10. 2005: Door, 15. / 17. 10. 2005: Cotton Interior, 14. 10. 2005: Toono Cover & Rain Cover ...
|