
|
Star Domewritten by Rene K. Mueller, Copyright (c) 2006, last updated Mon, October 8, 2012 Alternative Approaches
Since I focus on temporary buildings I tend to use white or colored PE pipe (2.5m, 3.3m or 5m long, 25 or 32 mm diameter) and bind multiple together at a time to get 10m long pipe as bow, and use three layers:
I made good experience with this combination with my yurt, as it provided some insulation while keeping the inside daylight bright. Laying all three layers over the bow skeleton, optionally the interior layer could be hung inside, but that's a bit more overhead to attach the canvas inside of the bow skeleton. ExtensionsSince I'm considering to build the star dome in 6.4m diameter (10m long bows, in 4x 2.5m per bow), here a few preliminary notes on possible extensions. As I proceed and actually build one in full size also detailed "how to", illustrations and photos will follow. Skylight
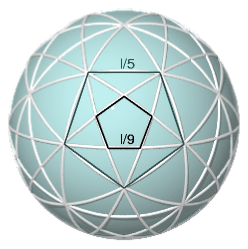
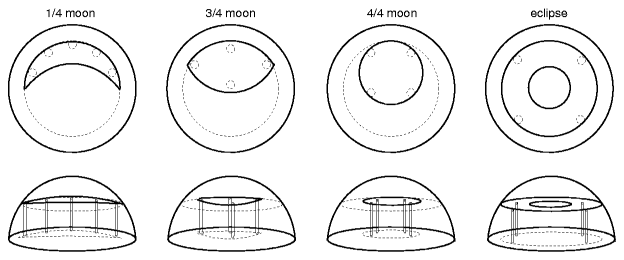
Anyway, I would use the small inner pentagon with l/9, following construction I consider, adapted from my yurt construction I did.
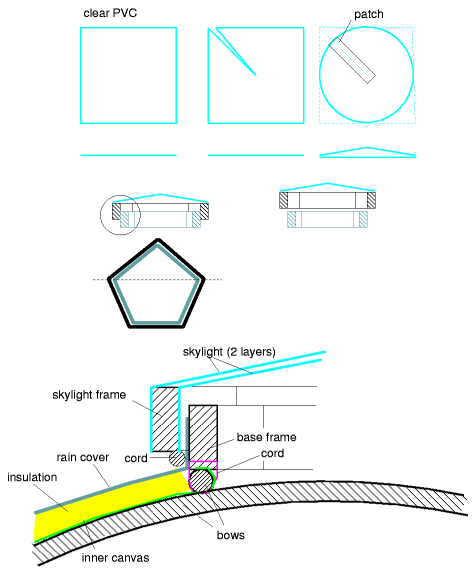
The diameter of the required skylight is l/9 * (1 + 2*sin(π / 10)).
The base frame would be tied to the pentagon: drill holes into the base frame, and pull a cord through, tie them around the bow next to it.
Door
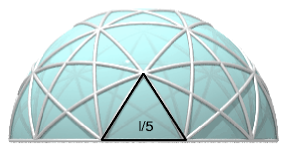
The side-length of the triangle (even sided) is l/5 (or aka s, which is circumference c/10), so the height is l/5 * sin(π/3).
I'm thinking of the making a l/5 long door frame with holes and attach it with cords to the bows, and the door opening to the outside. Since the hinge will be on the side the door needs to be pulled upward so a light door is essential, otherwise it gets too hard to enter. The angle of the frame struts are 180°/3, 60°.
I still need to work out the details, e.g. how to attach the rain cover, and ensure no water enters the door (the door slightly is leaning inside the center, not much, but the bottom door frame might catch steady rain water exposure).
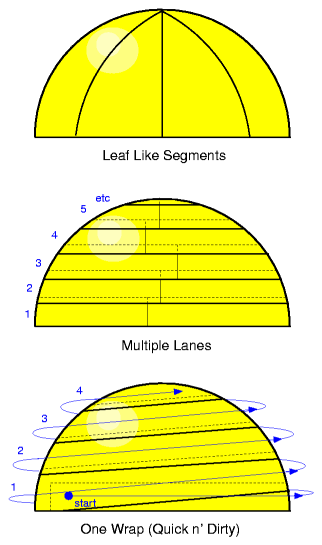
Rain CoverOn the previous page I provided the calculator to get the measurement (shape) of the leaf-like cover, since I'm thinking to make a star dome including thermal insulation, with unknown thickness (0.5cm - 15cm), the diameter base for the cover is variable.
and then attached two lanes to the leaf-seams: one on the left, and one to the right, and those two stripes or lanes have eyes where one or two cords can be pulled through, and then it can be pulled together like an old fashion shoe. To make it attractive I'm thinking to use white cord, and maybe cover it with a colored canvas over the fastener. This solution would enable one to make the rain cover tight, and fitting the shape closely. It would be maybe suitable to have this fastener just at the side of the door as well (detailed illustrations will follow). The rain cover needs to be attached at the base bows, and therefore a piece of rain canvas could be sewed additionally in order to put eyes on it and tie so the cover on the base; leave some extra rain cover reaching over and have the rain water flow away from the base (see illustration bottom detail). It's a notable detail, but it's required so no rain water actually flows into the shelter in case we just pull the cover under the base bows. FloorBelow some options to do a circular floor:
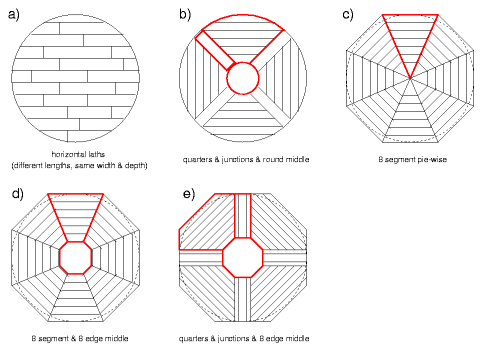
The red outline indicates segments as whole pieces or segment to handle by a single person (to put up and take down). The first example a) requires a lath grid underneath so the laths can be put on - so personally consider d) most elegant. More details follow later. 2nd FloorWith high ceiling making a 2nd floor for beds is an interesting option, in particular in the winter-time when the heat from the stove rises.
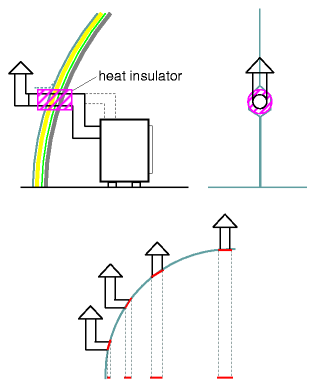
Stove
This way the canvas doesn't need to cut a hole for the pipe, but just wrap it nicely around the pipe. It's wisely not to have the pipe too high up reaching outside of the dome, as the higher the flatter the angle, and the more exposure of the heat insulator and junction pipe vs heat insulator where rain water falls unto. Maybe a little extra rain cover for the heat insulator will ensure water runs around it. I'm not in favour when the pipe goes through the roof (e.g. in case of the yurt or other forms) as you battle with water leakages and I tend to prefer options where the water insulation remains simple and little to fiddle around. A fan mounted near the skylight will ensure the hot air circulating properly within the dome. Content:
|


| Home | · | About | · |  Tipi | · |  Yurt | · |  Dome | · | Features | · | Gallery |


Creative Commons (CC) BY-SA-NC 2005-2017, developed, designed and written by René K. Müller
Graphics & illustrations made with Inkscape, Tgif, Gimp, PovRay, GD.pm
Web-Site powered by FreeBSD & Debian/Linux - 100% Open Source