written by Rene K. Mueller, Copyright (c) 2005, 2006, 2008, last updated Sun, September 22, 2013
Introduction
Welcome to my personal "Yurt Notes".
Check out the manuals first to get an idea about the overall considerations to build a yurt.
Additionally I wrote down some of my notes and calculations I made myself and implemented a "Yurt Online Calculator" based on those calculations. Also, a lots of hints I received from people I visited who also build their own yurts have been included here.
I developed my yurt (11/2005) according these notes, and I still add and edit those notes here occassionally.
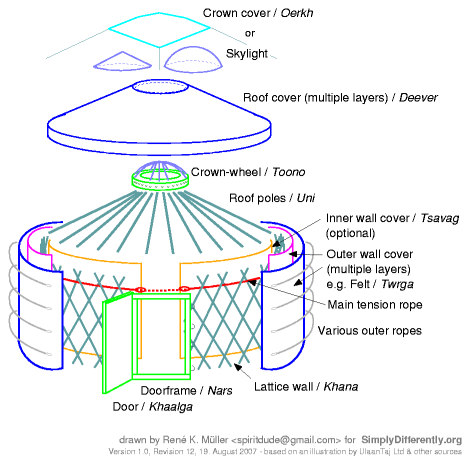
Yurt Parts Overview
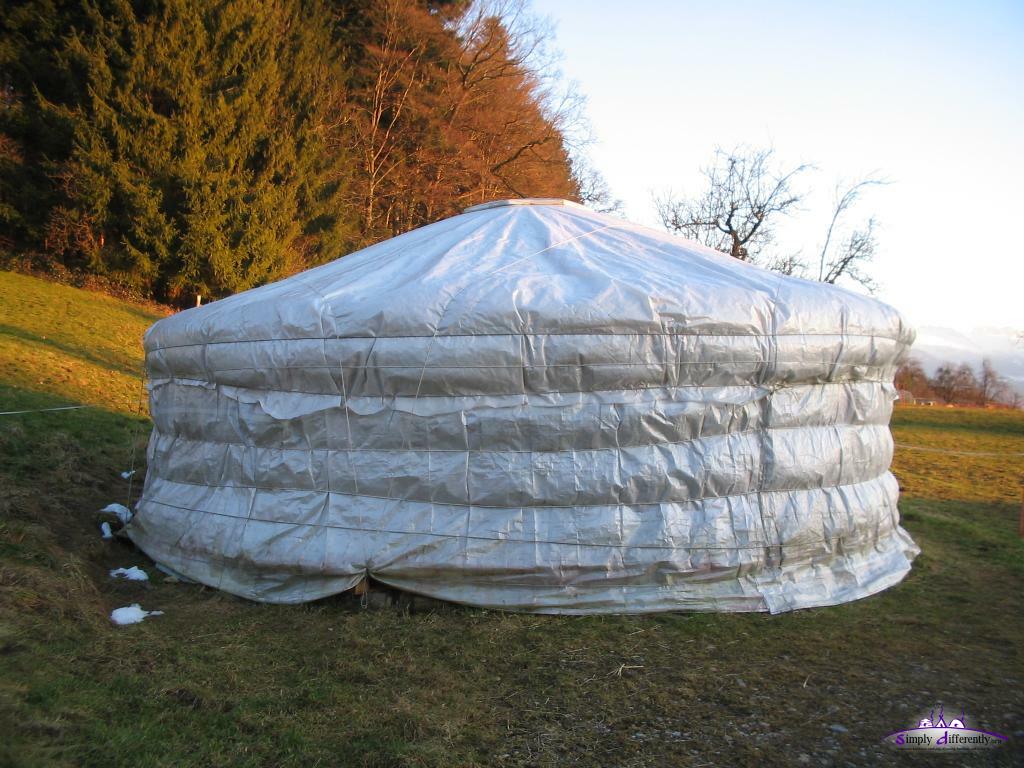
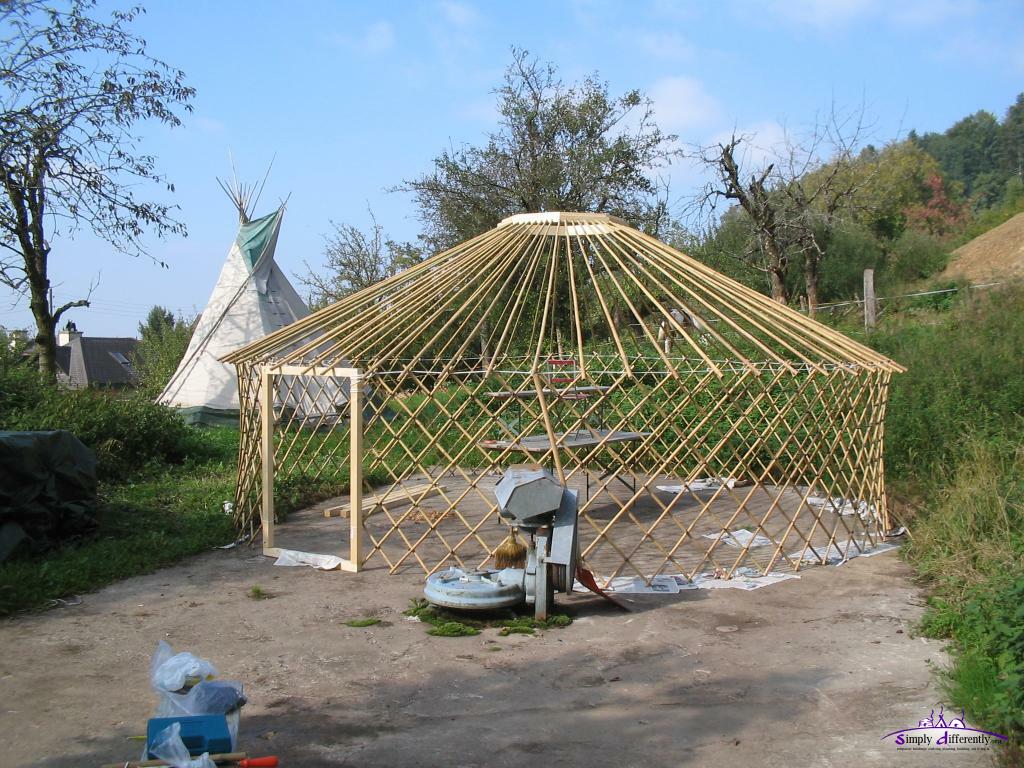
My Yurt: Skeleton
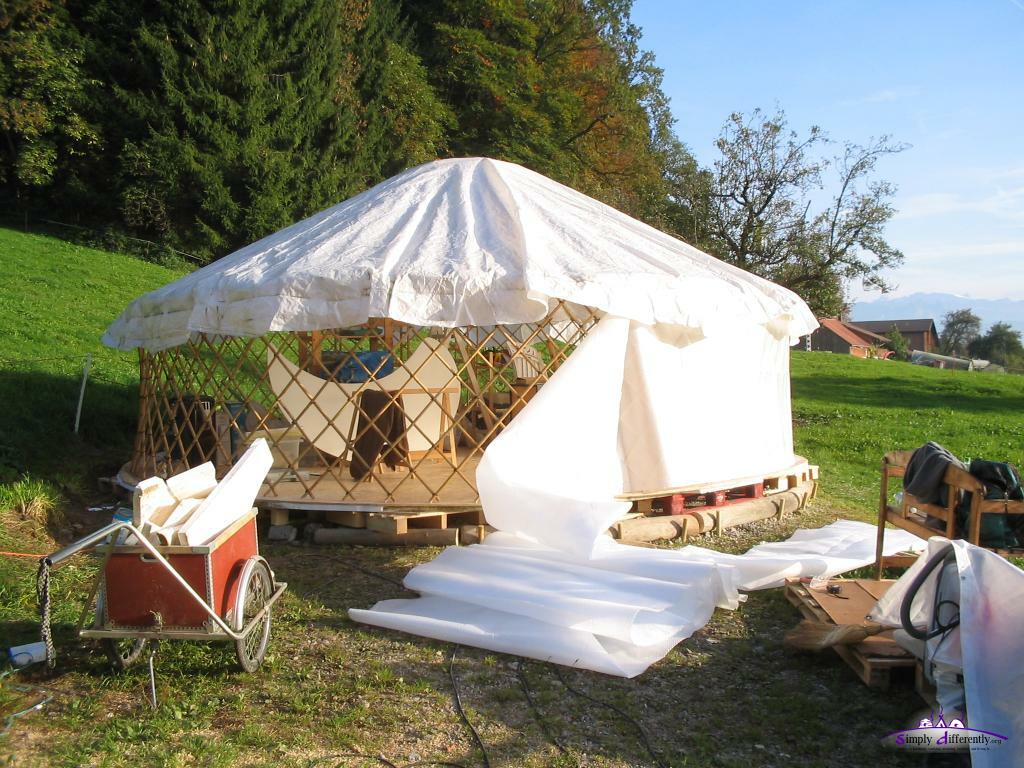
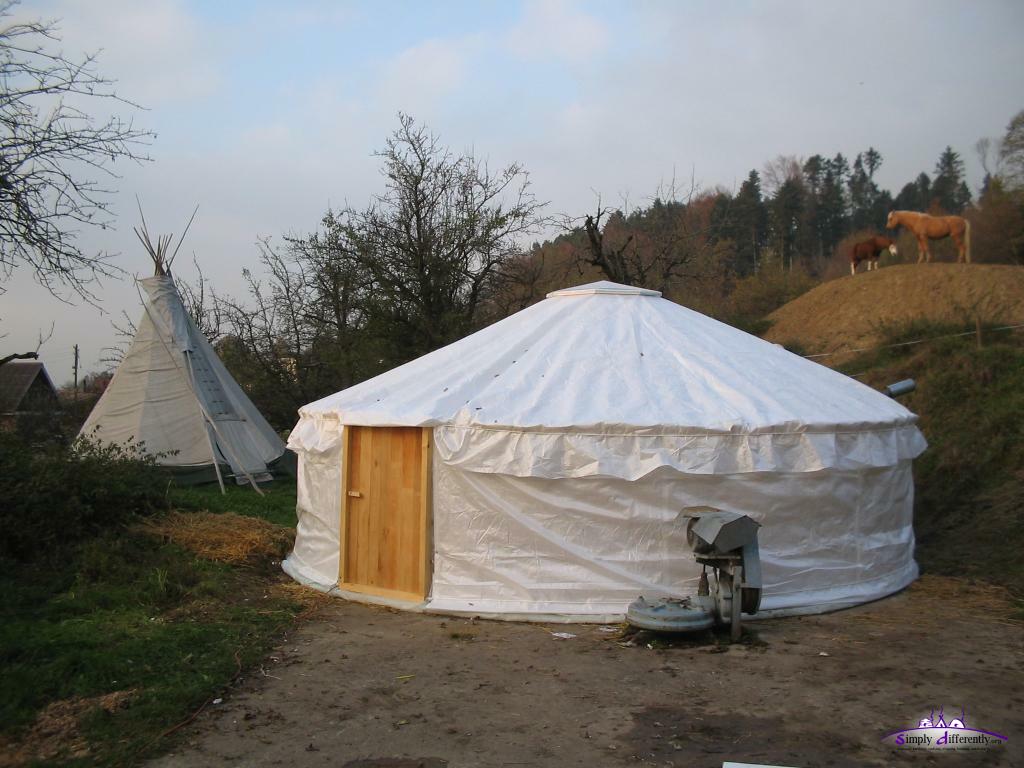
My Yurt: Complete Setup
If you do use this calculator and these notes to build a yurt, drop a note so I can get an idea how useful these notes and the calculator actually is. My email address is at the bottom of the page.
Mongolian Terms
As you will notice I also use the mongolian terms, here a brief overview:
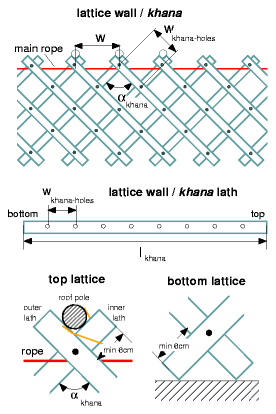
I consider the lattice-wall (khana) build by laths (or sticks) and angled by αkhana (usually 90°, but smaller also possible, then the lattice wall / khana rises) to each other to create a lattice.
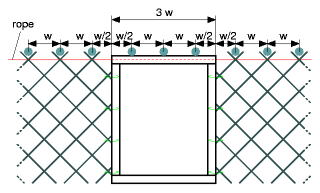
The roof-poles are assumed to lay on the top lattice crossing of the wall / khana, with a space of w as seen on the illustration.
All laths of the lattice wall / khana have the same amount
nholes of holes, and the same distances wkhana-holes. The top crossing needs to have enough space to carry the roof pole/lath.
Of course if you decide to not lie the roof poles on the lattice end crossings,
then you can choose your own lattice-wall geometry and choose the amount poles yourself.
Crown-Wheel / Toono Details
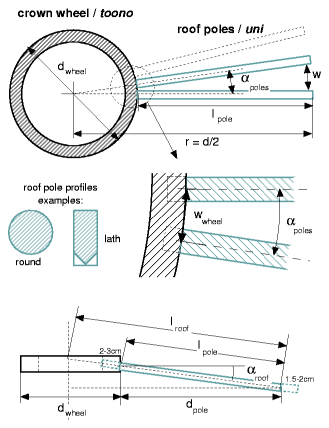
The poles are inserted into the toono (crown/roof wheel), with αpoles separated, or wwheel at the toono, this wwheel minus space determines the max diameter or width of the roof pole/lath.
The roof poles (e.g. bamboo sticks) and angled by αroof, e.g. 20-35 degree, to form a tilted roof.
The final roof pole length is longer than calculated, as some space is required to enter the toono/wheel, and also for the tail of the roof pole to reach beyond the wall, I suggest 1.5cm to 2cm additional beyond the hole with the cord, which is used to insert at the wall lath (the inner wall lath to be specific). So, the total roof pole length is 4-6cm longer as calculated, so keep this in mind.
Yurt Math
If you are not interested in the math of the yurt, just skip the next paragraph and jump to the next page where you can enter the geometry of the yurt, and get the detailed measurements of the components.
Symbols:
d = diameter of the yurt (e.g. from 2.5-20m)
c = circumference of the yurt
w = distance between roof poles (20-35cm)
αkhana = angle between khana laths (90°)
wkhana-holes = distance of khana-holes
wdoor = door width, apprx. 80-120cm
npoles = amount of roof poles
αpoles = angle between roof poles
lpole = length of root poles
αroof = angle of roof poles from crown-wheel (20-40°)
lroof = length of roof (radius)
droof = diameter of root canvas
htot = total height
dwheel = diameter of crown-wheel, apprx. 15-20% of d
wwheel = width of poles on the crown-wheel
h = height of walls
lkhana = length of khana laths
lkhana-section = length of khana section (3-7m)
nkhana-sections = amount of khana sections
nlaths = amount of khana laths
A = surface of yurt (required canvas)
π = 3.141 or apprx. 22/7
The height h is 140-180cm, or even 200cm, smaller yurts (e.g. 3-4m) are lower, e.g. 6m often is 1.60 or more.
The height is so low because the resulting room is better to heat, but for reason of comfort you may choose
to have it your head height high.
Traditional yurt development comes from a given w khana-spacing and length of a khana-section, and
then the amount of poles is calculated, e.g. 2-3 khana sections, or 4-6 khana sections for
large yurt, then the poles are counted. I have prefered to define the yurt from the amount of poles for reasons of angle
measurement and symmetry (e.g. multiple of 4 poles), to increase or decrease npoles
in order to make and see how large the spacing of w gets.
The resulting w should be between 20-35cm in order to create a stable
wall / khana, good stable laths may allow larger spacings of w.
Usually the roof poles lie on each lath junctions, which is arranged as crossed lattice.
Modern yurts disregard this approach and lie the roof poles on the rope which holds
the wall / khana together, this way one is very flexible to build with given parts
(e.g. wall / khana, crown-wheel / toono etc) multiple sized yurts, but you
sacrifice some of the stability of the lattice wall.
Traditionally and also for stability the wall lattice is spread so the crossing laths
relate in 90° (αkhana) angle, but you may have a shorter angle like 60-80° and
have with shorter laths a higher wall.
The diameter of the crown-wheel / toono is traditionally 20% of the yurt diameter, but this is just a reference nothing more.
Yurt Calculator
Wheel / Toono
The crown wheel or toono can be implemented in various ways, I feature two common ones more detailed:
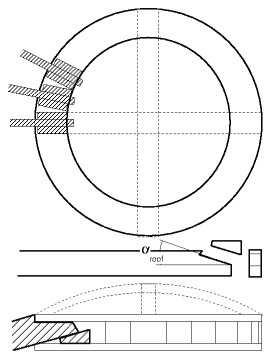
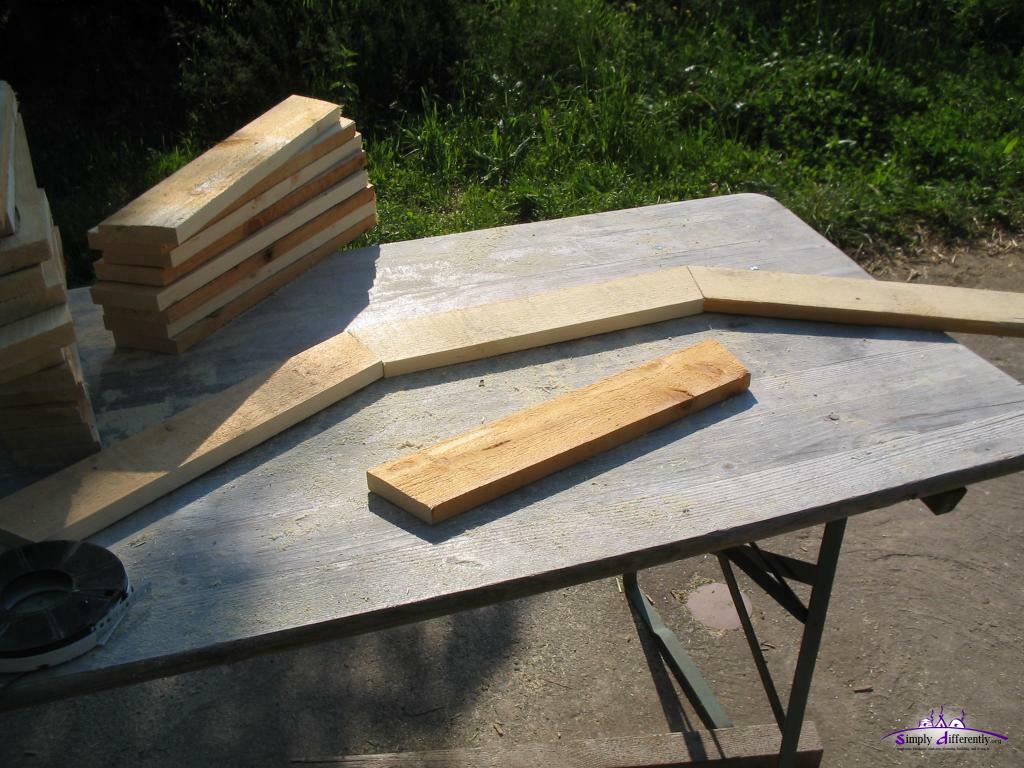
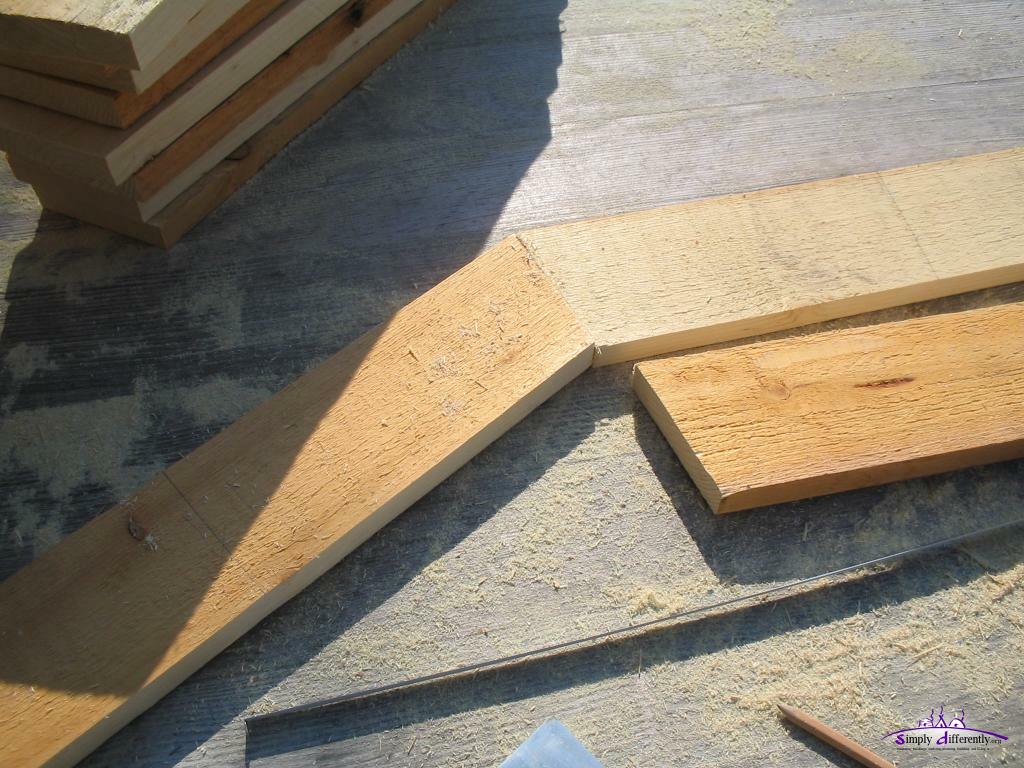
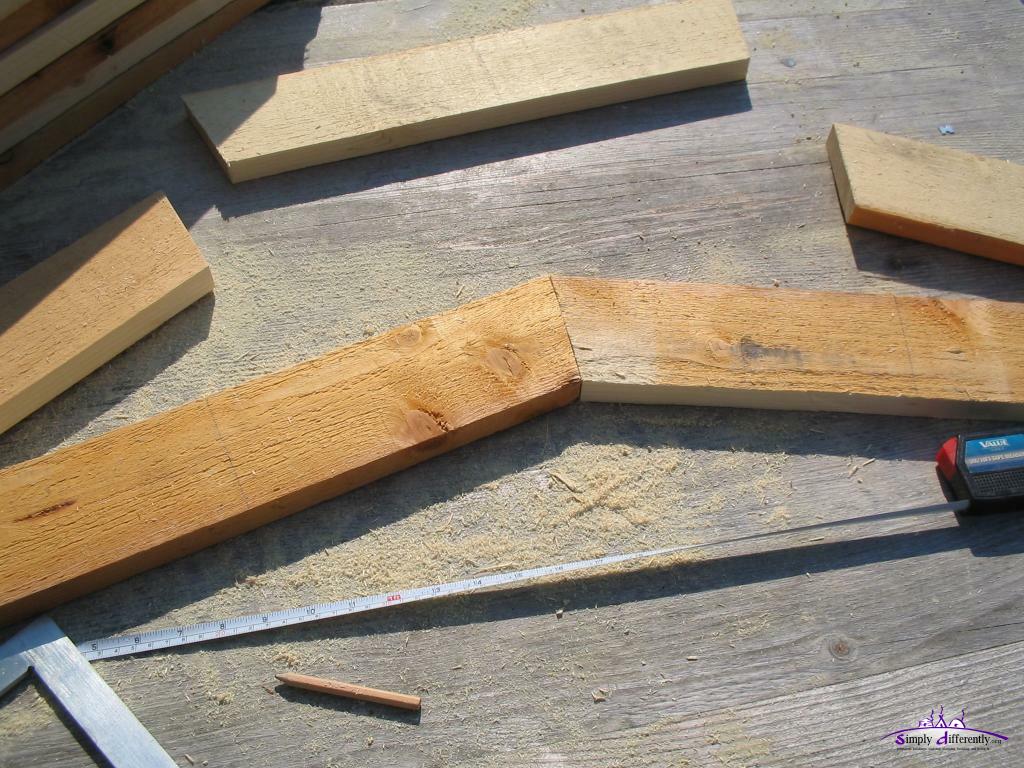
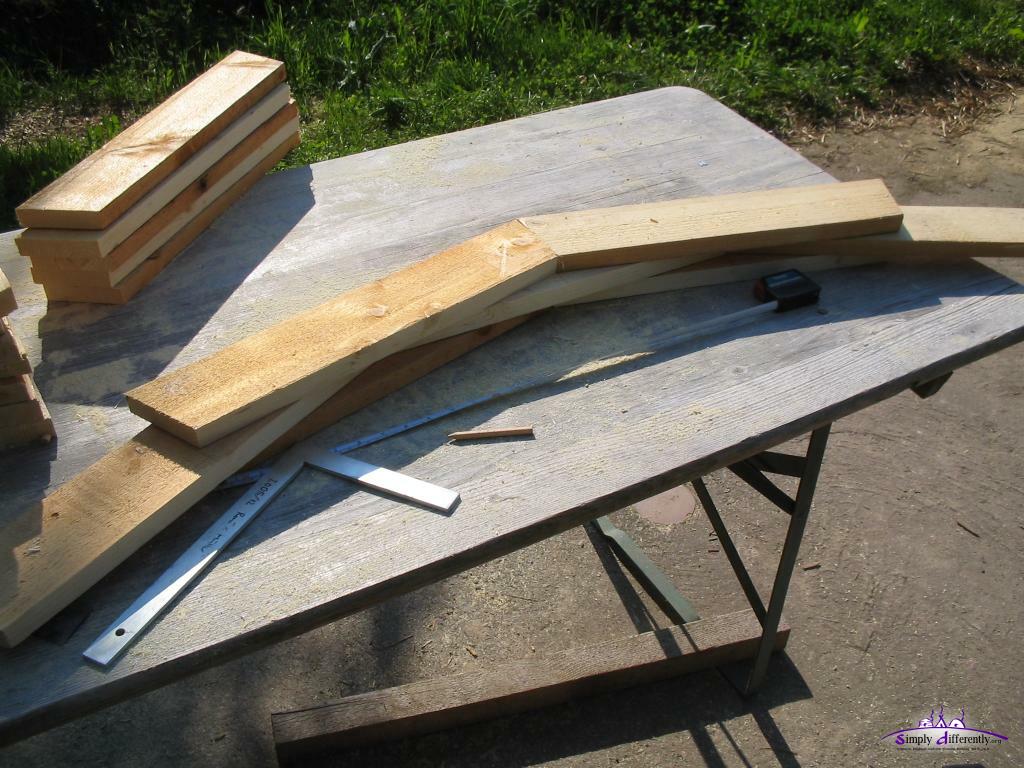
Traditional
Toono (traditional)
If your roof poles (or rather laths) are rectangular, the wheel could be composed by two flat rings, and 2 times npoles small pole spacers, which force the roof lath to remain in a particular angle and tilt. The roof lath is slightly wrought so it fits into, with the αroof (roof tilt).
The How-To Manuals on Yurts has more detailed information, e.g. the end of the poles you usually saw a small 2-3cm cut in, so the pole can lay on the top khana cord, additional fixation required.
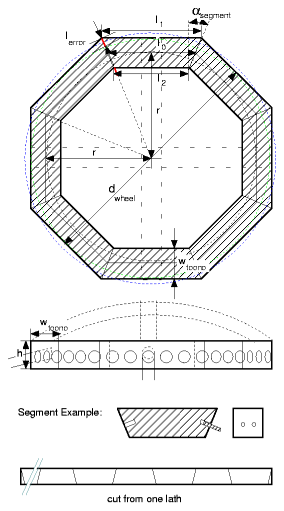
8 Segment Wheel
Toono with 8 segments
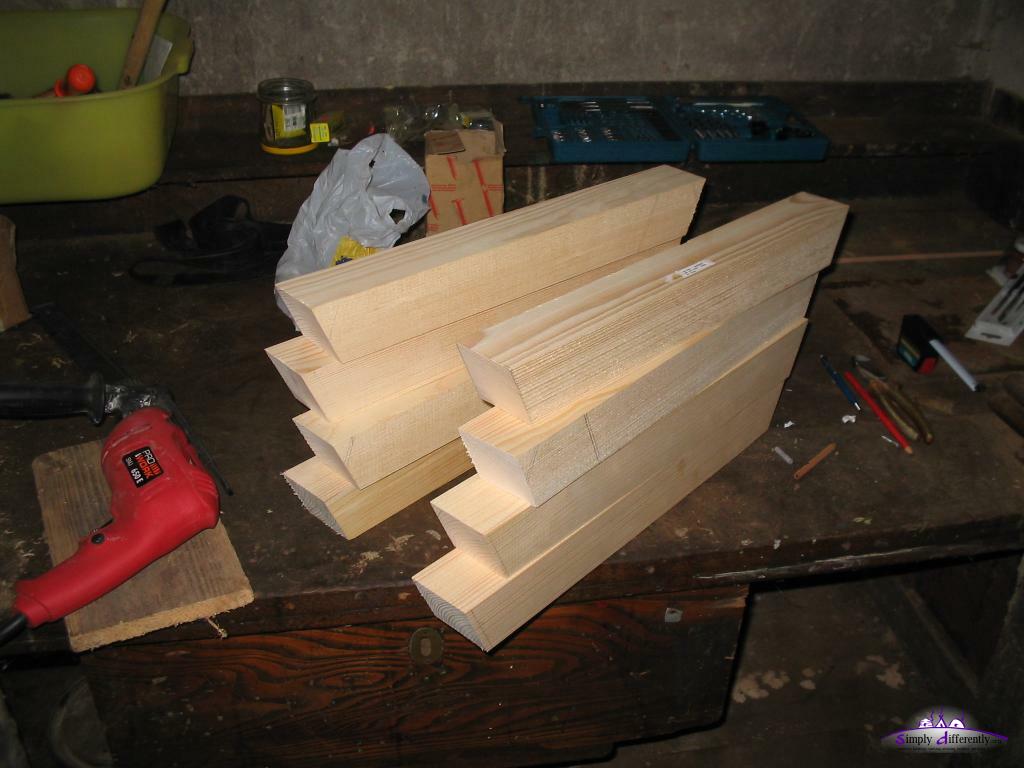
In case you consider round roof poles (such as bamboo, or rectangular profile whose ends you round) then a n-edged polygon approximation of a circle build by wtoono wide lath(s) is most easy, and you drill holes into the wheel.
The higher the n-edges, the lesser the lerror to the ideal circle. I think it might be suitable to drill the holes deeper to compensate the lerror - I won't recommend you make certain roof poles shorter than others. I experienced that an error of 1-2cm can be neglected when the diameter of the yurt is 5m or larger.
Note: You have to be very exact with angle and length of each segment, errors accumulate with higher degree or amount of segments.
Optionally I found that putting the dowels after I glued the segments easier, and less erroneous as the position of dowels can vary then more.
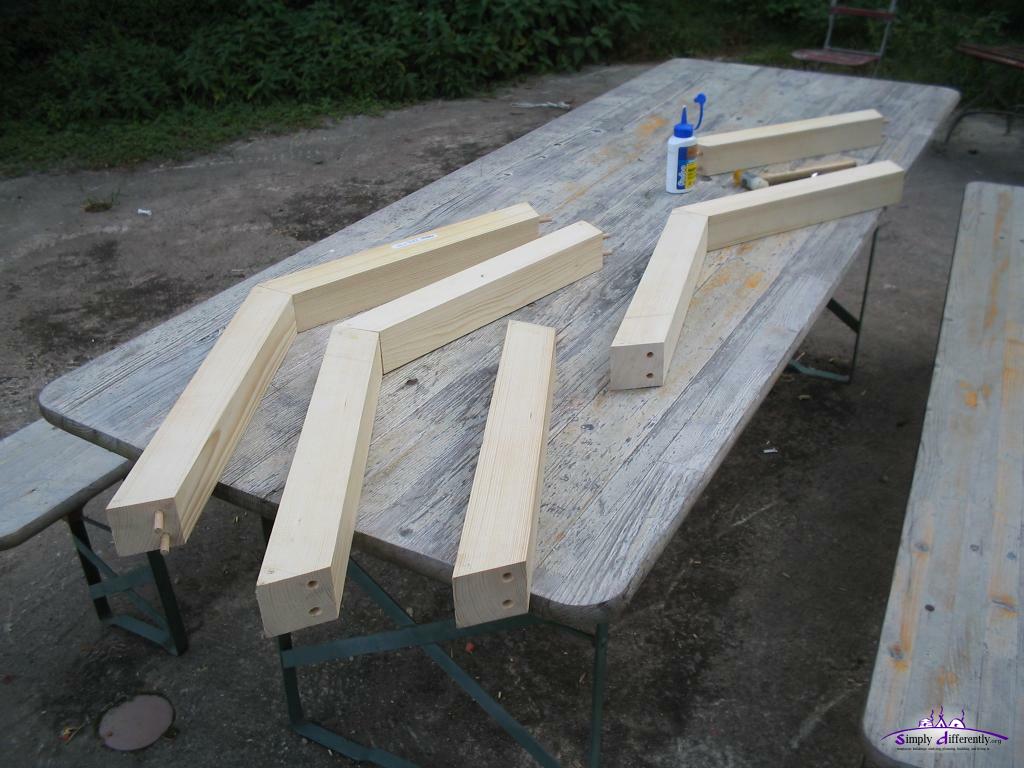
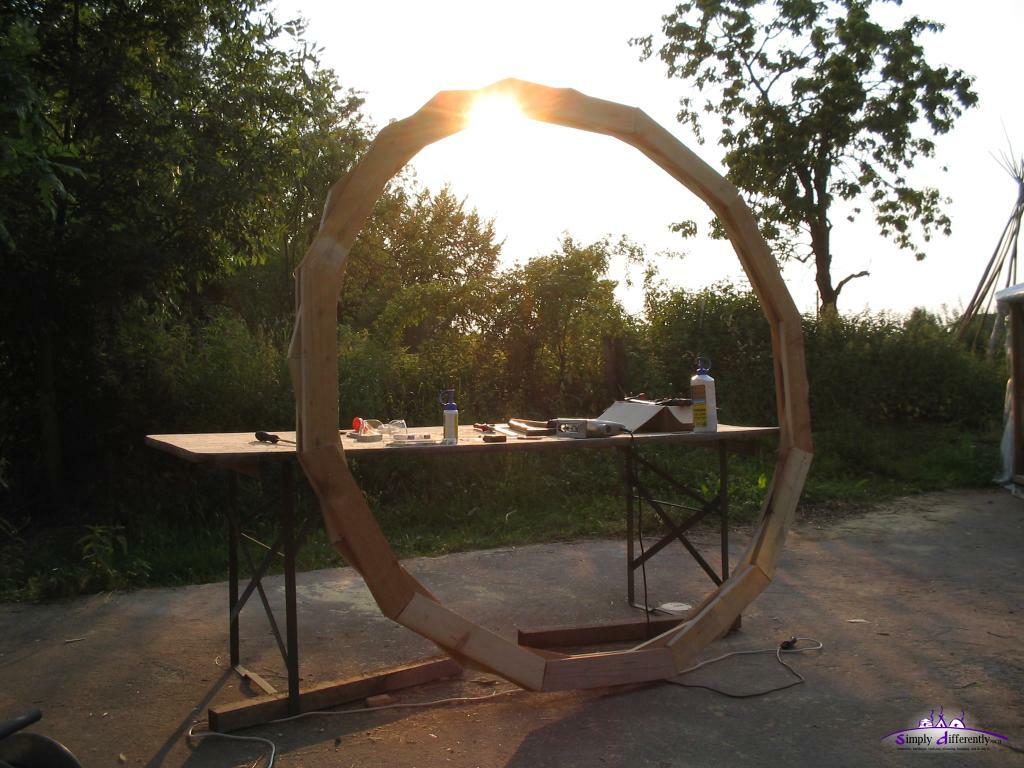
A 8-segment crown-wheel / toono 122cm diameter I made:
Toono 8 segments 2005/09/28 09:42
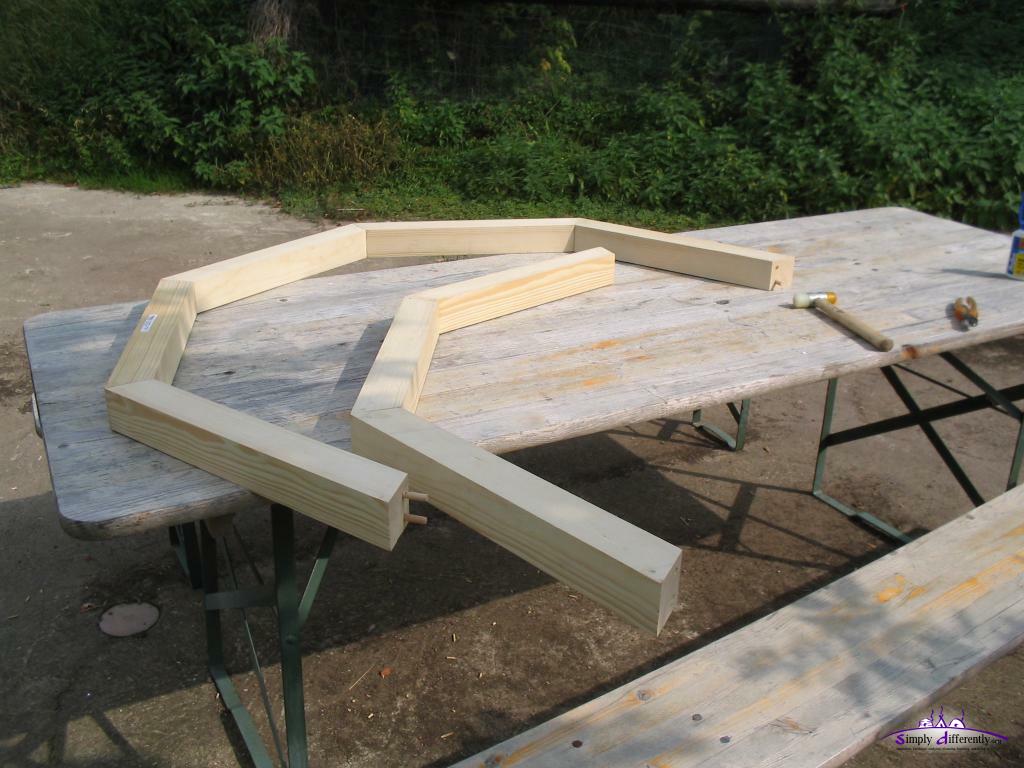
Putting together two segments 2005/09/28 11:35
And so on ... 2005/09/28 11:56
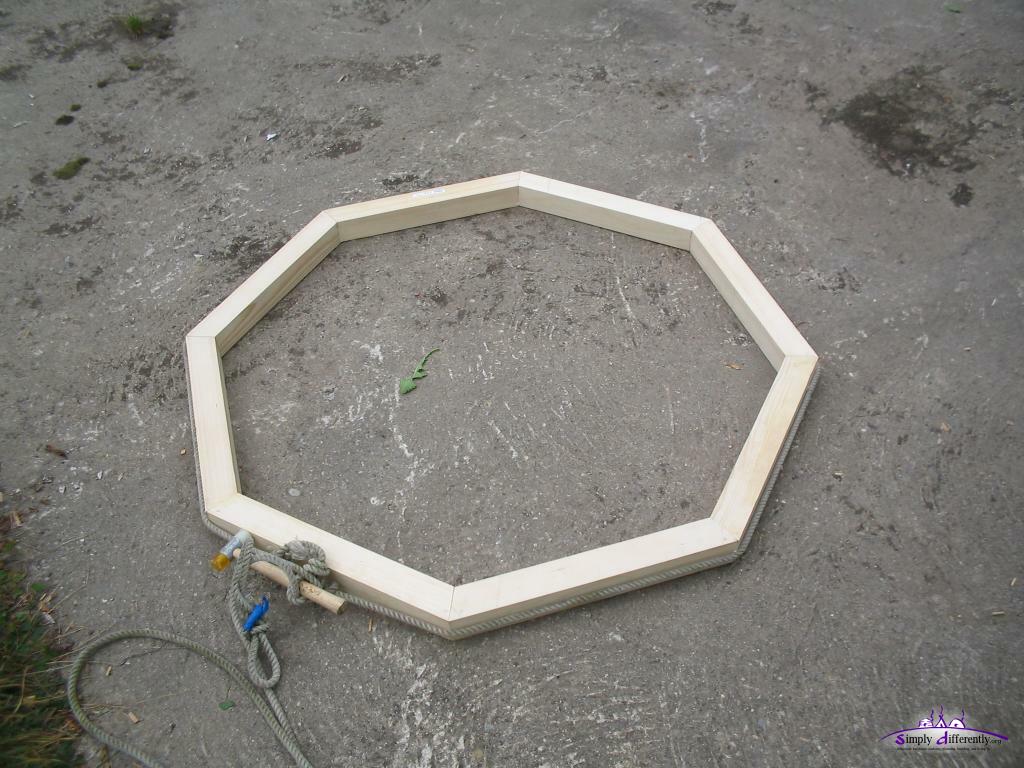
The toono finished, without roof pole holes, glued and tied with a rope to press together for 12 hours 2005/09/28 12:07
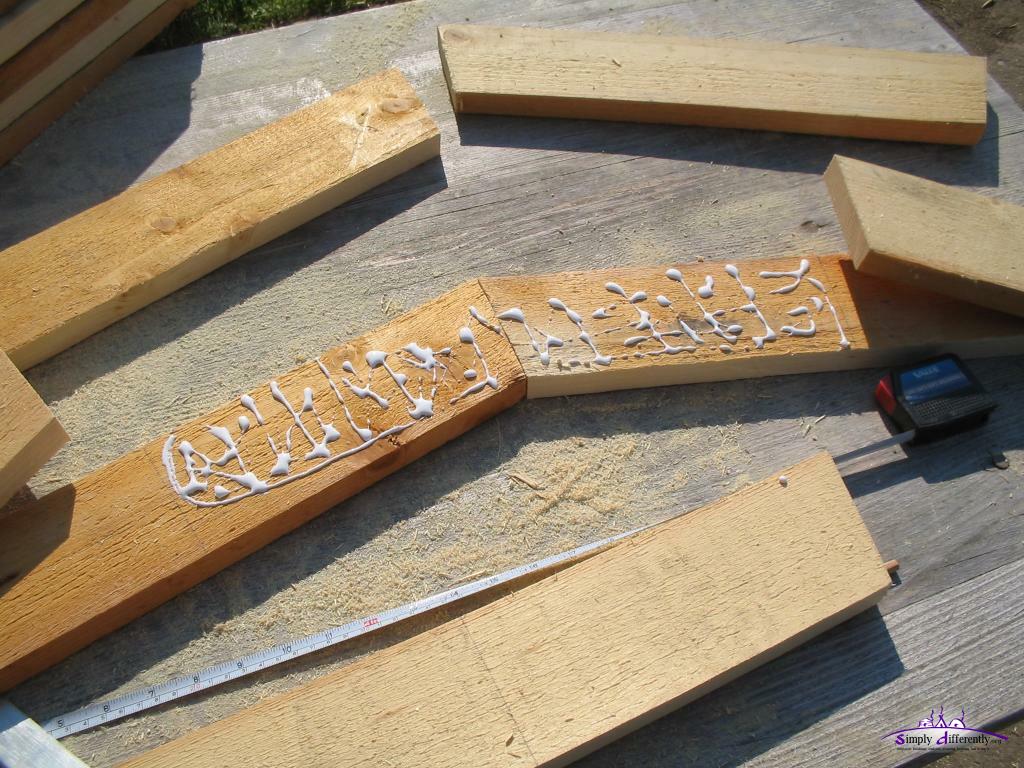
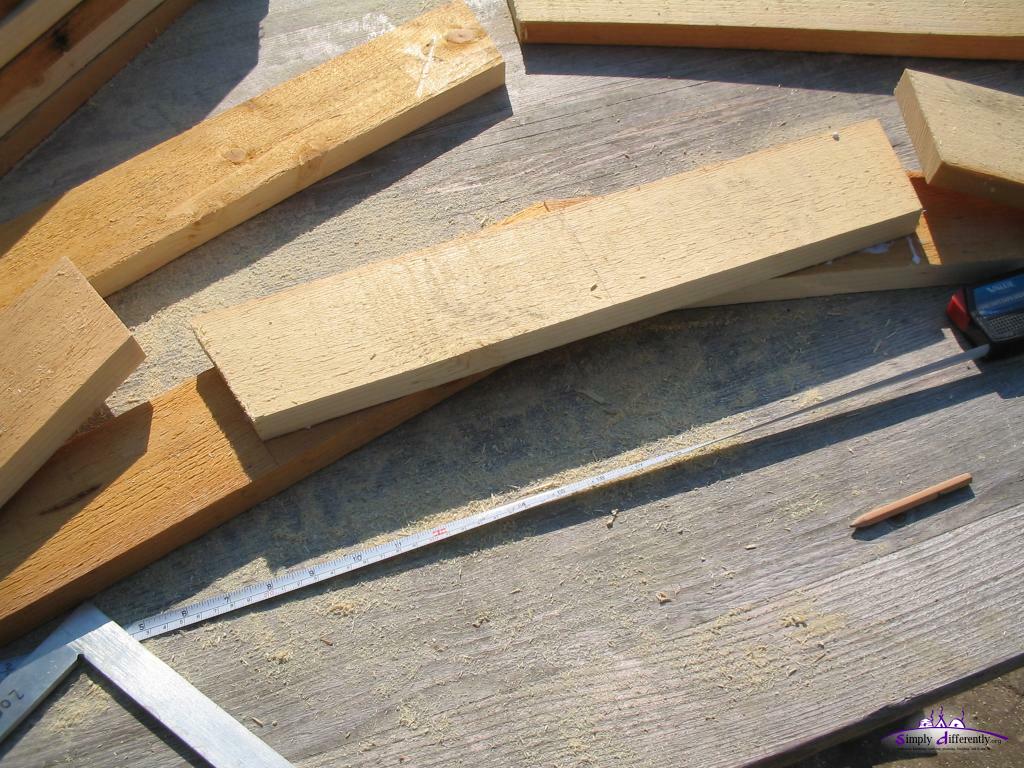
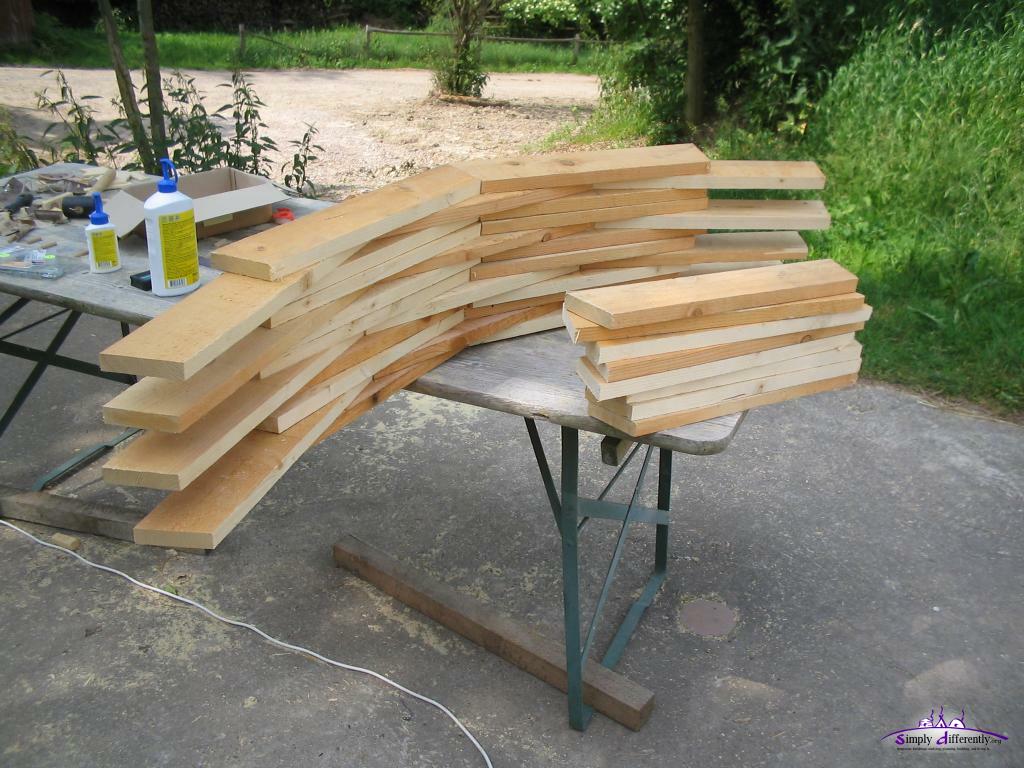
Multiple Polygon Layers
Multiple Layers
You may use multiple flat polygons (use the calculator above), and rotate each new layer a bit and overlay 3 or 4 of them (e.g each 1.5-2cm thick), glue and maybe screw them together as well - and then saw a circle (outside, and inside), this approach has more overhead, but is most suitable for larger diameters.
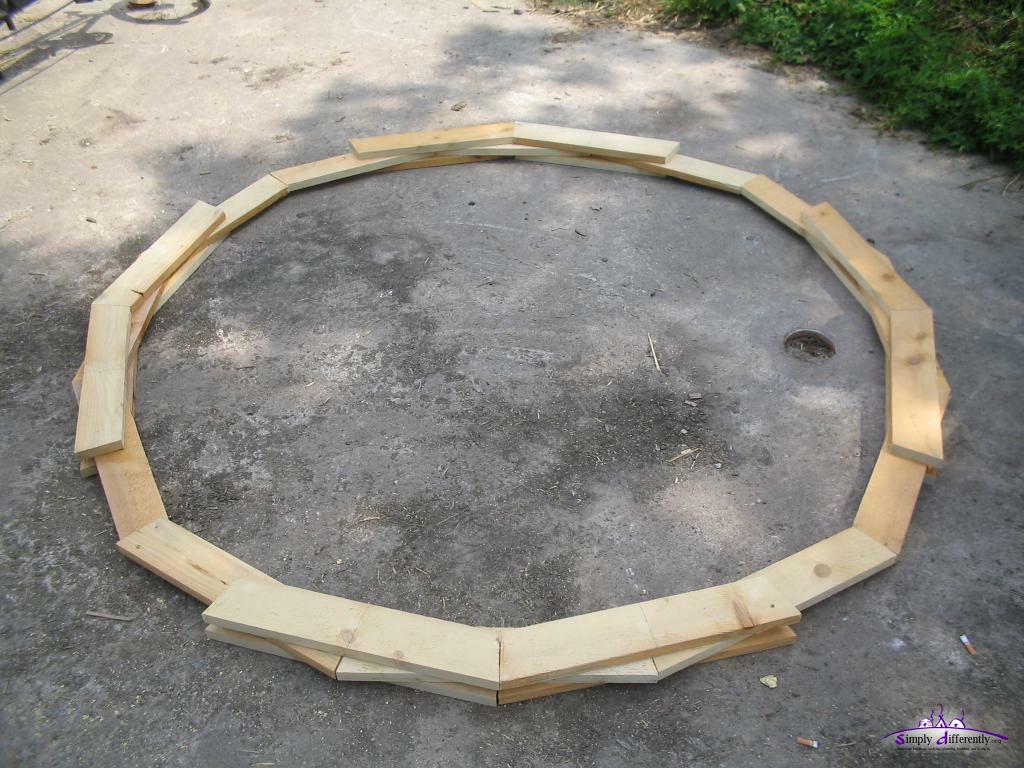
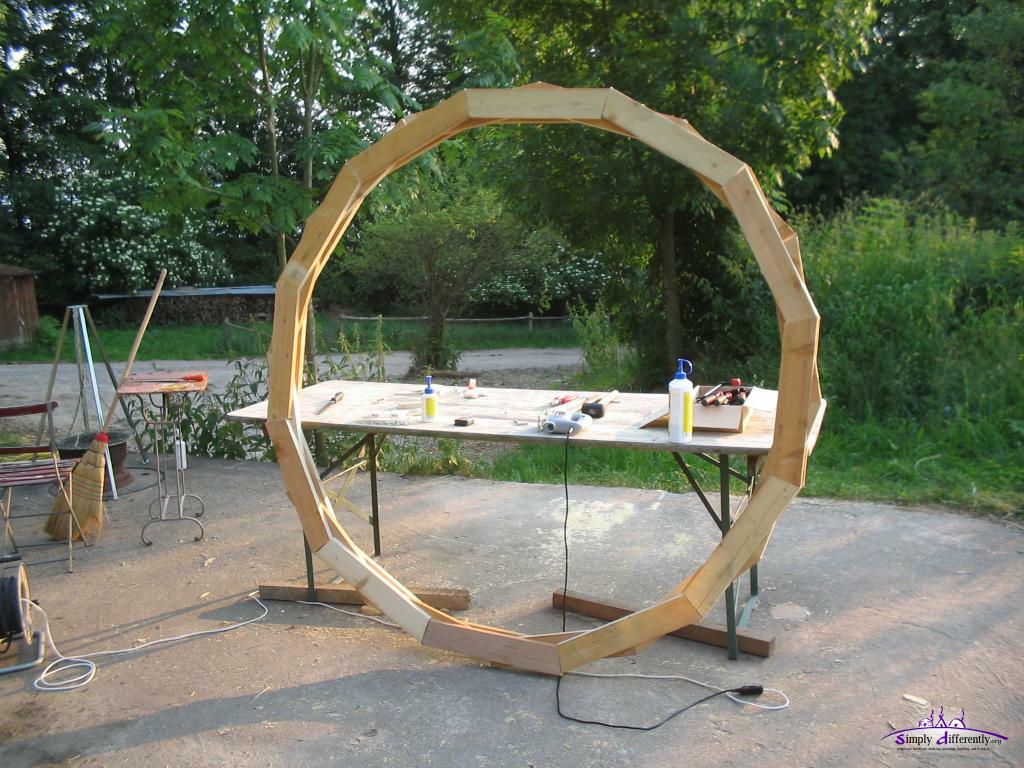
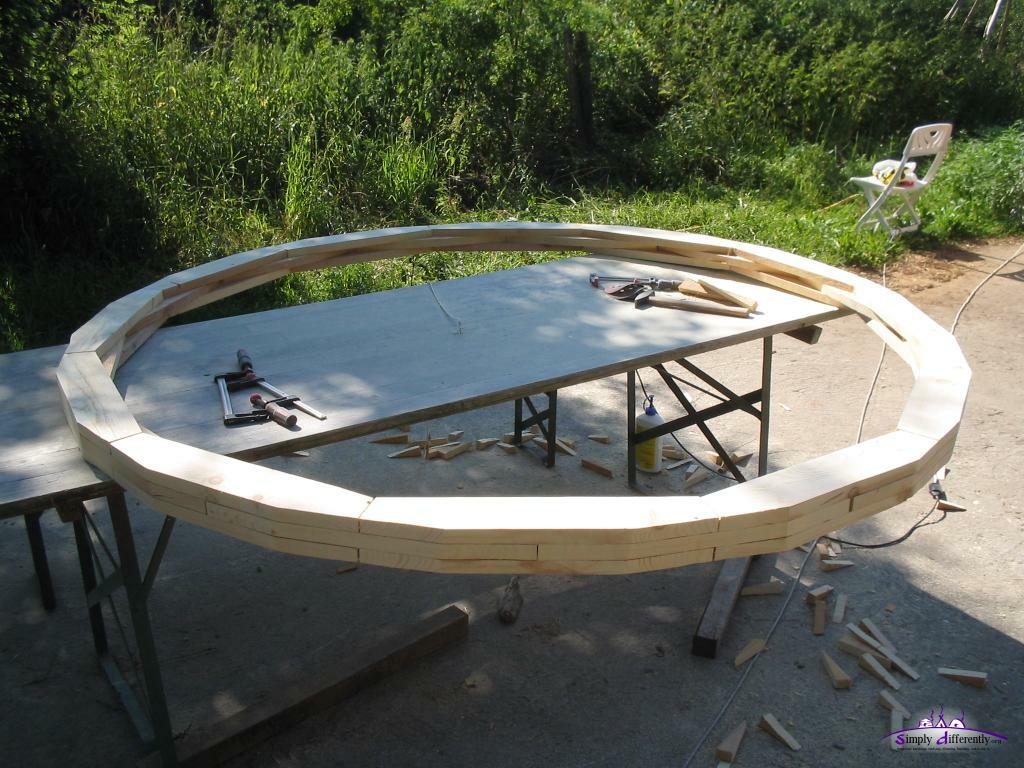
A 12-segment 3 layers crown-wheel / toono, 195cm diameter I made:
12 Segment, 3 Layers Crown-wheel (36 segments): laying out a quarter (1) 2006/06/13 15:41
2006/06/13 15:42
Marking the half of each segment in order to position the segments 2006/06/13 15:44
12x3 segment crown-wheel: complete (no frame or pole holes yet) 2006/06/15 17:41
12x3 segment crown-wheel: complete (no frame or pole holes yet) 2006/06/15 17:42
Beautifying the wheel 2006/07/10 14:54
And finally I will use screws to fixate the layers - photos will follow of this version of a crown-wheel.
Crownless
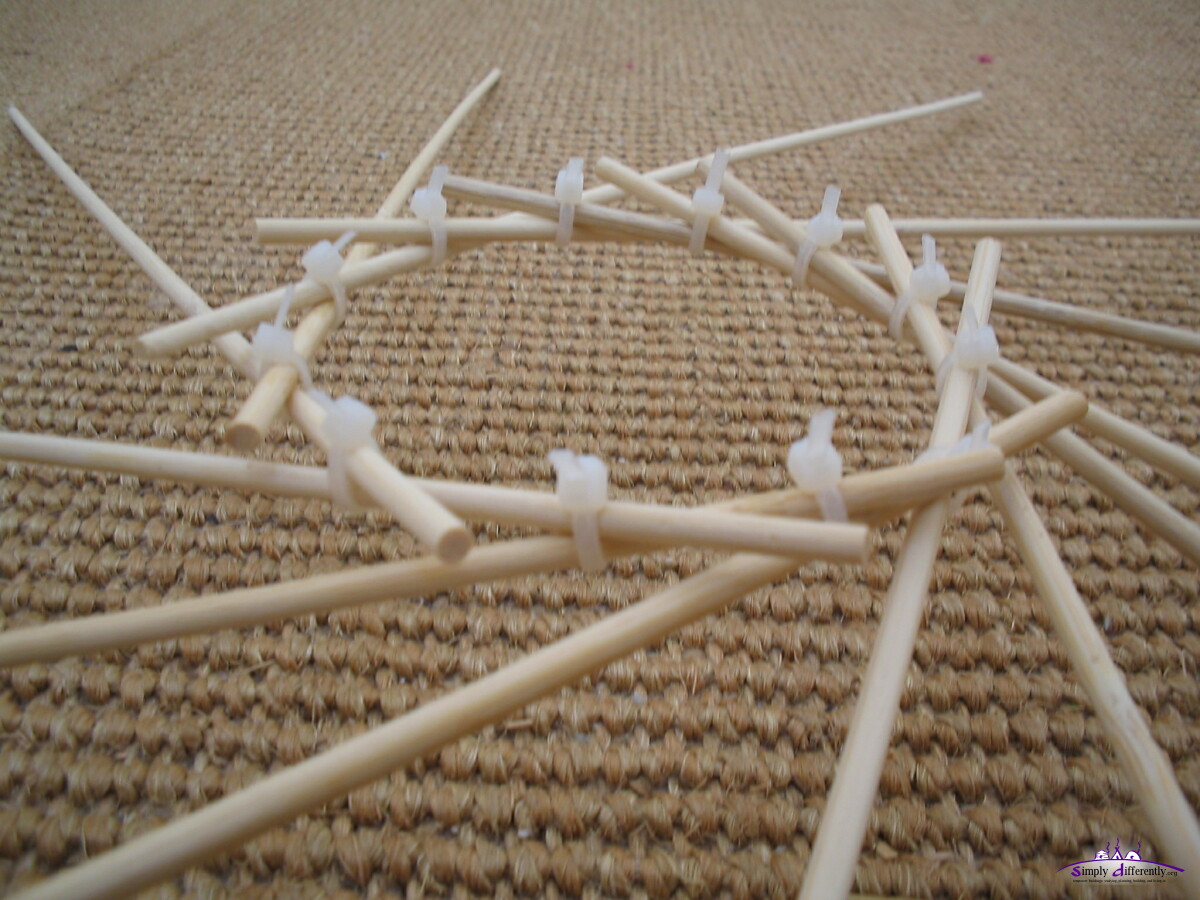
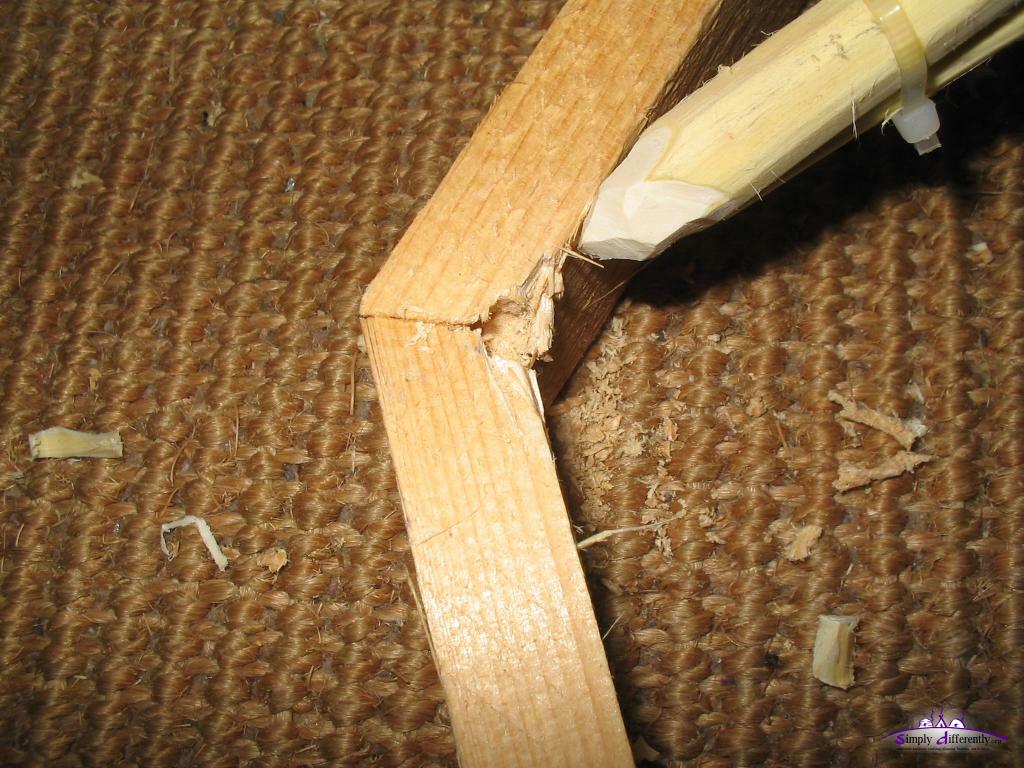
There is also a "crownless" option available by laying the roof poles unto each other, and thereby form a stable crown and cone-like roof of the yurt.
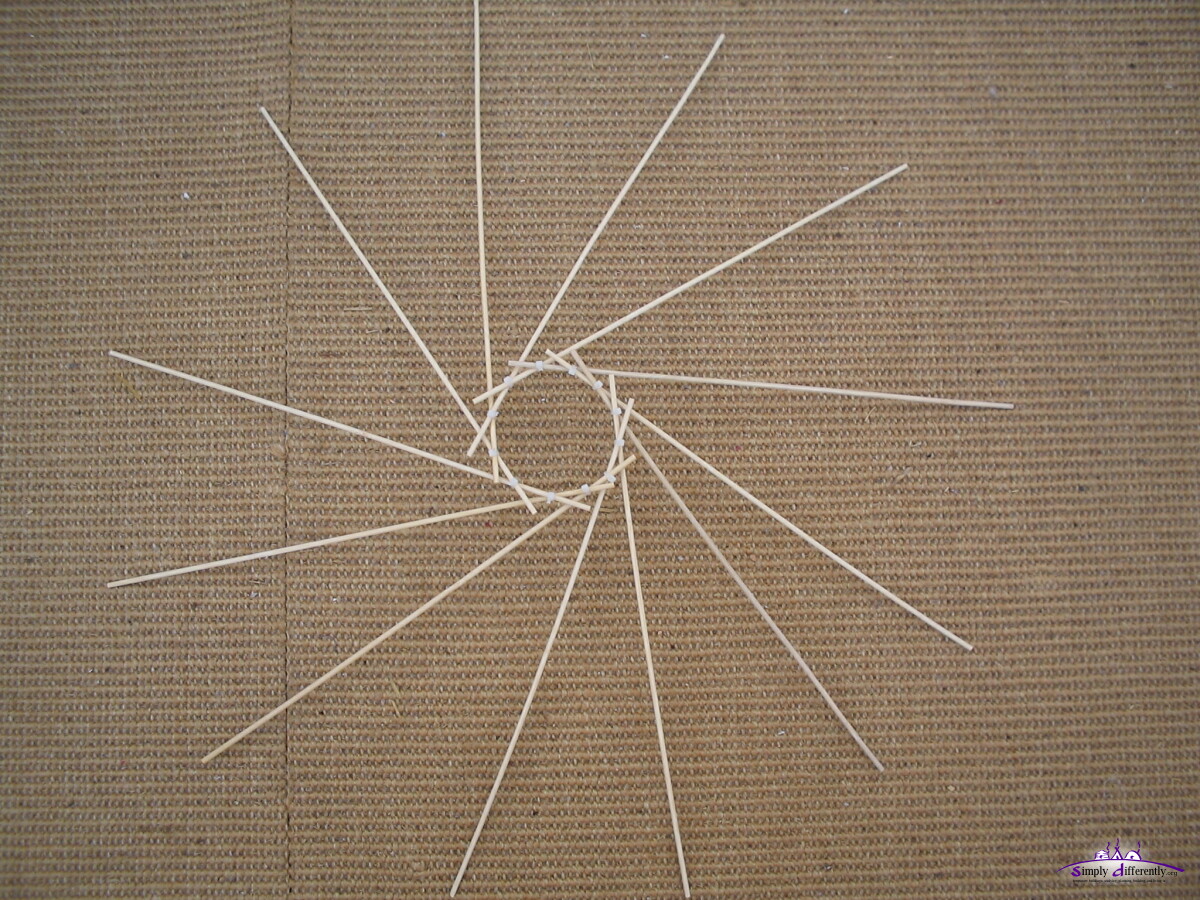
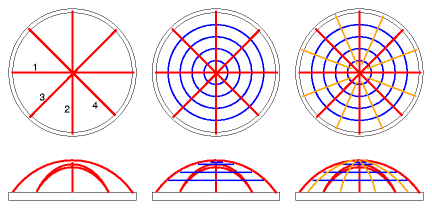
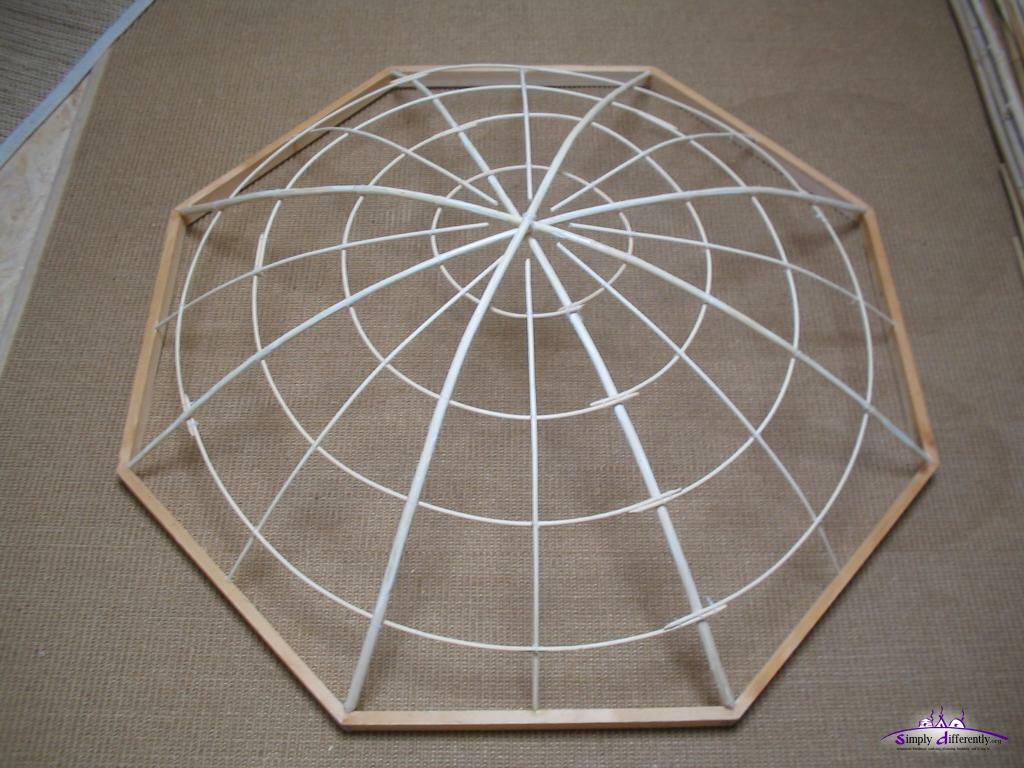
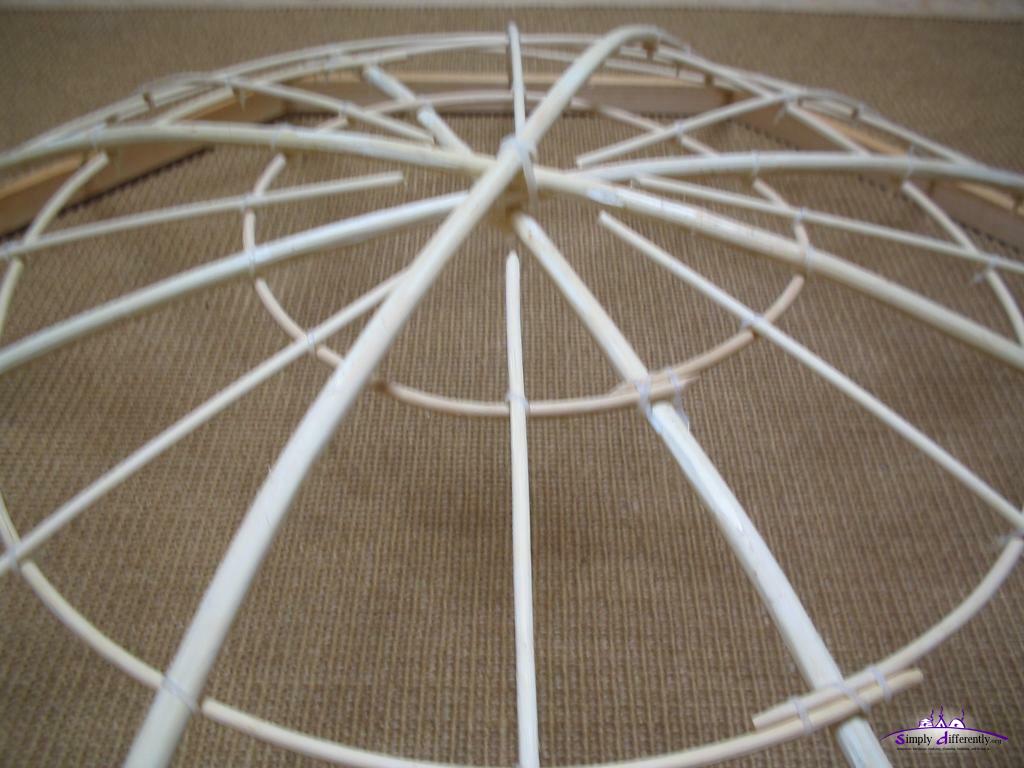
A few photos of a quick experiment I made a while back for a dome model, but using the same "crownless" approach:
Closed the circle 2006/05/06 16:26
Overview 2006/05/06 16:27
Closeup (3) 2006/05/06 16:27
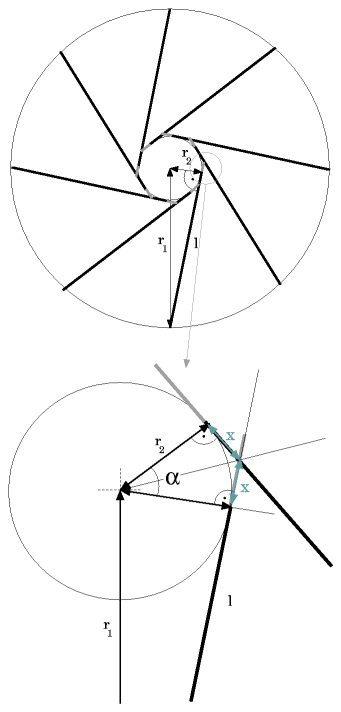
Crownless Details
Expressions:
α = 2 π / npoles or 360° / npoles
l = √( r12 - r22 ) or
l = √( (d/2)2 - (dwheel/2)2 )
x = tan(α/2) * r2 or tan(α/2) * (dwheel/2)
lpole = l + x
Note: this is a 2D calculation approach, the 3D calculation approach with tilted roof with αroof and poles with a certain thickness is a bit more complex to calculate, but it won't differ as much from this 2D approach I would say; I may later extend this to a full 3D calculation approach.
It's also a certain challenge to fixate the crossing of the poles, where they lay on each other.
Be aware this approach is a bit more complex: e.g. you may have to build the roof grid on the ground and lift it up unto the lattice wall, as you cannot create a stable crown with 3 or 4 poles, you require to assemble all of them - for a more stationary yurt but it may be a good option, as you only require roof poles, no rather complex crown-wheel.
I'm considering this approach for stiffening a soft skylight or creating a supporting skylight grid, using the inner diameter as airing opening, and have a solid cover of that inner most and most top cover, compare the notes below on "Skylight".
Other Ways
There are other ways to build a toono, e.g. 6 round segments put together to form a full round circle, or two copper rings held together with distance husks which have the length of the diameter of the poles plus some spare, this solution like the traditional toono tend to rotate, and the roof poles instead to reach the toono by 90° but 70-80° (see photo below), and so the toono often has tilt, and makes the roof look asymmetric. This is why I like to build a toono with holes so the poles keep angle (vertical & horizontal) to the toono.
Roof Weight
To estimate the weight of the roof, dried wood is 550kg/m3, which is 0.55g/cm3, so all laths, plus the cover (e.g. 300g/m2), e.g. a 6m yurt with cotton cover, and 3m x 3cm x 3cm wood lath apprx. 90kg for laths, plus 15kg for the cover, and the toono apprx. 10kg = 120kg total, divided by nlaths e.g. 60 poles, apprx. 2kg per pole; this needs to be kept in mind that this weight will on the toono and on the khana per pole.
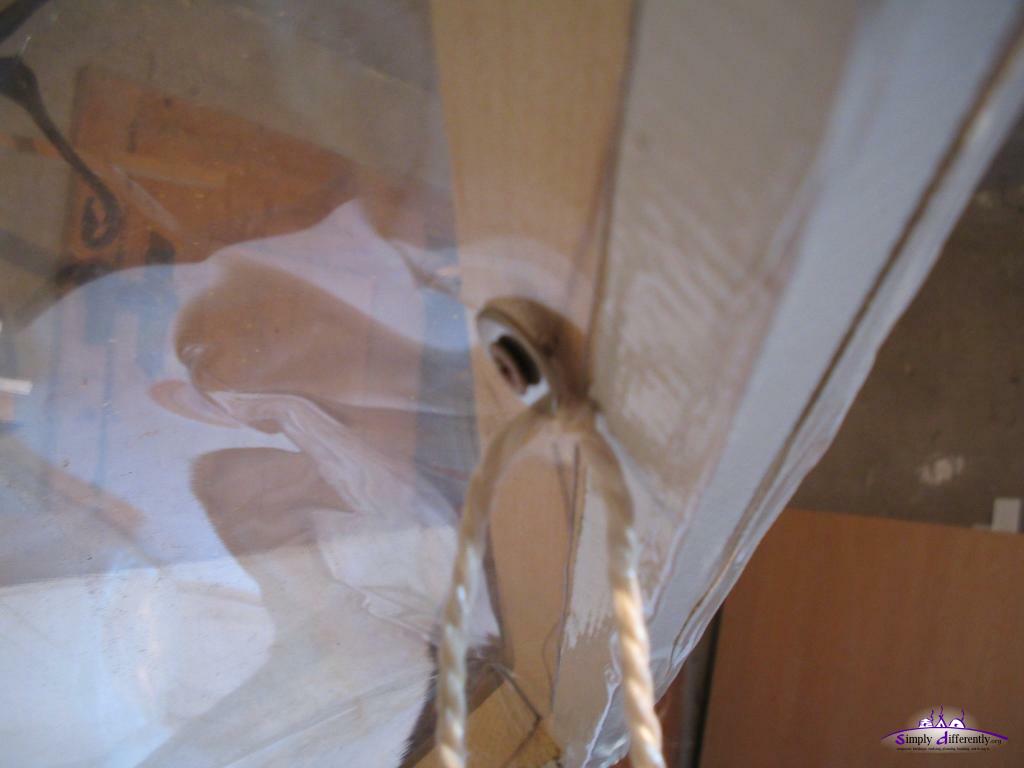
Skylight / Toono Cover
Toono and plastic sphere as cover
The traditional way is to use a rectangular canvas to cover the round toono or crown wheel; what I have seen in the Yurt Village Switzerland (yurt village) that they use 2/8 or 3/8 plastic (PVC) or perspex sphere which brings daylight into the yurt, despite of rain or so.
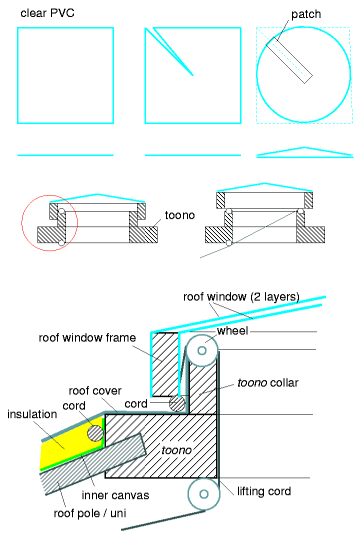
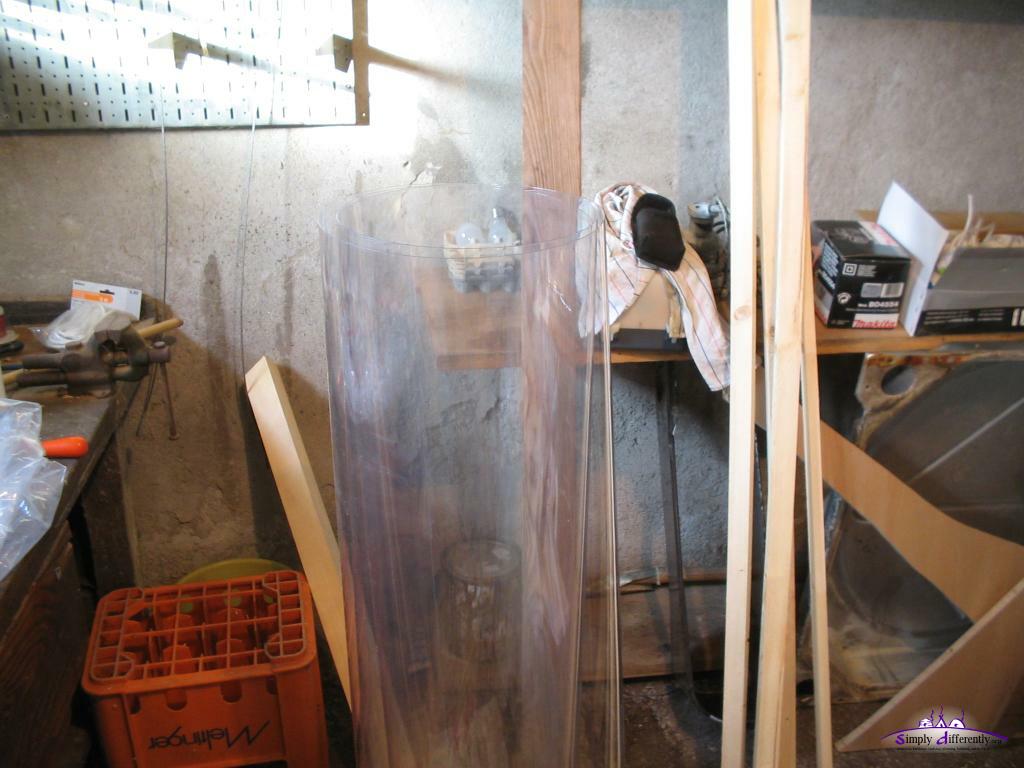
Clear PVC Toono Cover
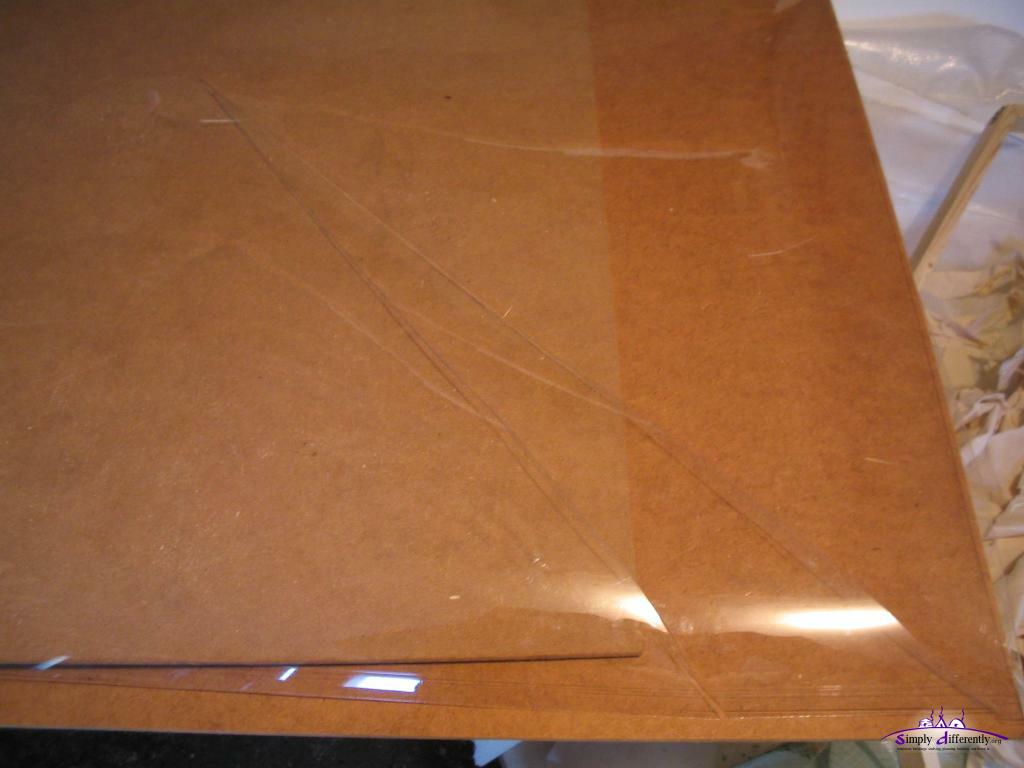
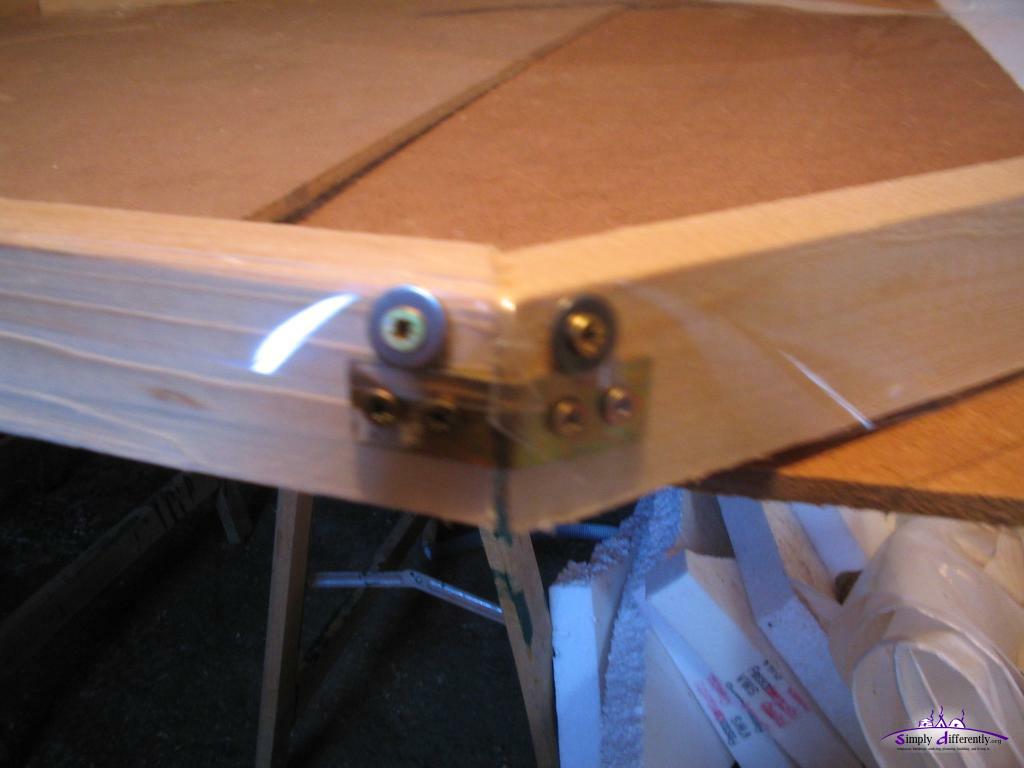
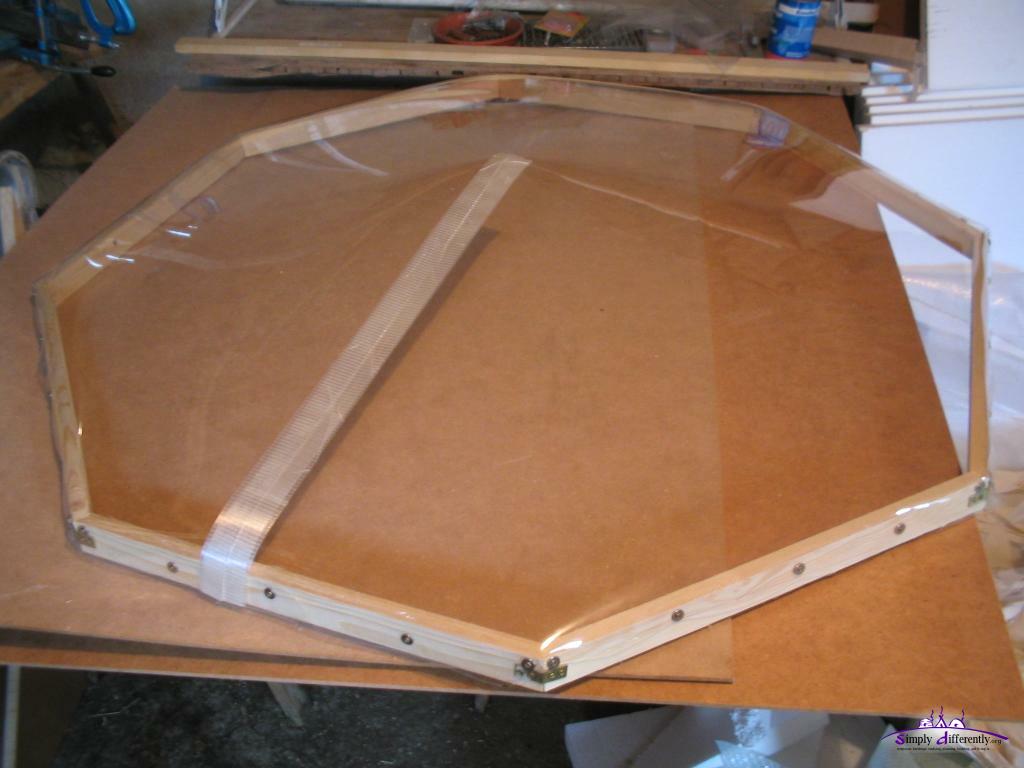
I have chosen another approach to do the cover, using clear PVC and make a cone to put over the toono, since I used the 8-segment crown-wheel / toono approach I also made a collar on the toono and a frame for the clear PVC cone, which go within each other. A lifting mechanism is added to lift up the cover on demand.
Here the step by step how I did it:
Preparing clear PVC 2005/11/22 14:39
Clear PVC cut-out, to form a cone 2005/11/23 11:00
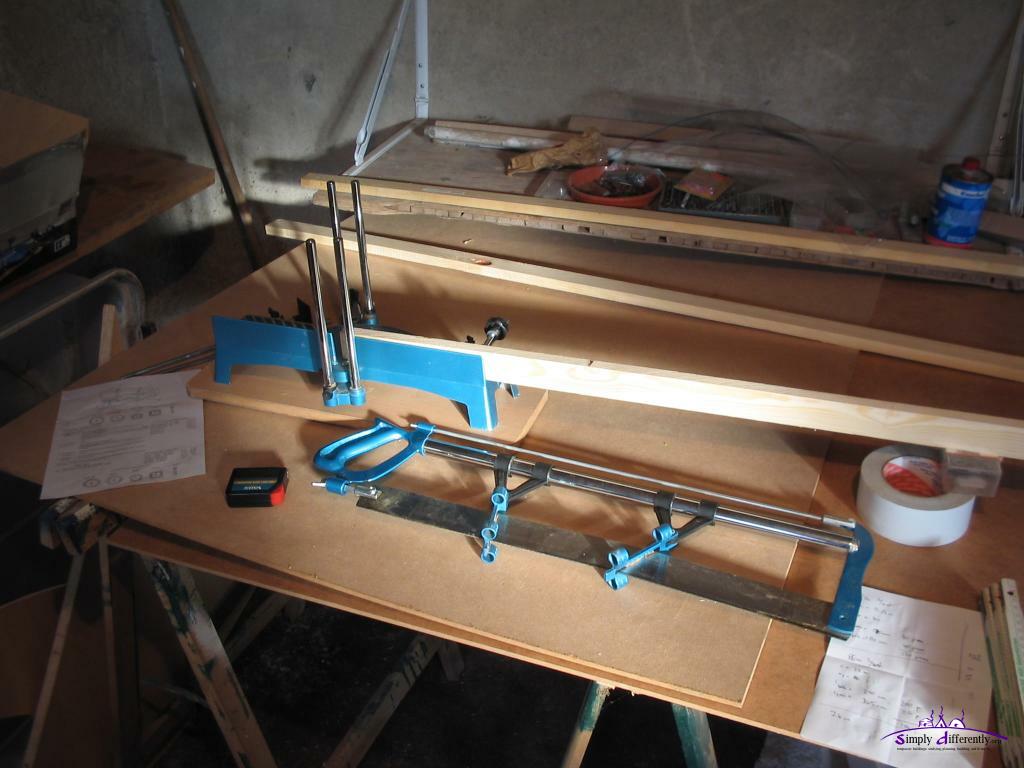
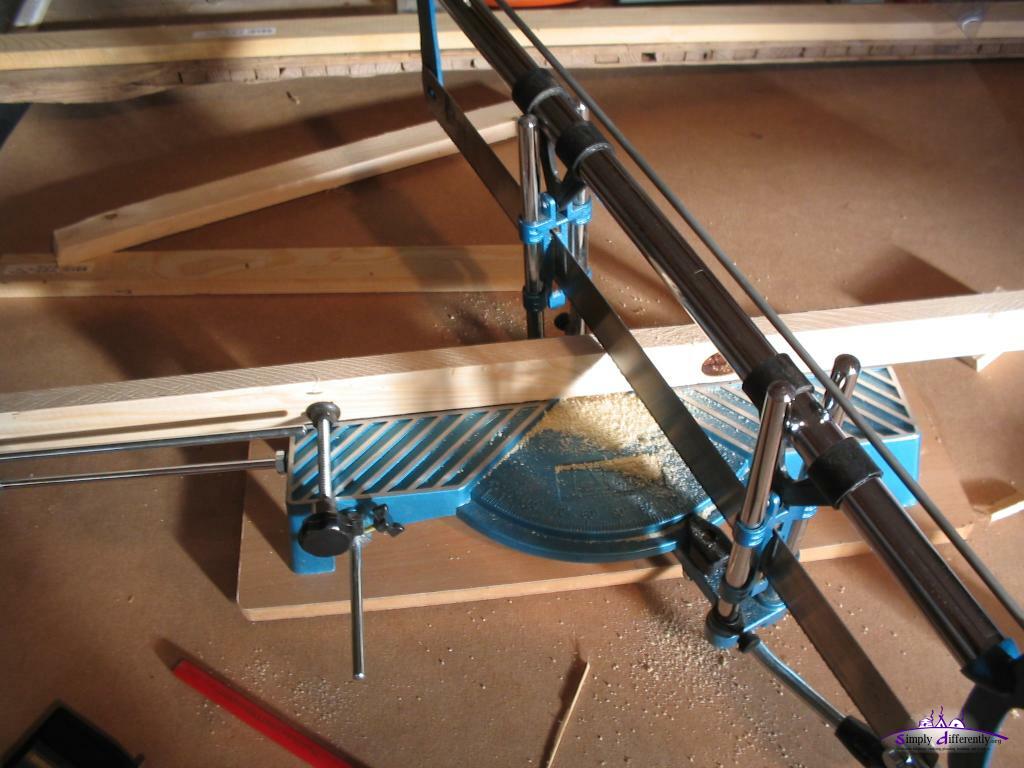
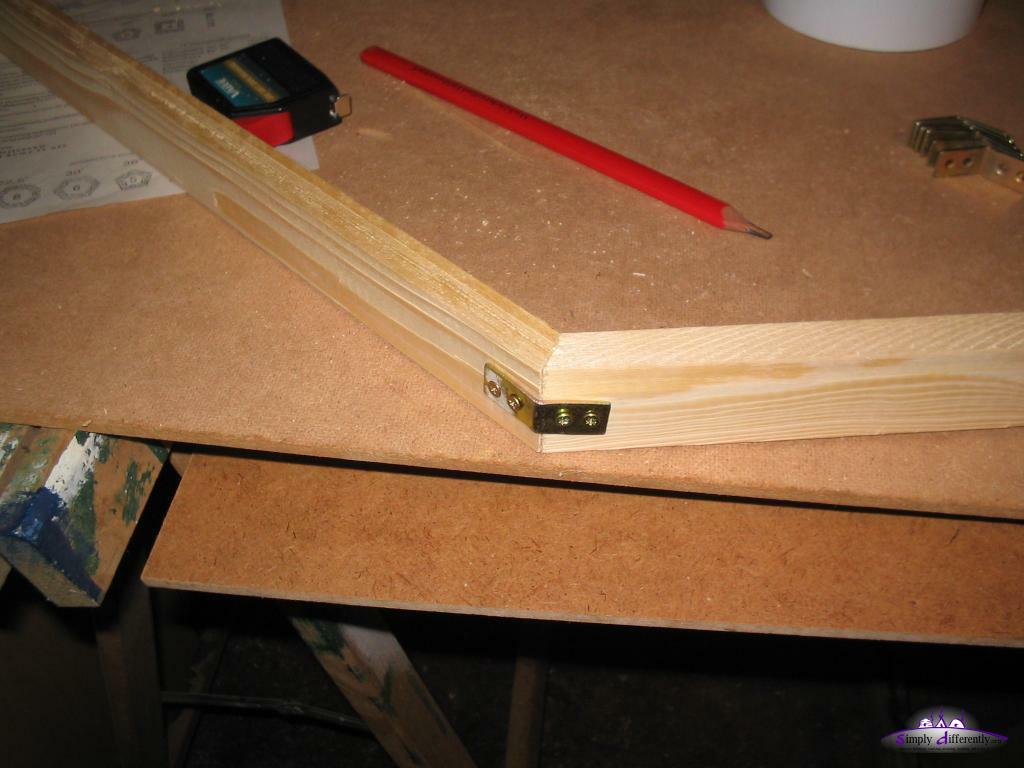
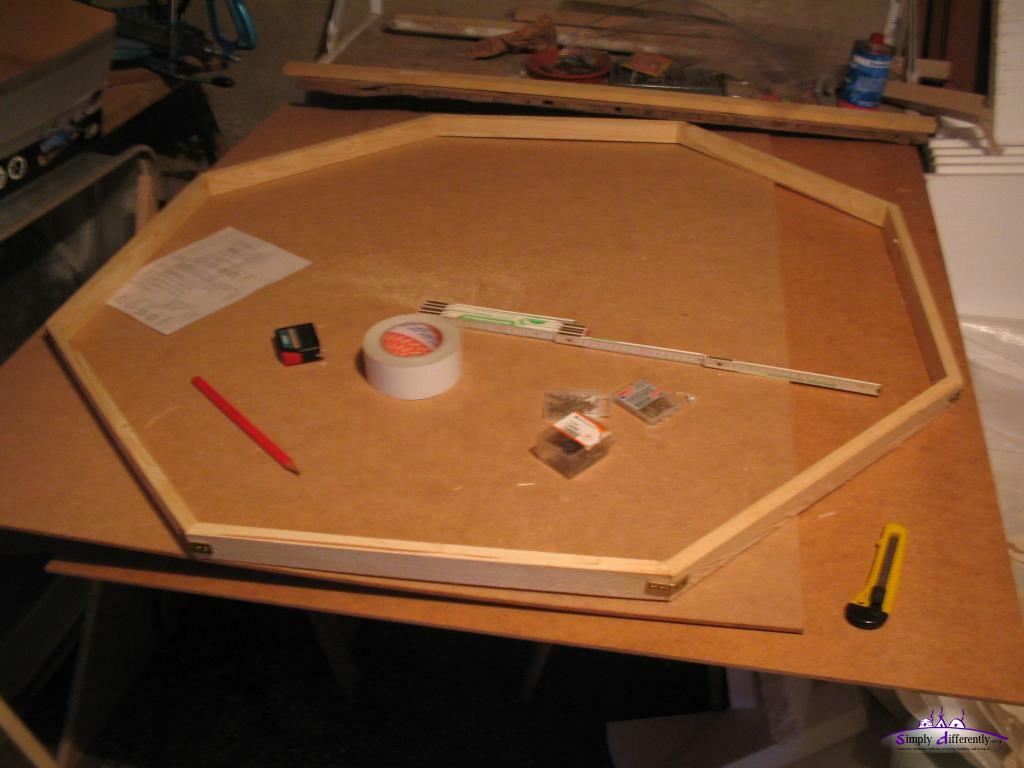
Roof cover frame segments 2005/11/22 14:39
22.5° angle for 8 segment polygon frame 2005/11/22 14:56
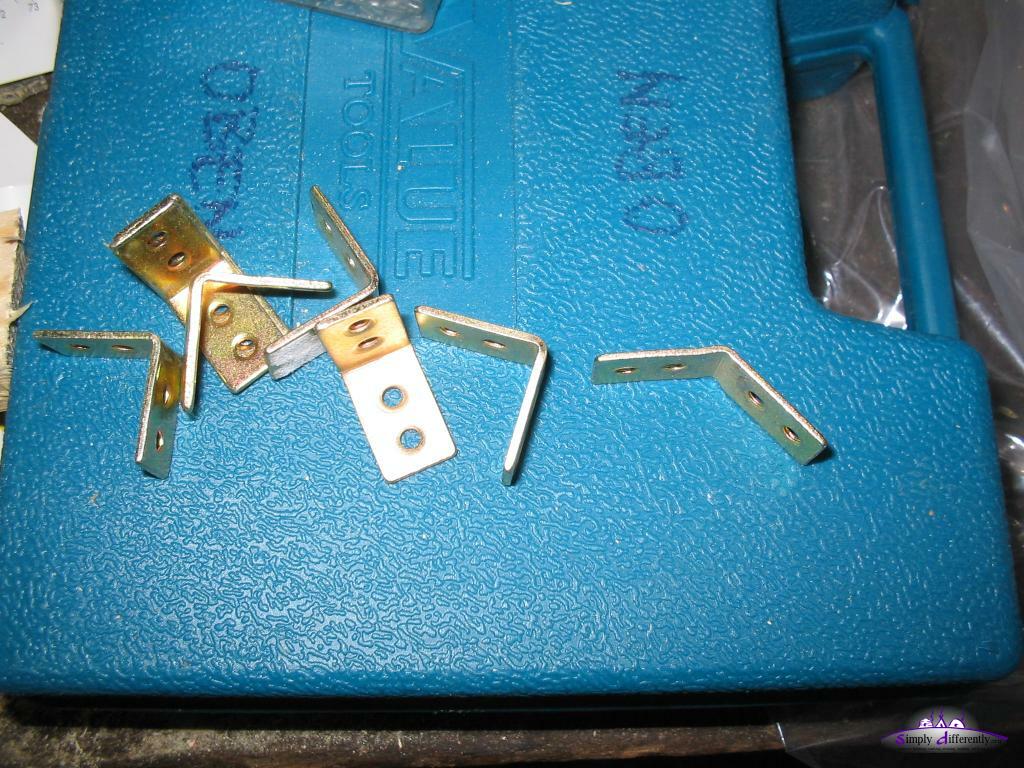
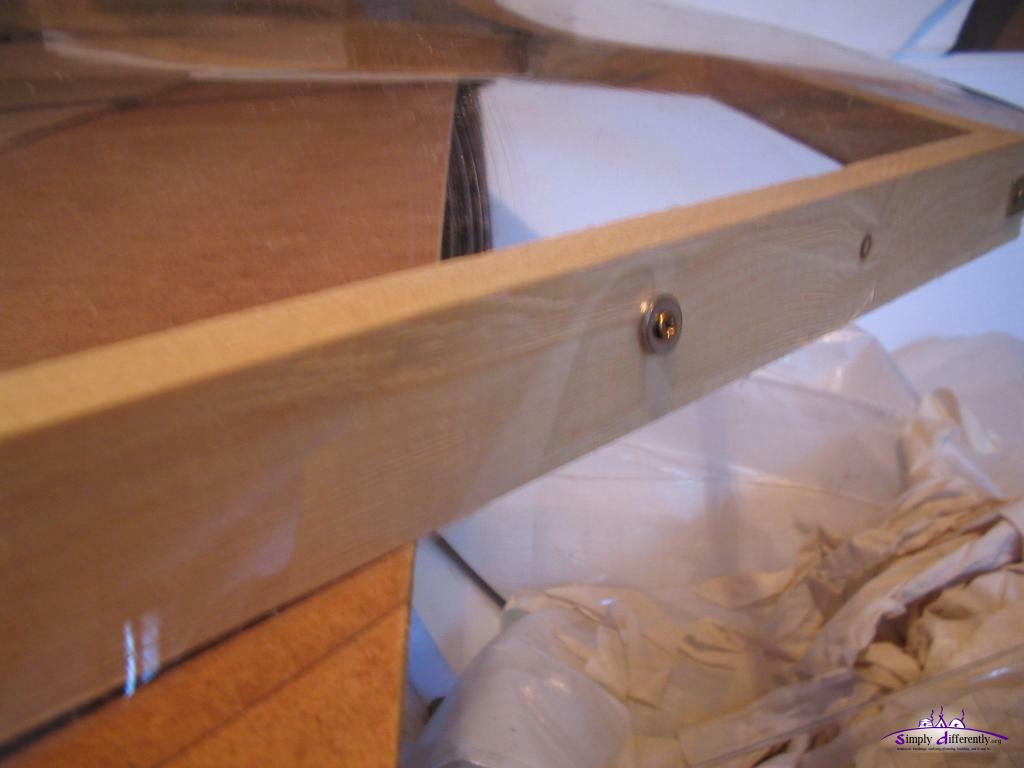
Reenforcement to screw segments together 2005/11/22 15:07
2005/11/22 15:23
2005/11/22 16:26
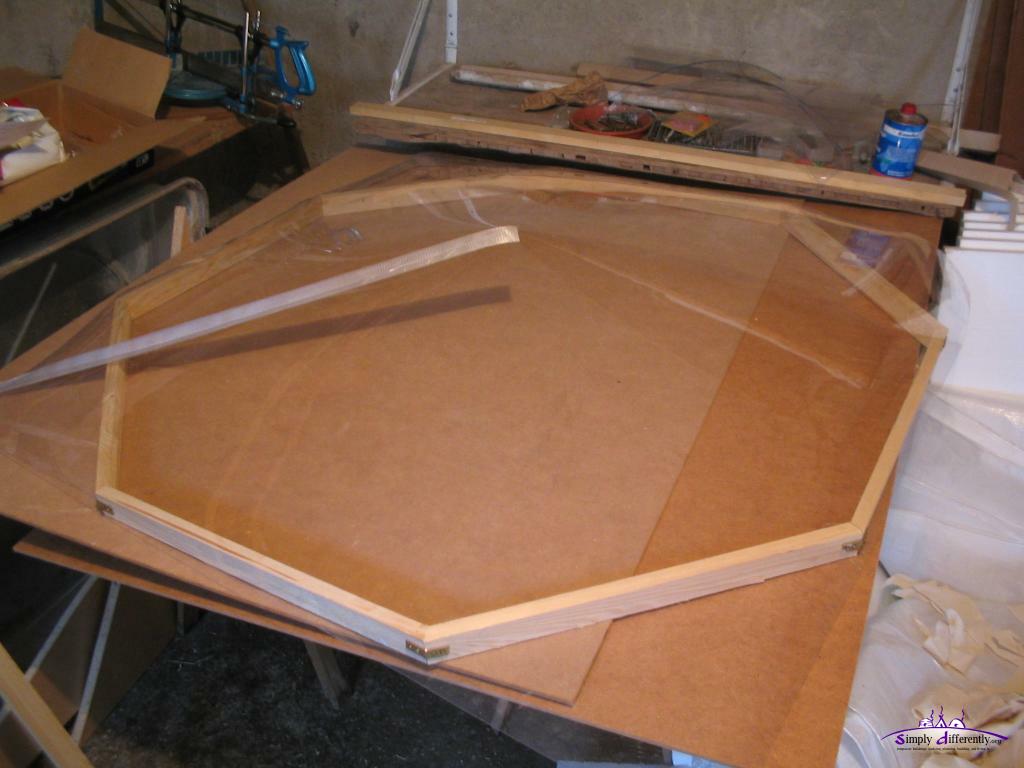
Clear PVC patched, and laid over frame 2005/11/23 11:13
Attaching clear PVC 2005/11/23 12:09
2005/11/23 12:09
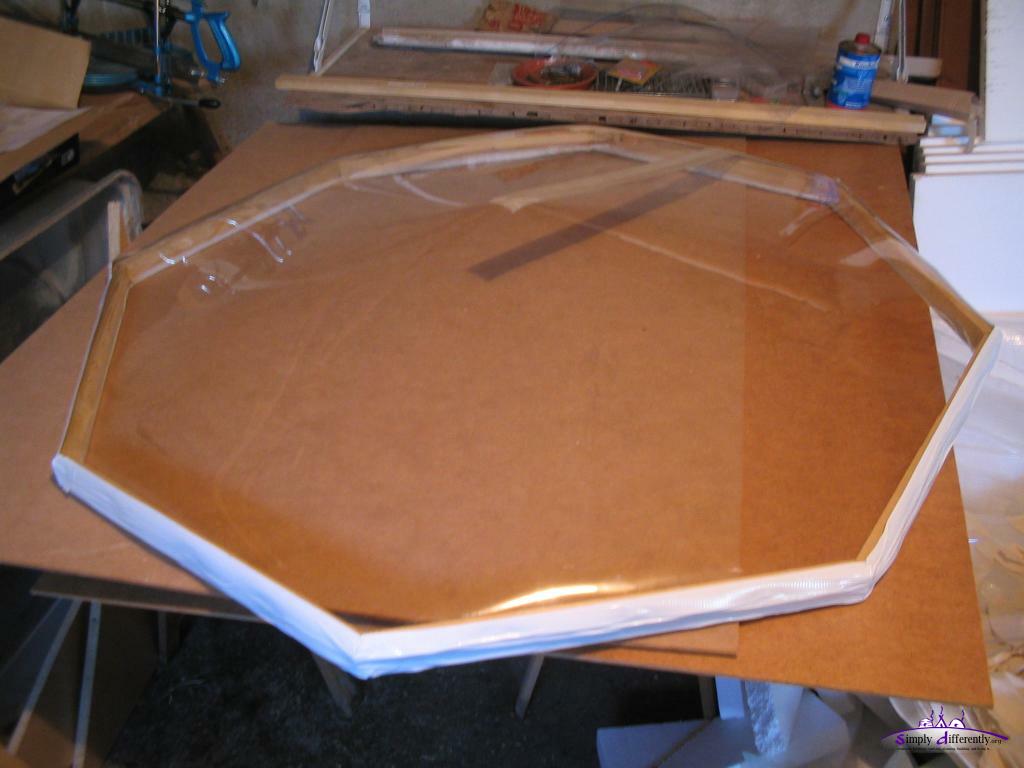
Outer clear PVC layer attached 2005/11/23 13:12
Taped frame 2005/11/23 13:35
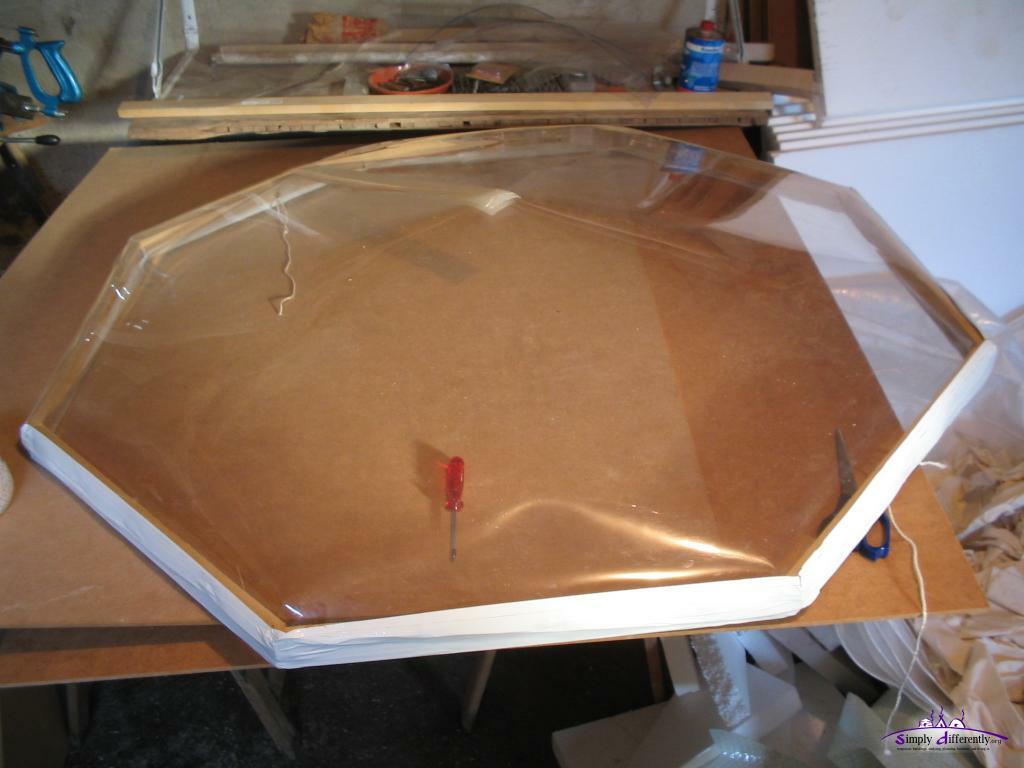
Two layers: one inside, and outside reaching over the frame 2005/11/23 14:49
Attaching cord to fixate roof cover to roof 2005/11/23 14:49
As an upgrade I used willow sticks as spokes and formed a supporting star between the two layers of PVC preventing heavy snow pushing the cone inside which only happened a few times (2-3 times in the winter); often the snow slided or even melted when I was heating the yurt, but the few times it happened it was early morning when I usually didn't heat yet (see last picture above).
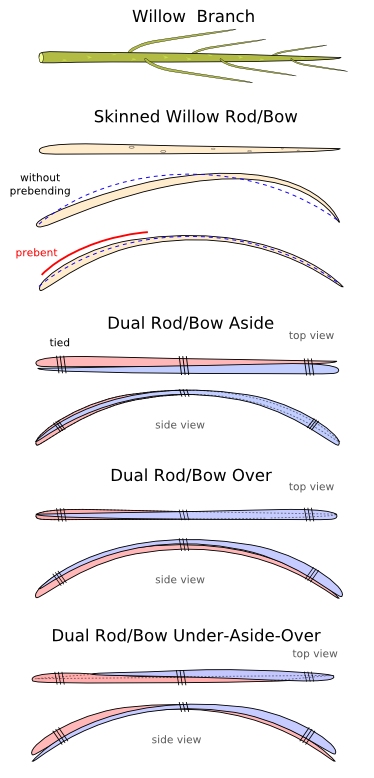
Willow Rod/Bows Options
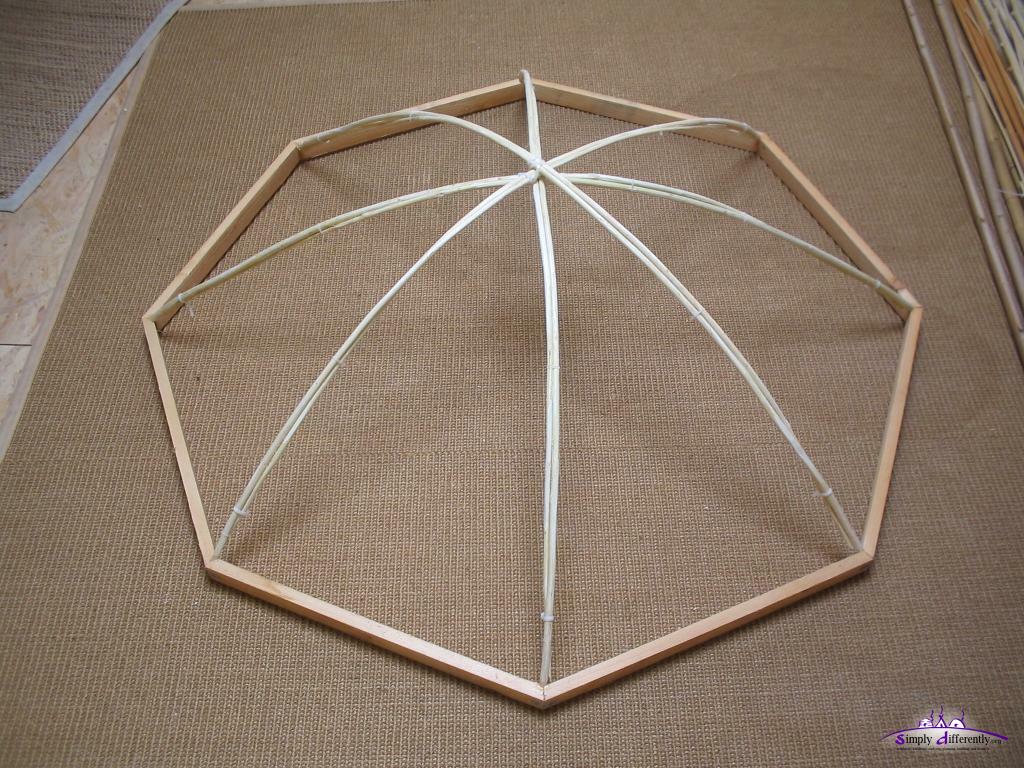
Further, here a few options using willow or hazel branch or rod to form a skylight grid.
Single Rod/Bow: the branch doesn't narrow too quickly, and is moderatly thick, at least 8mm at the narrow end.
I noticed, the willow bow is easy to prebend in order to create a symmetric bow.
frame diameter: 122cm
rod/spoke length: ~140cm
thickness: 0.9-1.5cm (variance 66%)
Double Rod/Bow Under-Aside-Over: two branches are arranged that one branch narrow end goes below the thicker end of the other, aside of each in the middle, and then again the thicker end over the narrow end.
frame diameter: 122cm
rod/spoke length: ~140cm
thickness: 0.5-1.0cm (variance 100%)
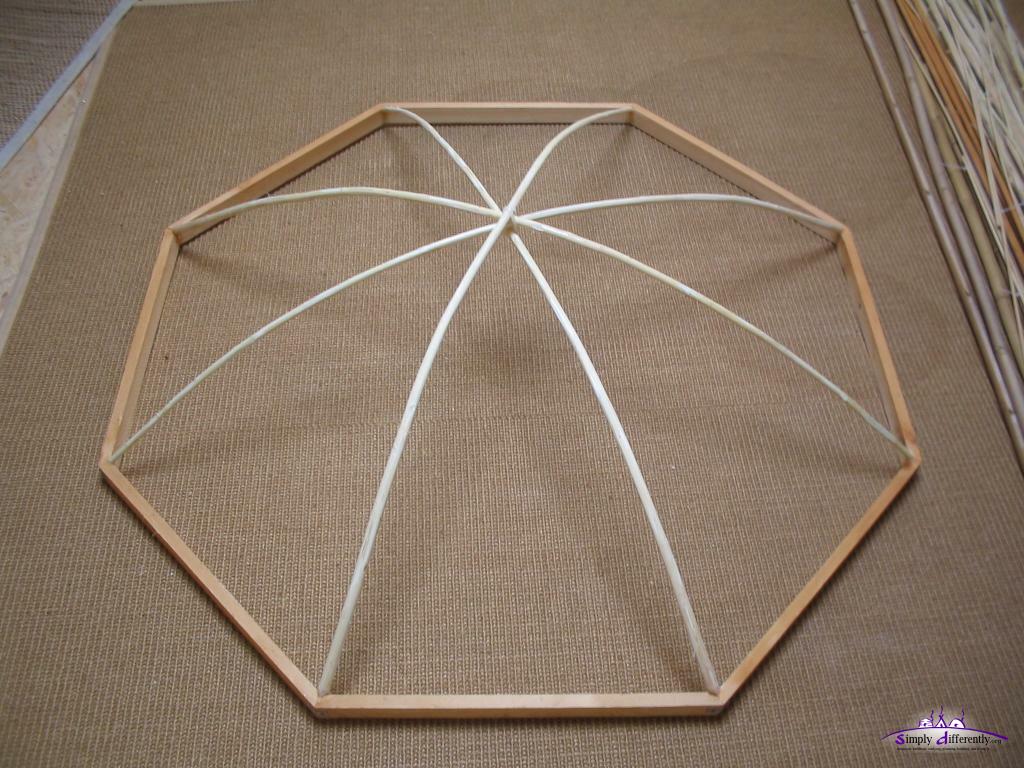
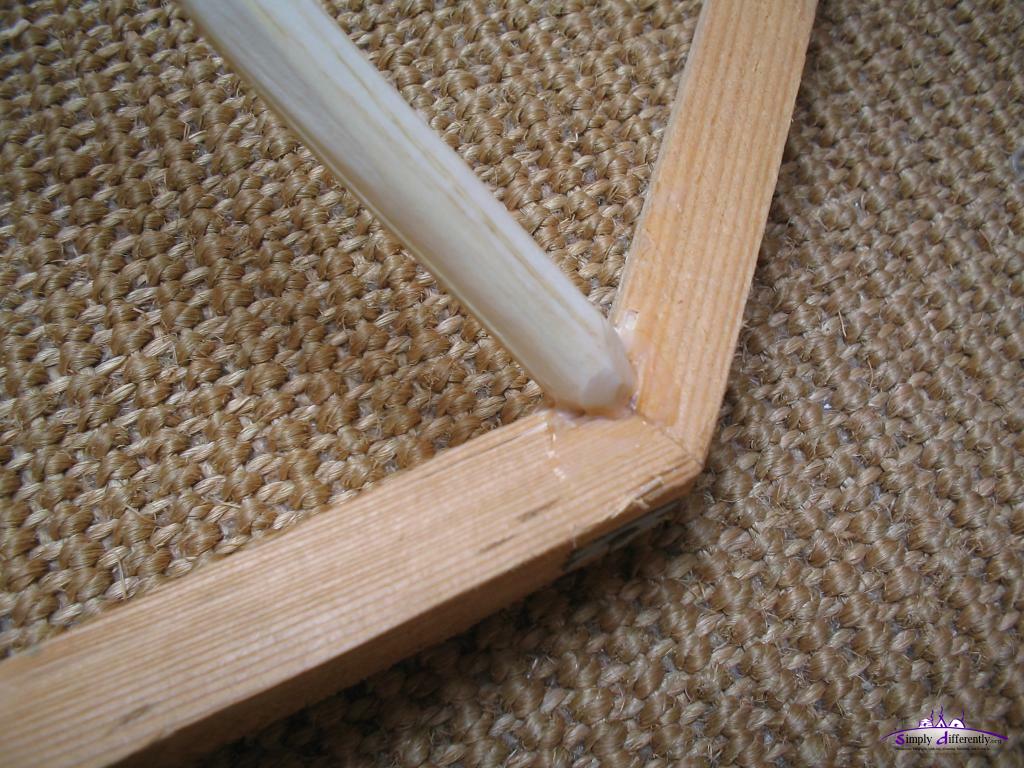
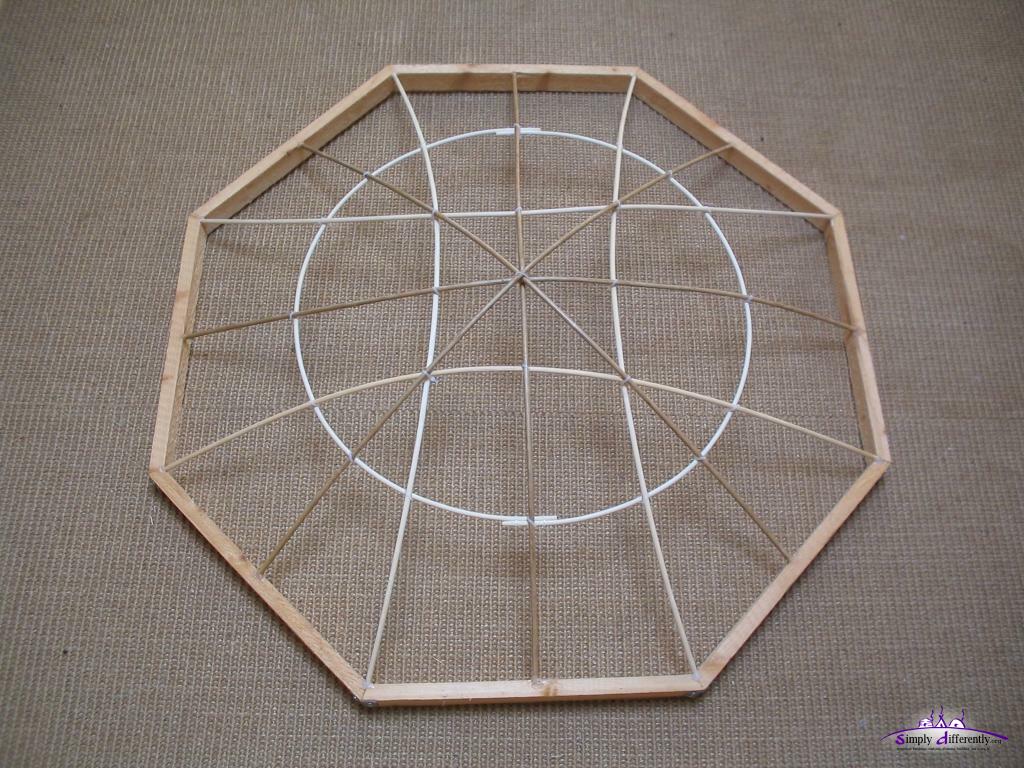
The third example in the photo series below shows that I used bamboo stick connected in the mids of the segment of the octagon (8-sided frame), this was due the length of the bamboo stick as I would have prefered to attach the spoke in the junction frame segment like the other two skylights.
Skylight grid: single willow rod (diameter 122cm) 2008/03/22 12:48
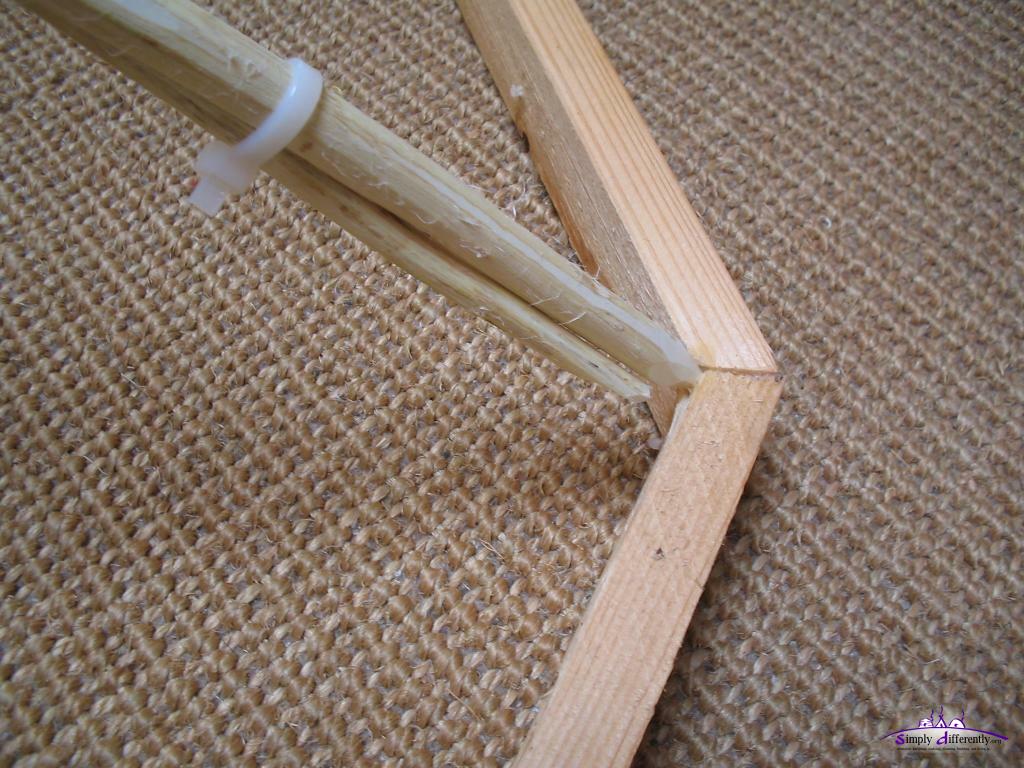
Skylight grid: single willow rod, close up connection to frame 2008/03/22 12:48
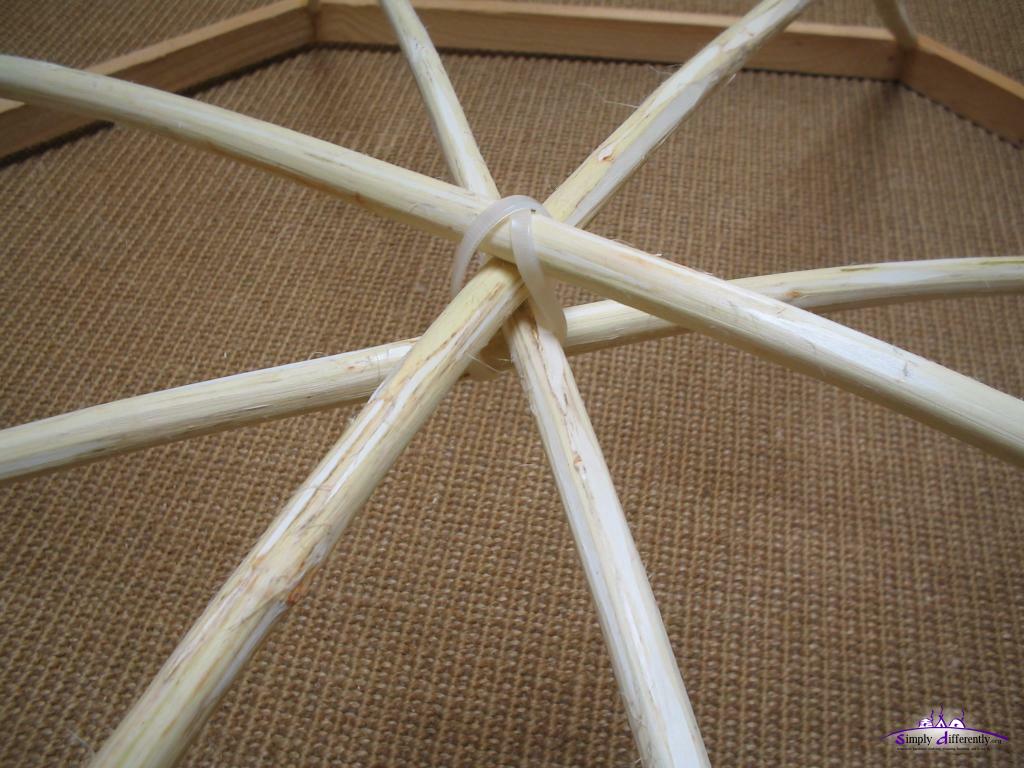
Skylight grid: single willow rod, close up center 2008/03/22 12:48
Skylight grid: bamboo sticks, close up connection to frame 2008/04/07 15:03
Skylight grid: bamboo sticks, close up center 2008/04/07 15:03
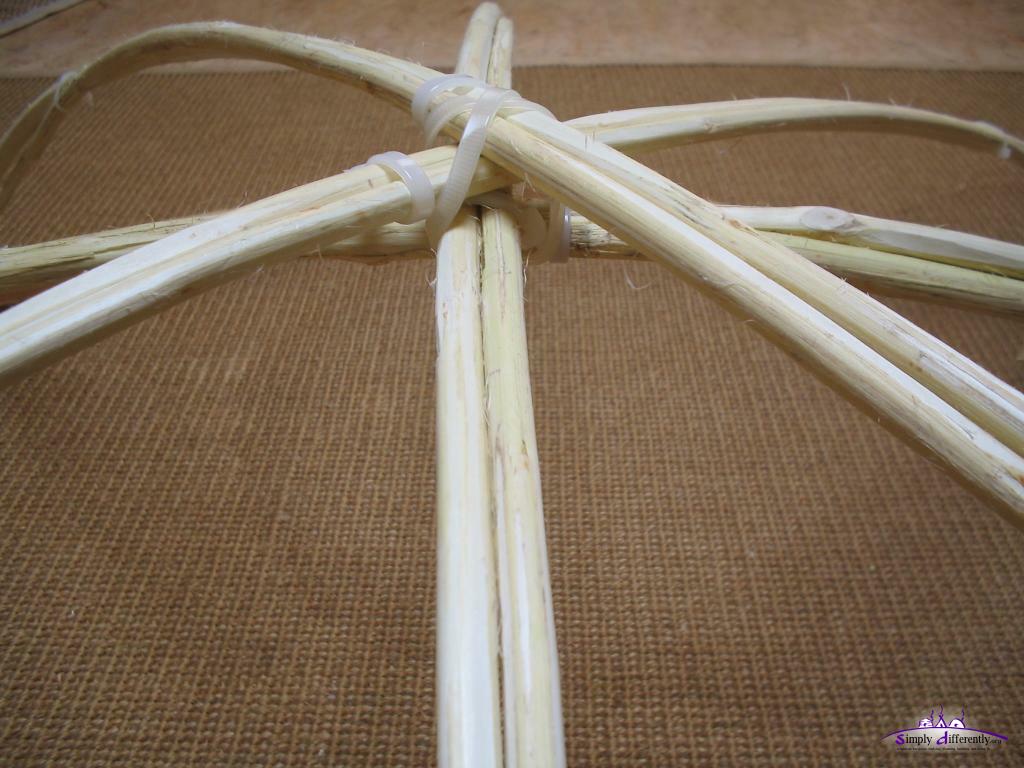
Detail Observation
Close up on skylight spoke to frame
I used to drill first horizontally into the frame segment junction and while drilling change the angle of the auger, this way you won't slide off.
Then I measure the length of each bow, and made sure the order of spoke from (top to down) was working, e.g. if necessary cut off some length so it would match below the previous bow - then I cut the ends pointy; once all bows were fitted this way, I began to glue (with wood glue which is water resistant) all holes in the frame and reinserted the bows, and let it dry for 4-5 hours.
As you noticed, I used cable-binders or cable-ties to fixate double branches, as well fixate the center that way.
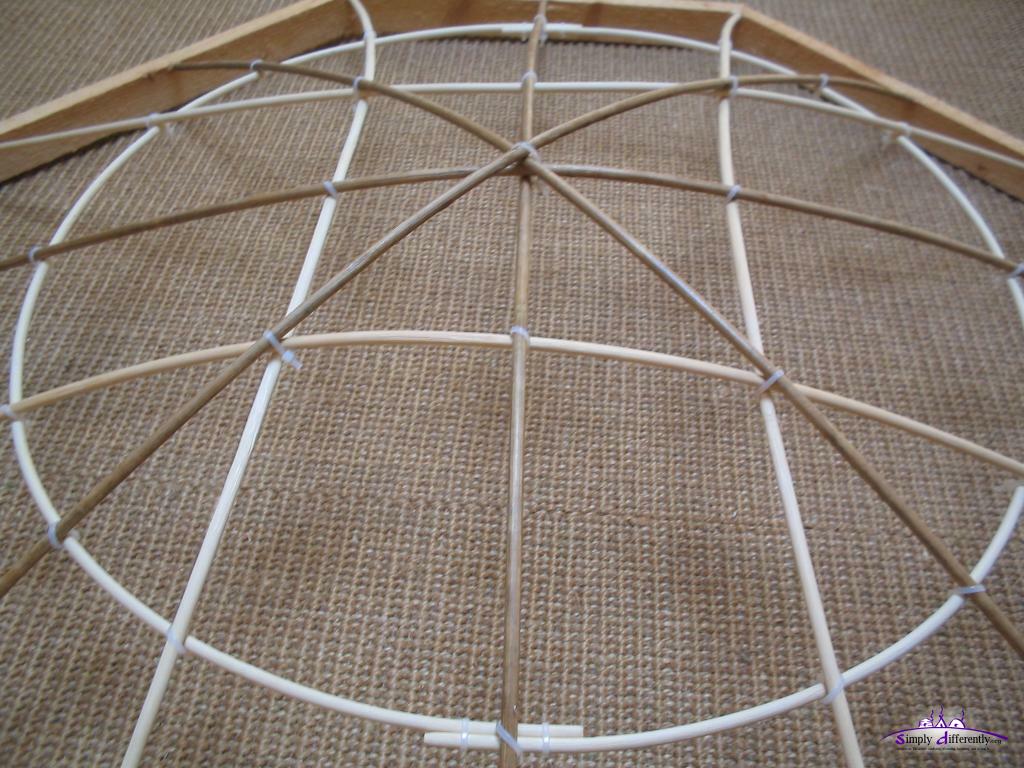
Refining the skylight grid
In case some further refinement is required, I decided this procedure:
Skylight grid with rings and shortened subspokes
Skylight grid: single willow rods with bamboo rings & shortened subspokes 2008/04/05 12:37
Skylight grid: single willow rods with bamboo rings & shortened subspokes (closeup) 2008/04/05 12:37
Skylight grid: single willow rods with bamboo rings & shortened subspokes (closeup) 2008/04/05 12:37
The final cover will be either some bubble-wrap or if I find a material which is a bit flexible then pull it over the skylight grid.
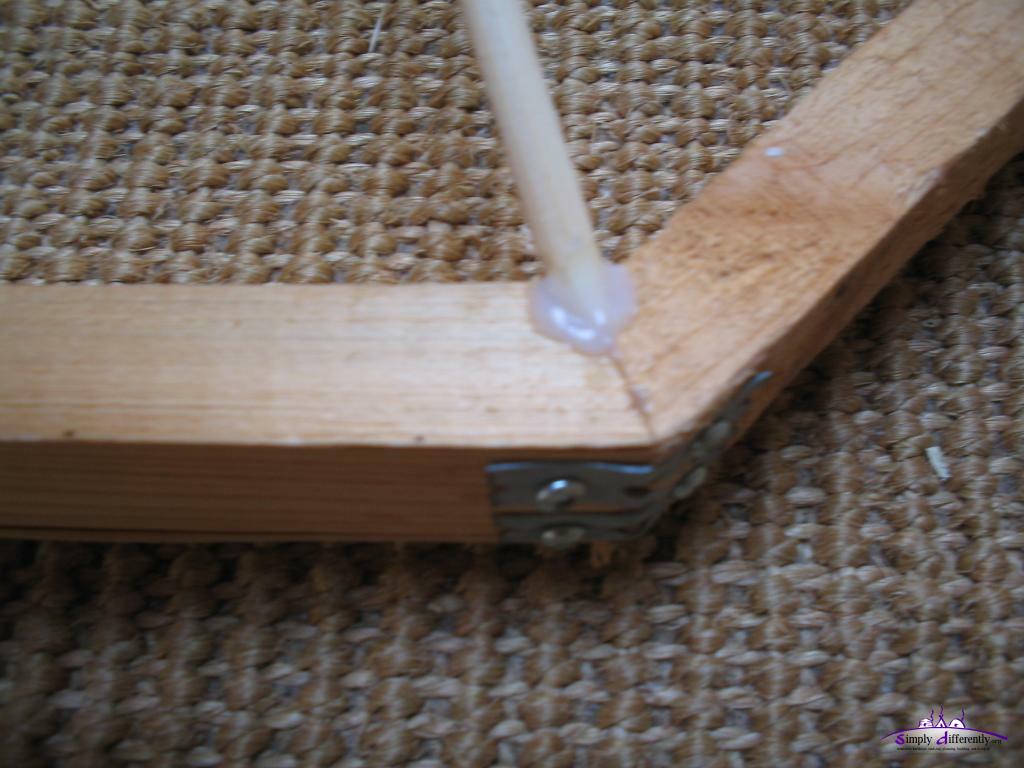
Btw, the frame segments are glued and with a short strip of eyed sheet metal screwed over the junction on the side to reinforce the corner.
Skinned vs Unskinned Willow
Unskinned willow remains flexible and has better bending and overall stability. Fresh skinned willow is very flexible, and one can bent it and undue bows and make it straight, or bent it to a certain radius and let it dry while remaining in this form; once dried out is stiff, but has somewhat limited strength compared to bamboo.
Skinned willow is almost white, and looks aesthetically.
Wall / Khana
Khana Composition & Termination
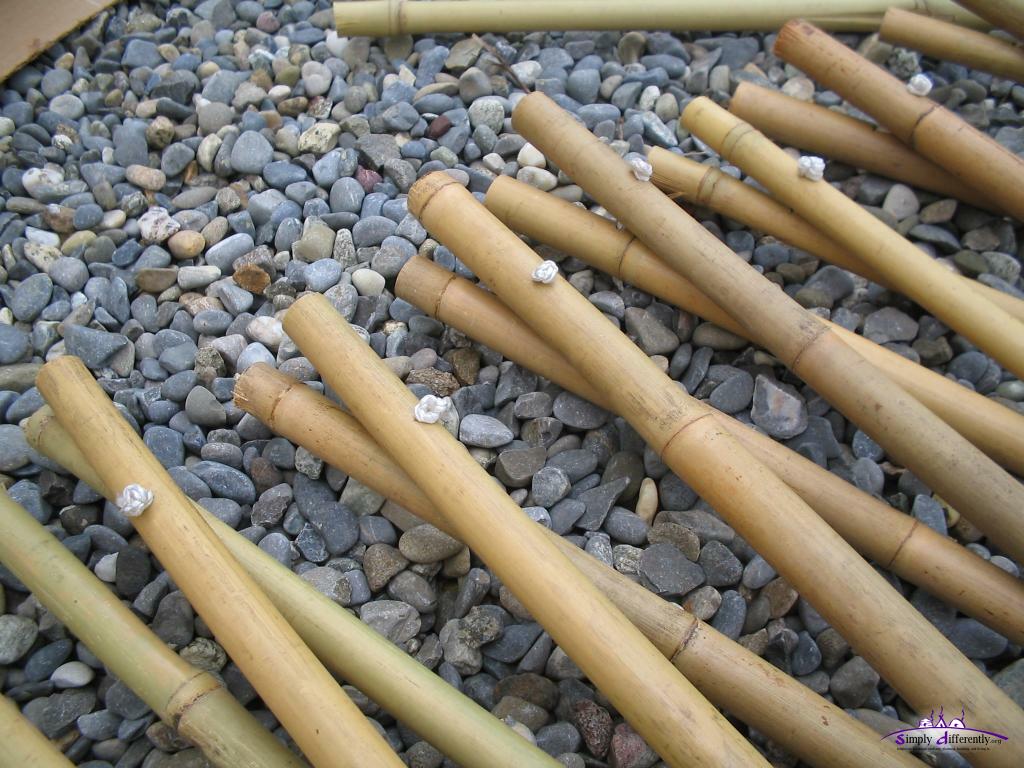
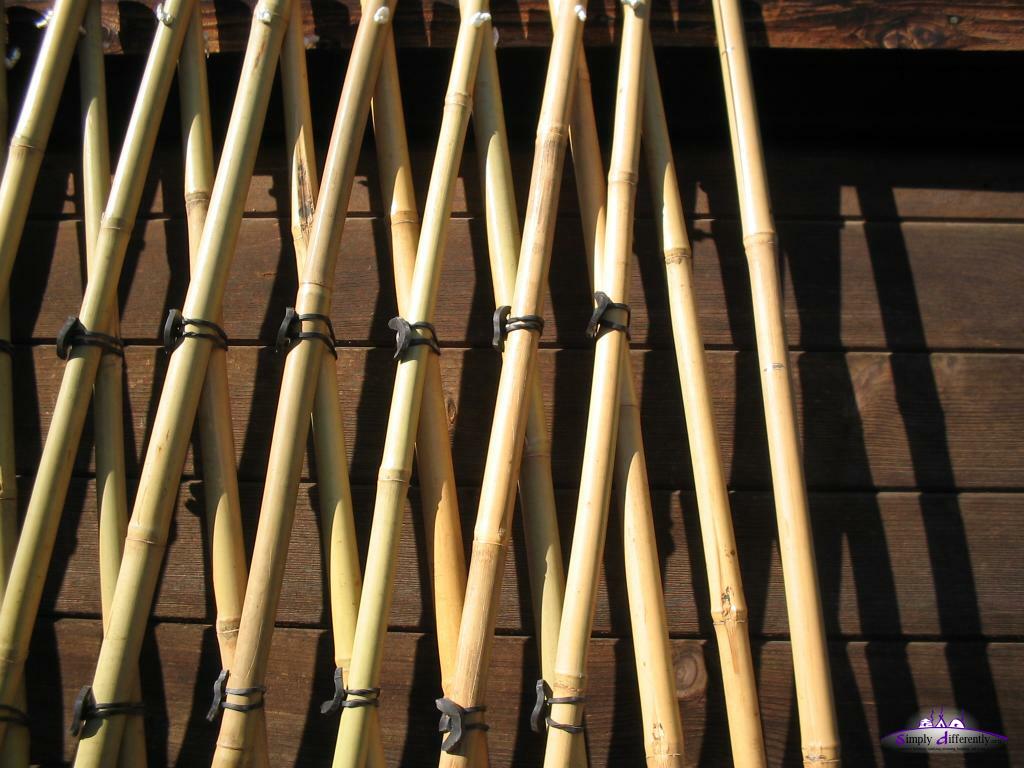
In order to build the khana, best make "twins": two laths, drill a hole in both at the first top most junction (and other holes as well if you choose that method), and join them with a cord or with your preferd junction method. Spread each "twin's" open ends slightly: upper lath to the left, lower lath to the right; then work left to right to put more "twins" over each other.
I used bamboo for the khana, and used one "norm" lath with marks on it where the junction should be, and put it next to the lath I needed to bind, which I did with rubberbinders:
Bamboo Lattice Wall
Rubberbinder
I've got the rubberbinders from the wholesale garden company:
The rubber binder 2005/09/21 08:57
Closeup rubber binder 2005/09/20 13:21
It's not sure how long they last, as they contain softener which leaves the rubber slowly and finally gets brittle.
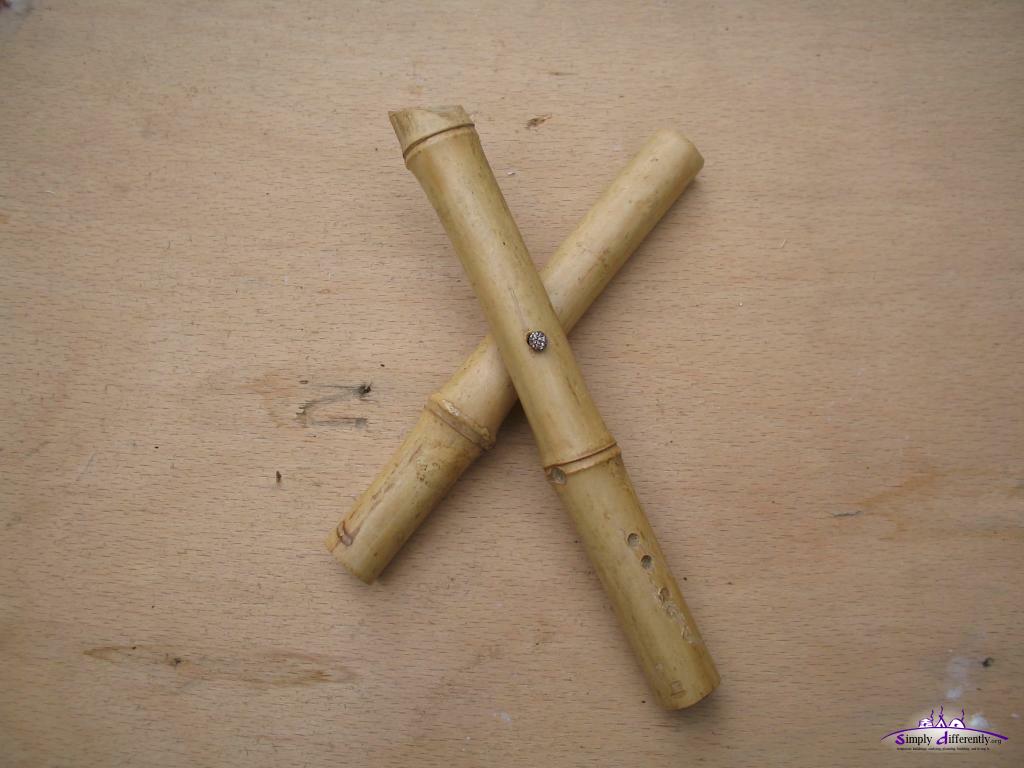
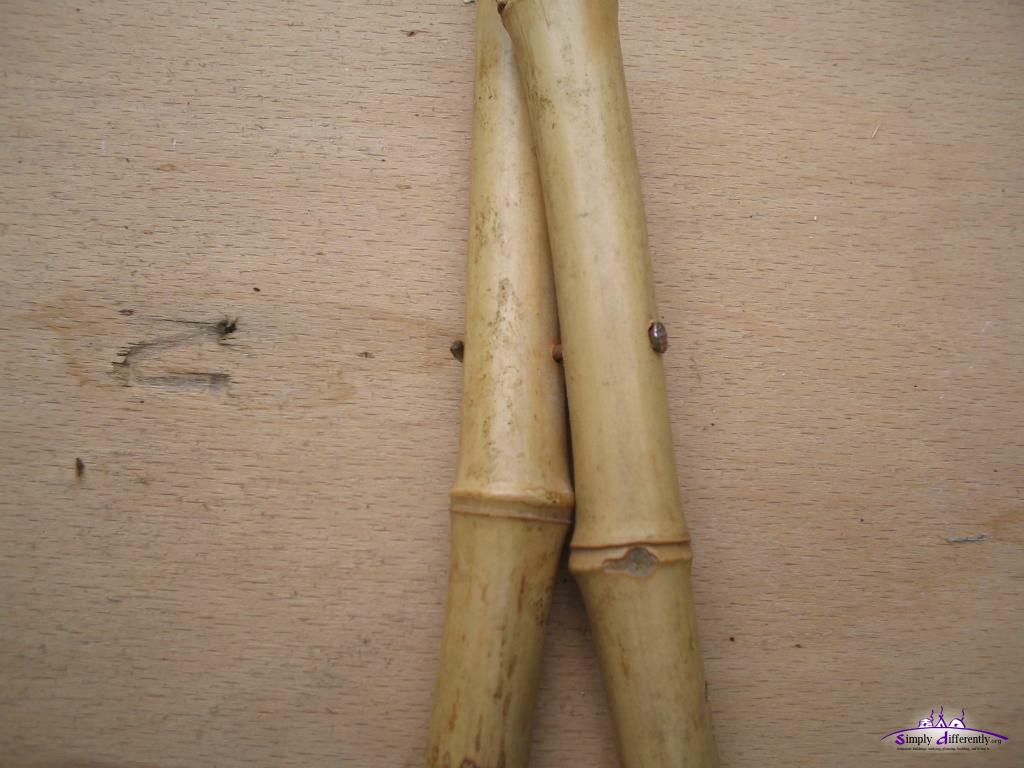
The nail is bent first, and then cut off apprx. 4-6mm and finally with a grinder the cutted end smoothed.
Bamboo Lattice Wall, with bent and cut nail (1) 2006/09/07 07:53
Bamboo Lattice Wall, with bent and cut nail (2) 2006/09/07 07:53
Bamboo Lattice Wall, with bent and cut nail (3) 2006/09/07 07:53
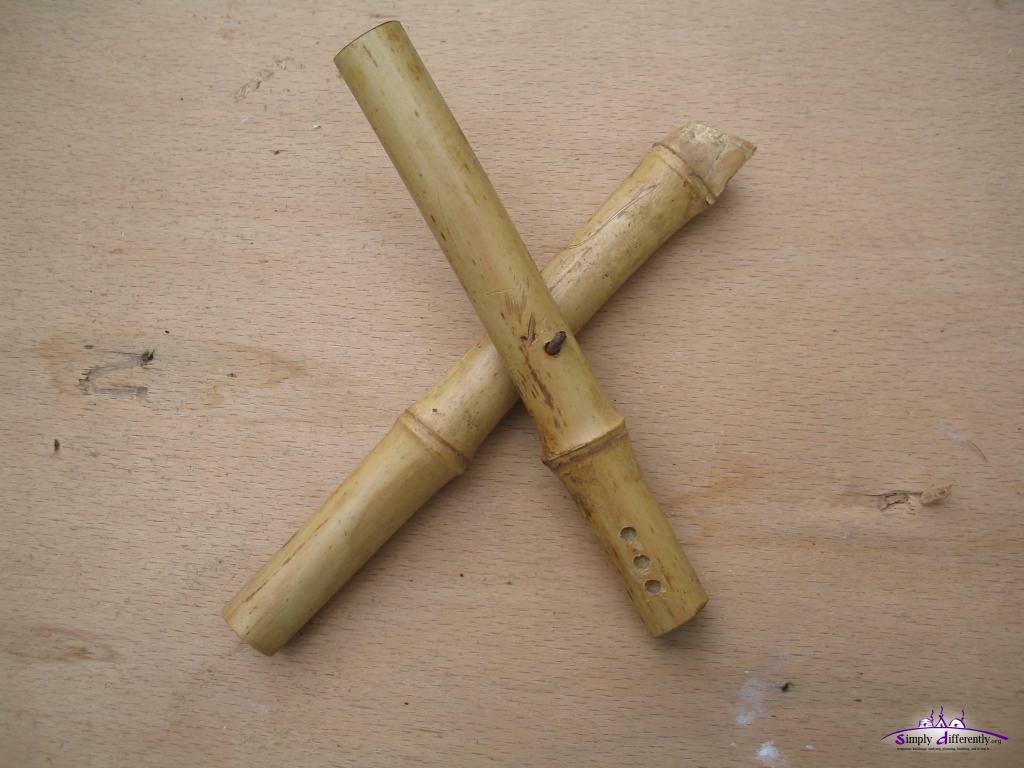
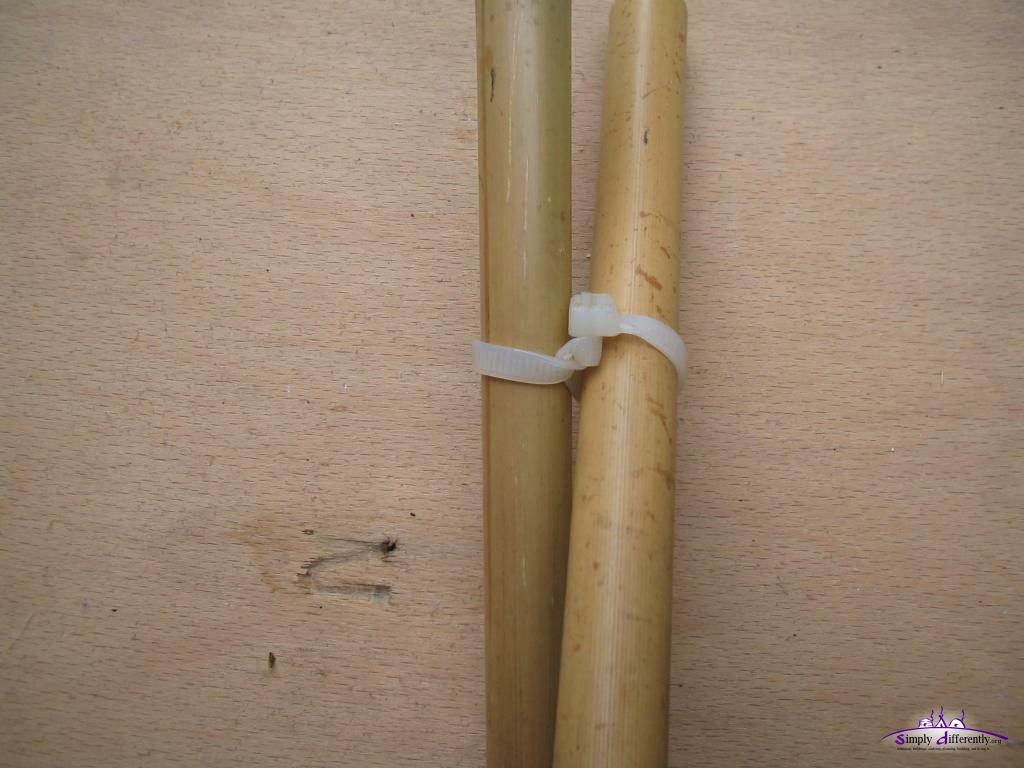
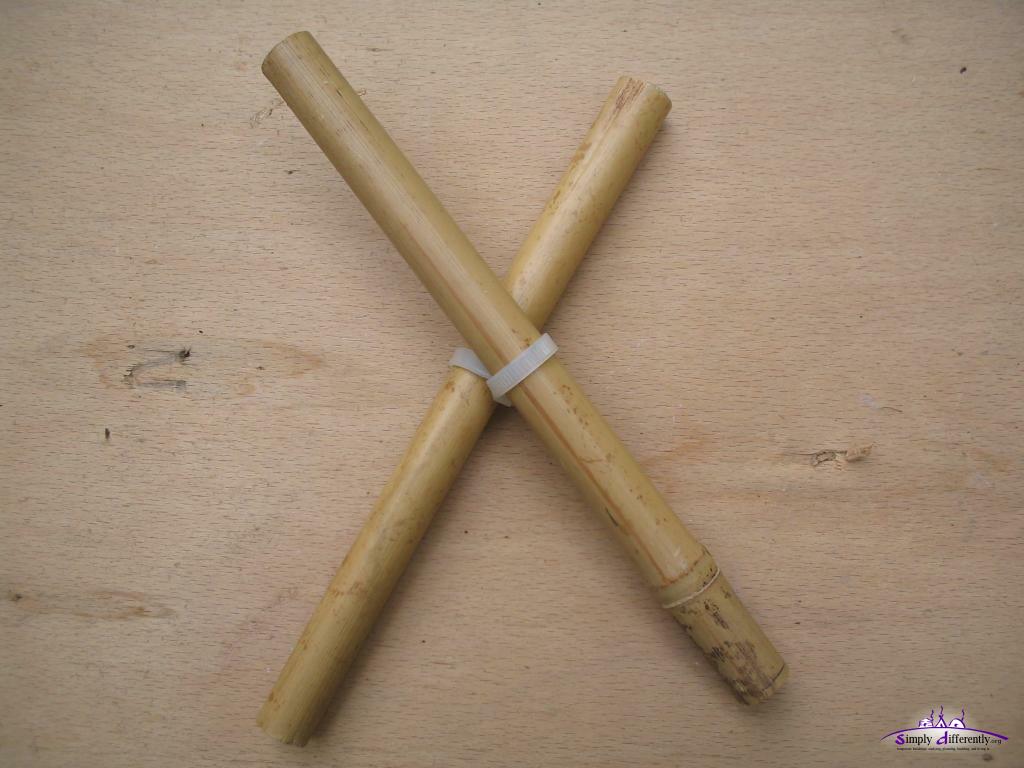
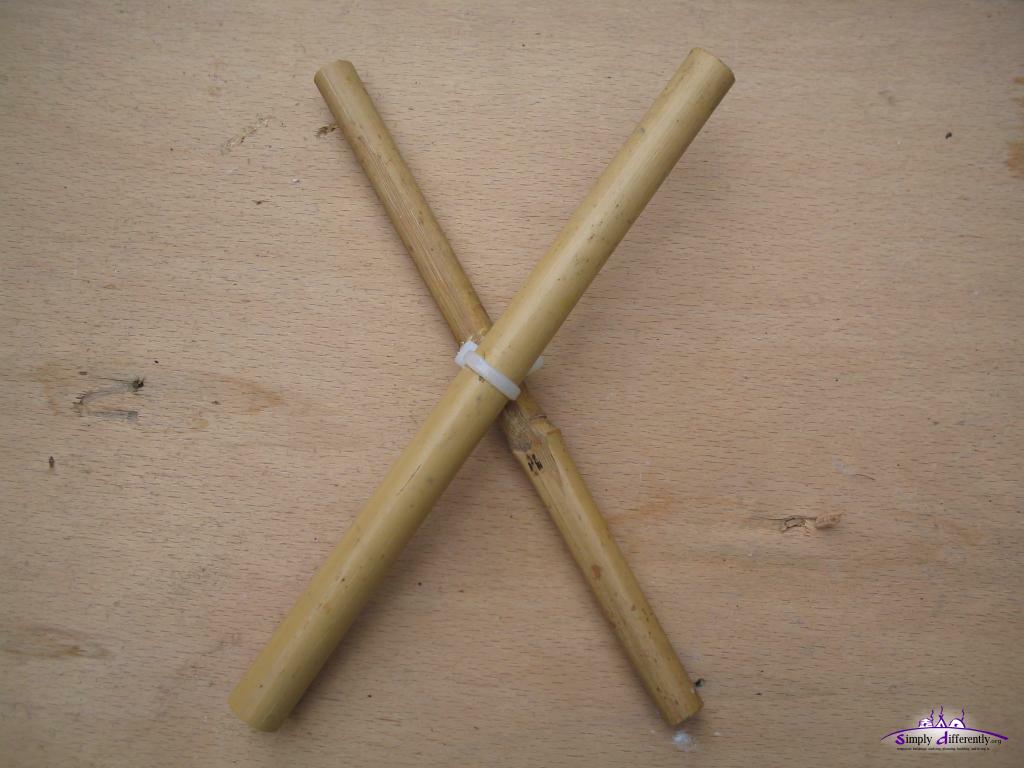
Single Cablebinder without Hole
A knot is made between the laths, and finally tied.
Bamboo Lattice Wall, with single cablebinder (1) 2006/09/07 07:53
Bamboo Lattice Wall, with single cablebinder (2) 2006/09/07 07:54
Bamboo Lattice Wall, with single cablebinder (3) 2006/09/07 07:54
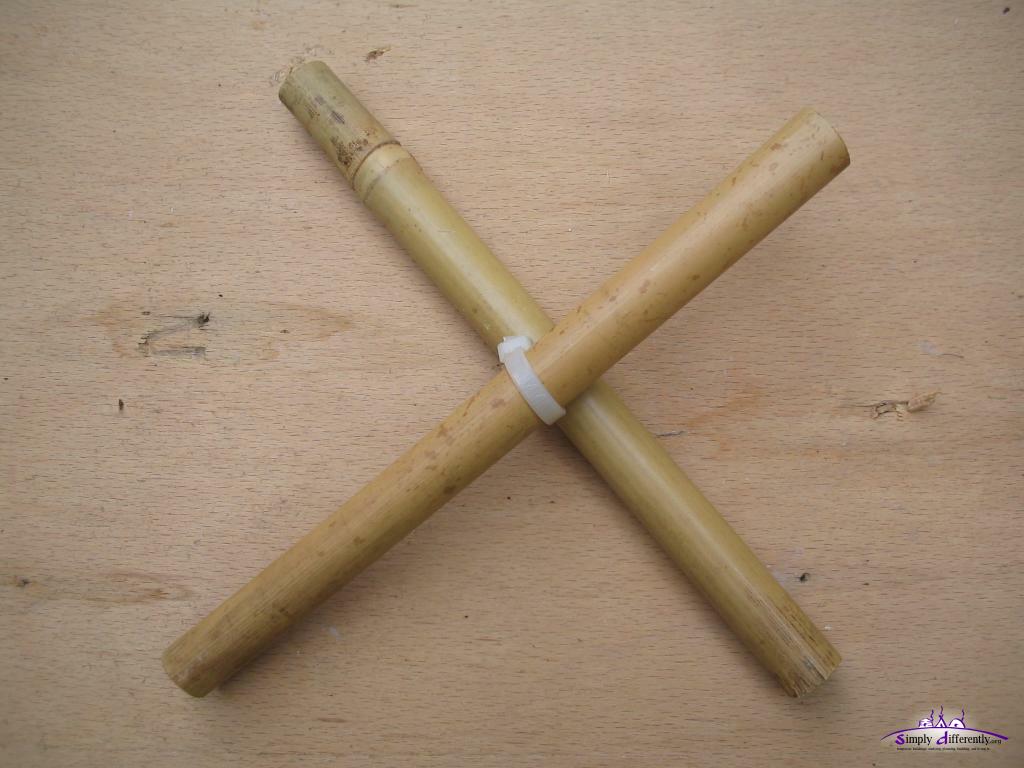
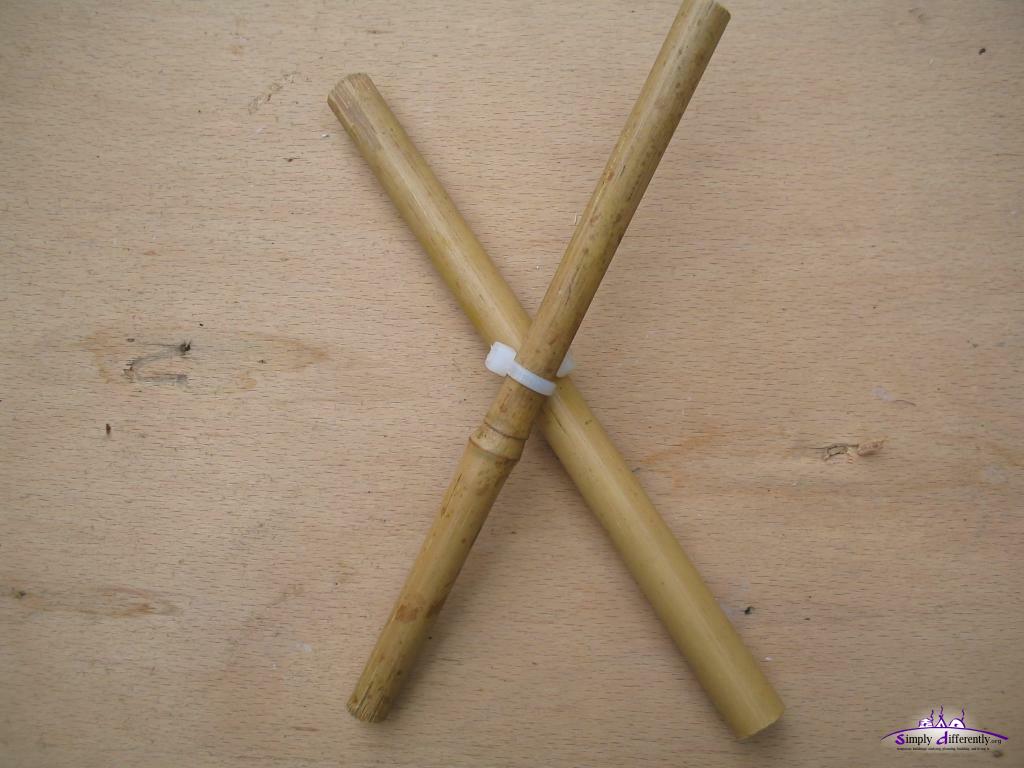
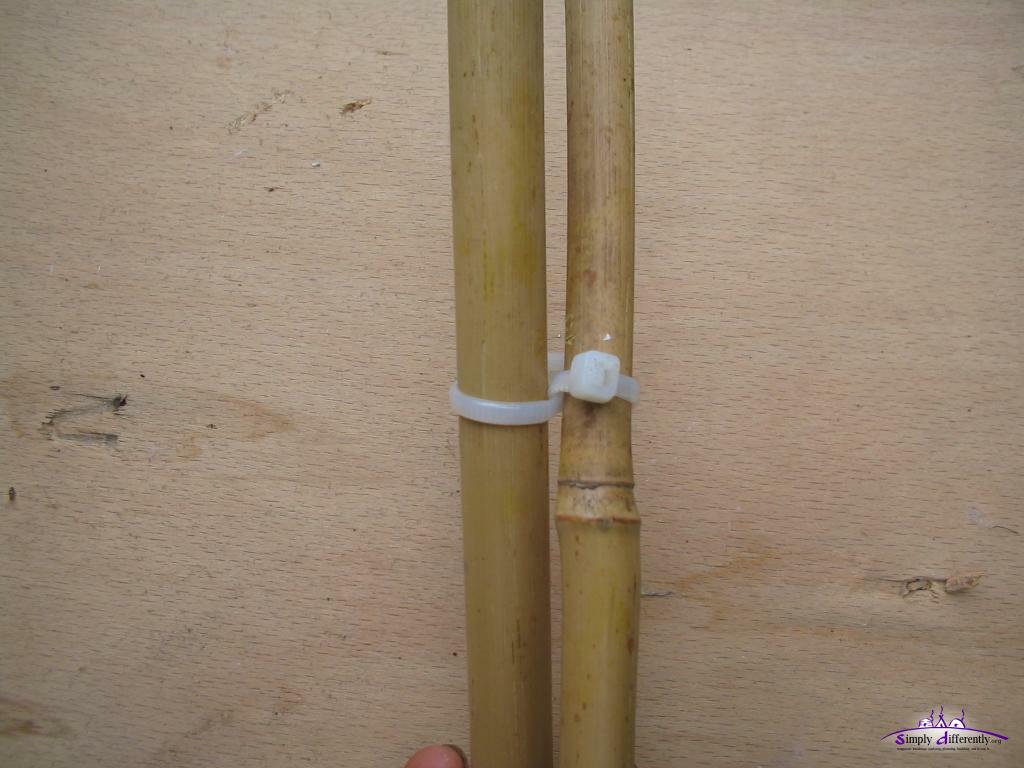
Double Cablebinder without Hole
Both laths are held with two cablebinders interlocked. This way is rather for short periods of time where the wall is compressed as otherwise the cablebinders wear out and the junction with the cablebinders slide away.
Bamboo Lattice Wall, with two cablebinders (1) 2006/09/07 07:54
Bamboo Lattice Wall, with two cablebinders (2) 2006/09/07 07:54
Bamboo Lattice Wall, with two cablebinders (3) 2006/09/07 07:54
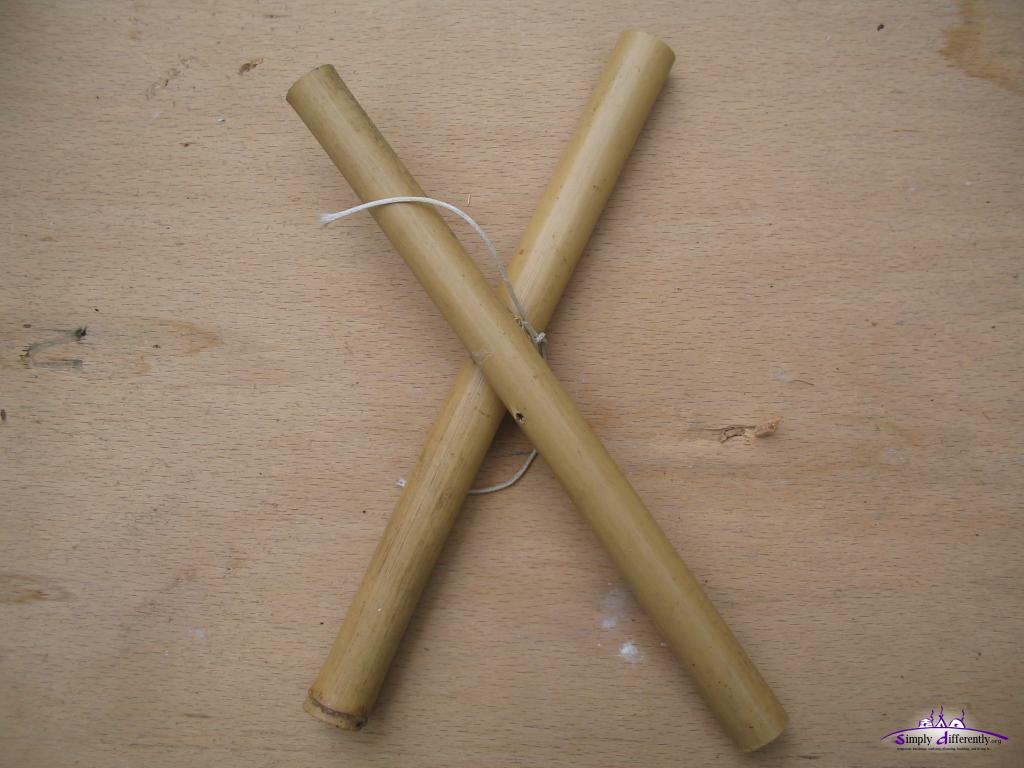
Bamboo Lattice Wall, with thread (1) 2006/09/07 07:54
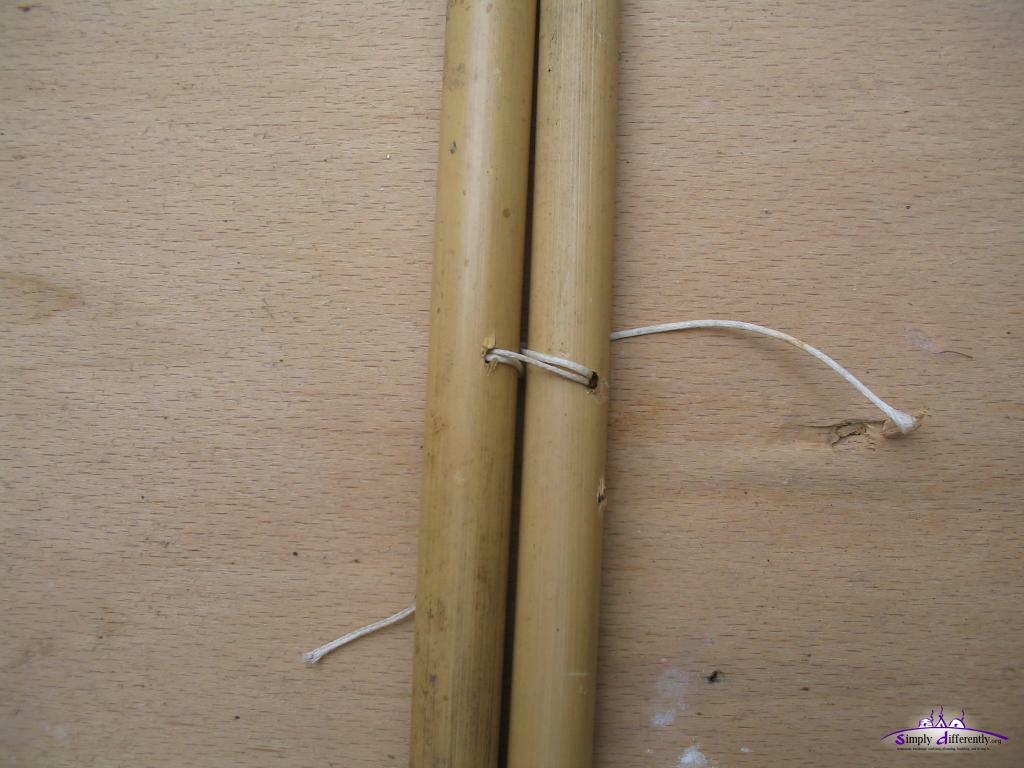
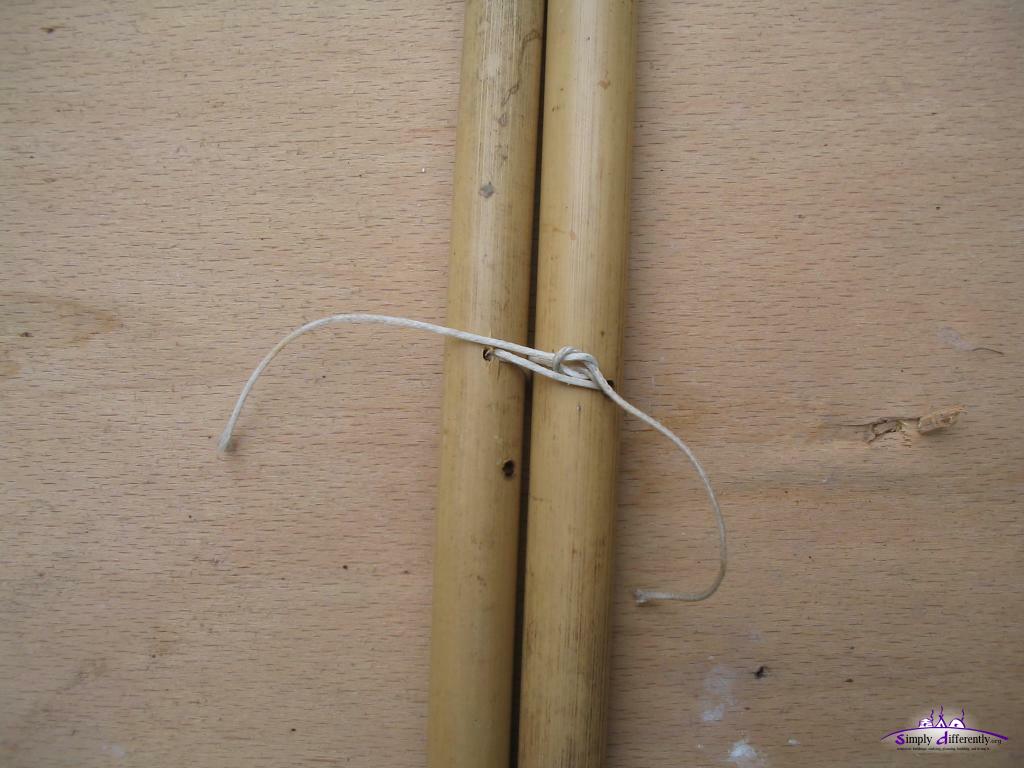
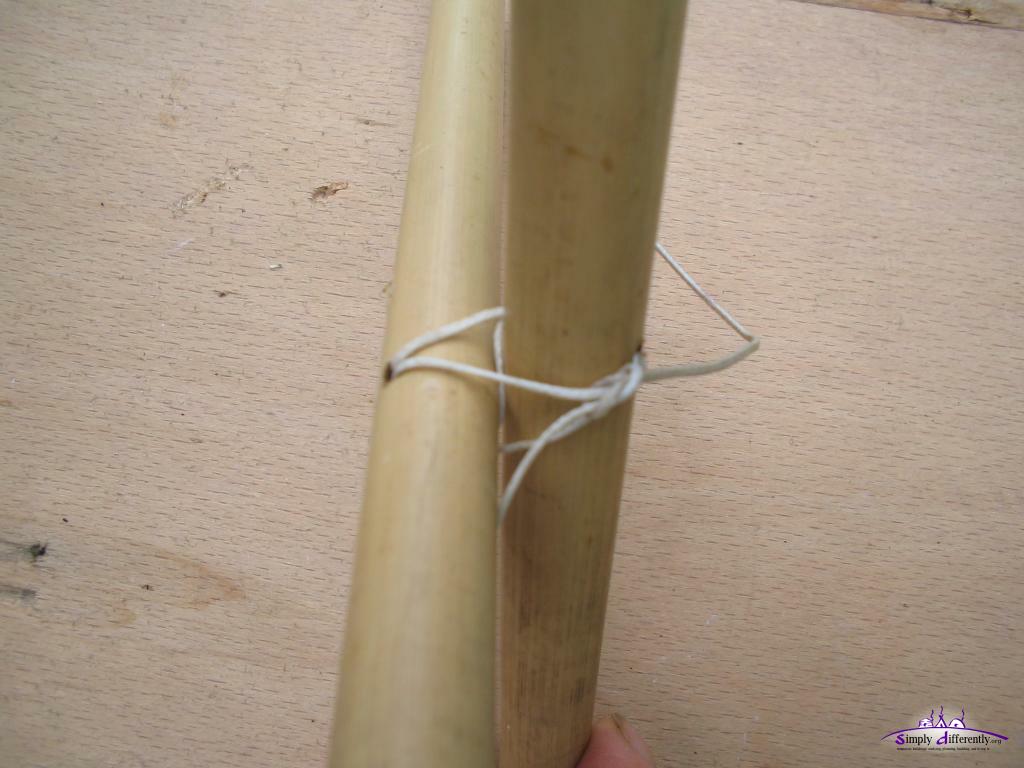
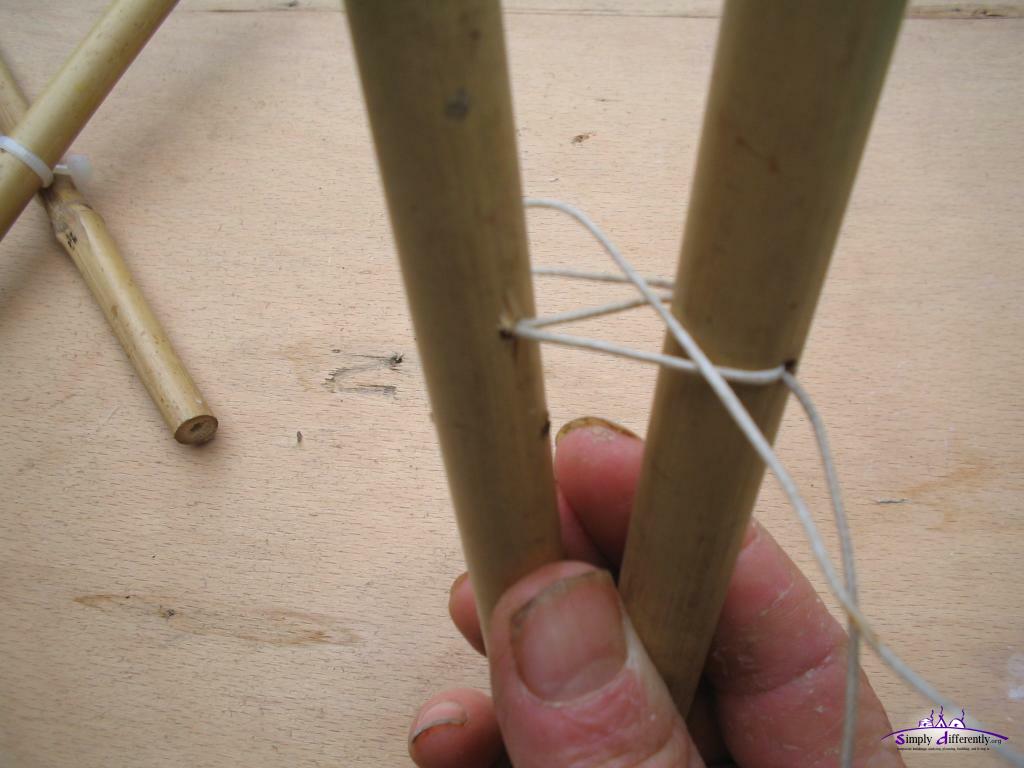
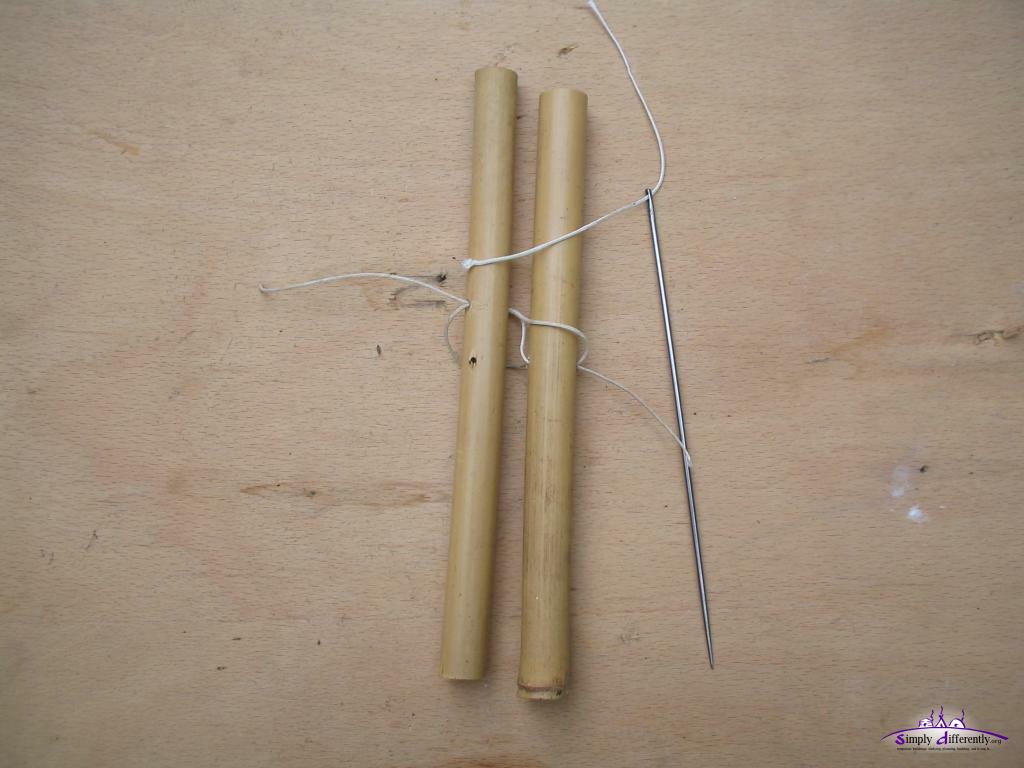
Thread with Hole
This option is rather interesting using a needle and a strong thread to bind two laths together.
Bamboo Lattice Wall, with thread (1) 2006/09/07 07:54
Bamboo Lattice Wall, with thread (2) 2006/09/07 07:55
Bamboo Lattice Wall, with thread (3) 2006/09/07 07:55
Bamboo Lattice Wall, with thread (4) 2006/09/07 07:55
Bamboo Lattice Wall, with thread (5) 2006/09/07 07:55
Bamboo Lattice Wall, with thread (6) 2006/09/07 07:57
Other Options
You can also bind the two sticks with a thread without a hole, just make sure the knot doesn't move, e.g. glue it.
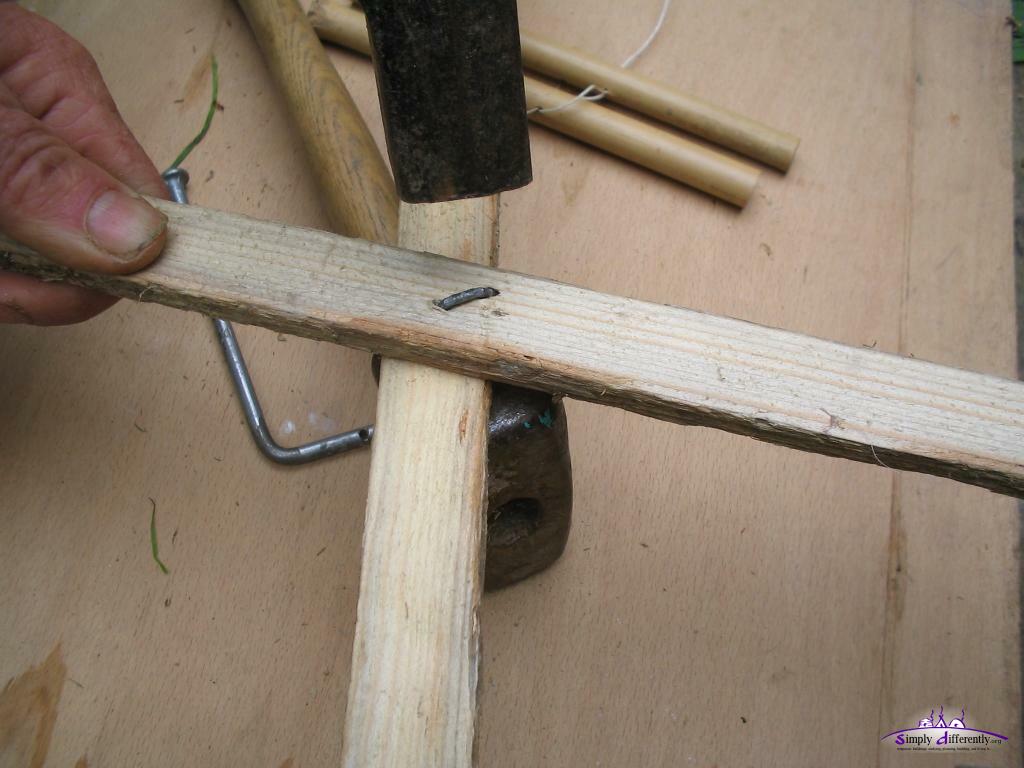
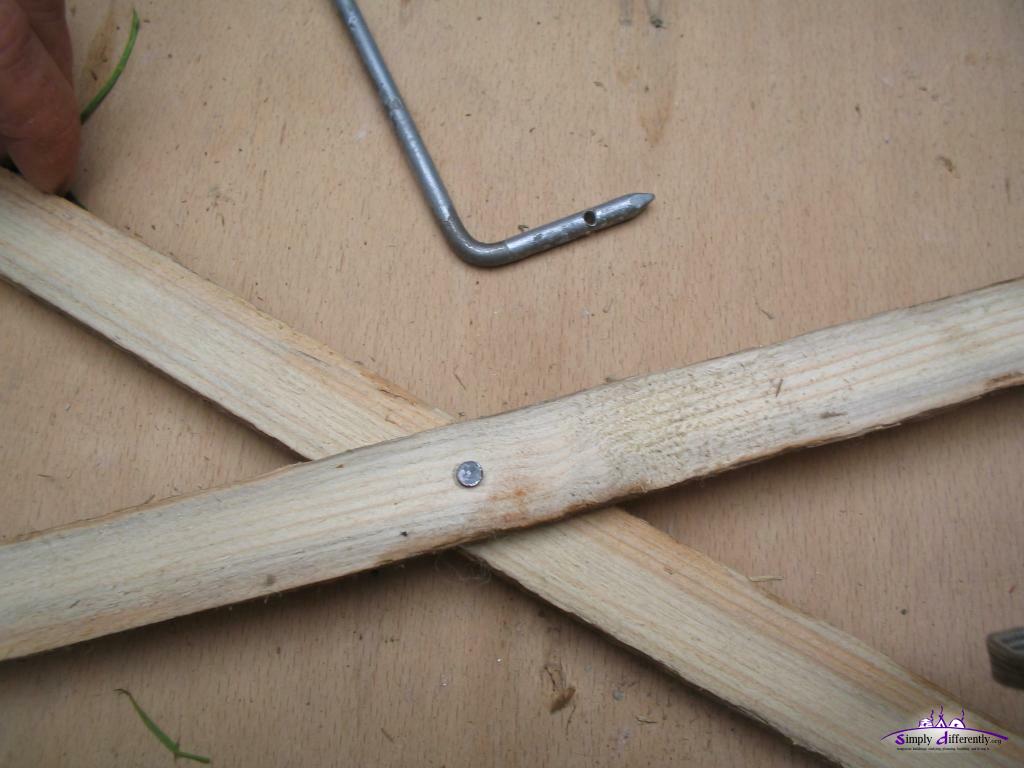
Flat Timber Lattice Wall
Following option is also contributed by Claudius Kern:
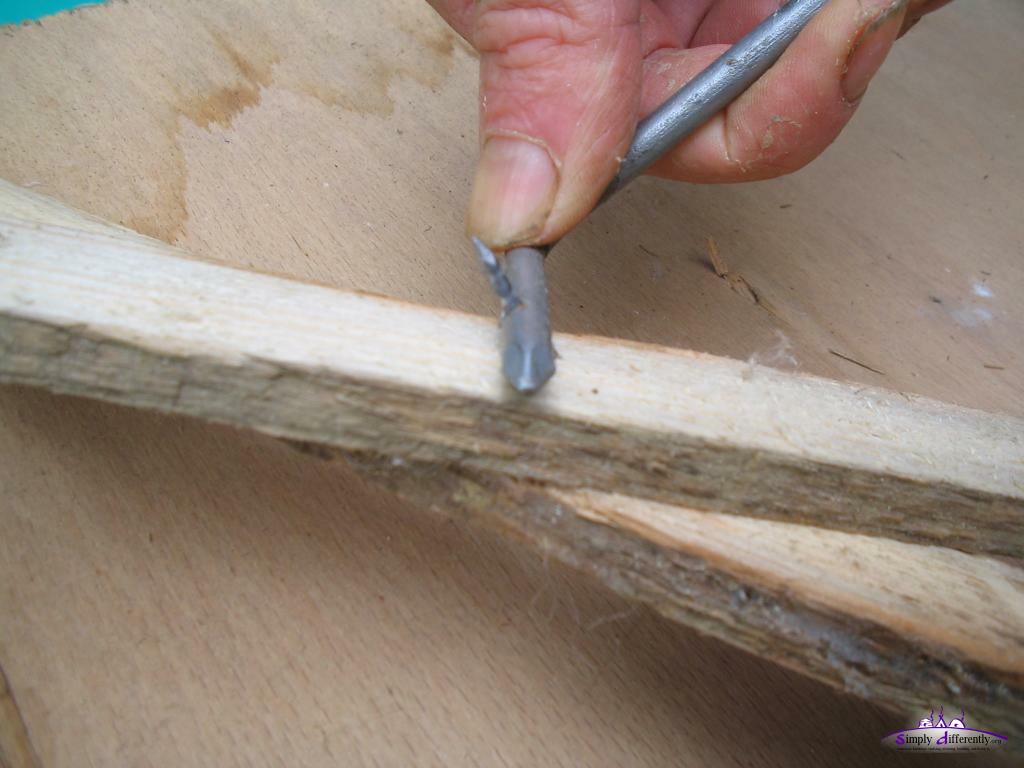
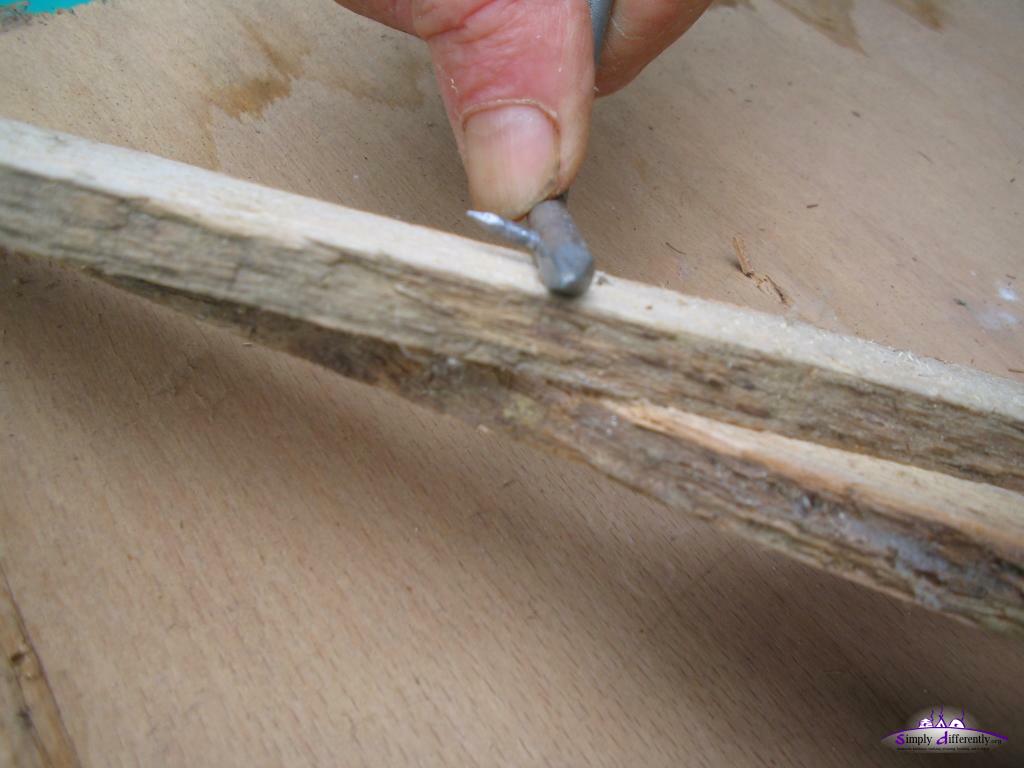
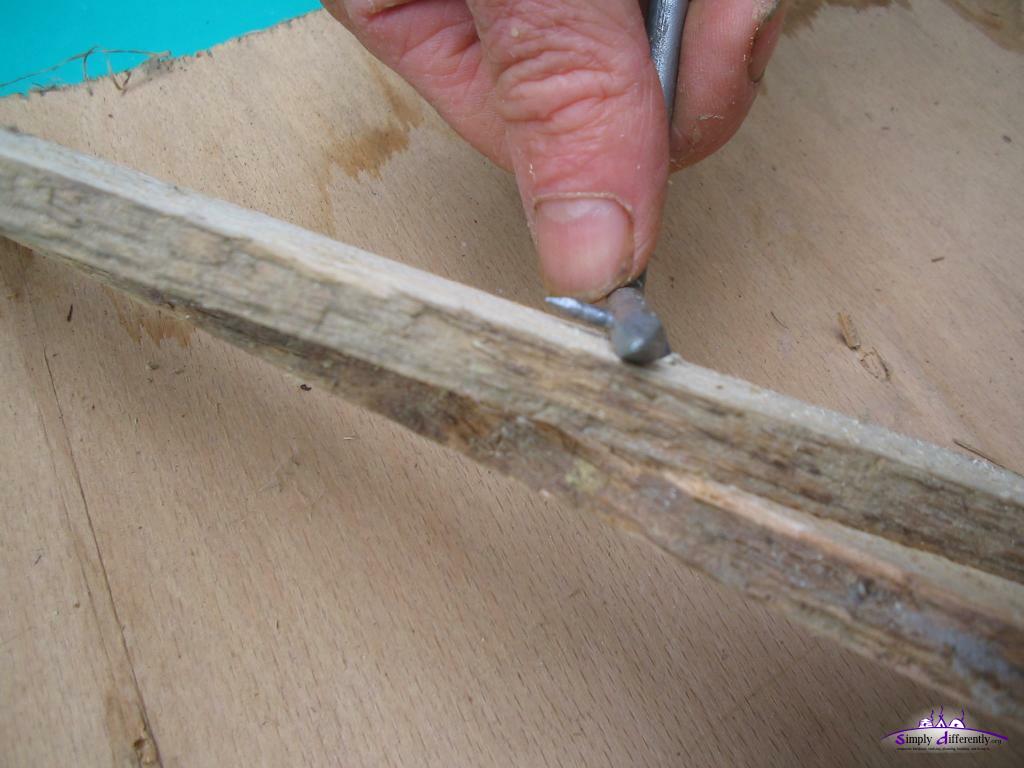
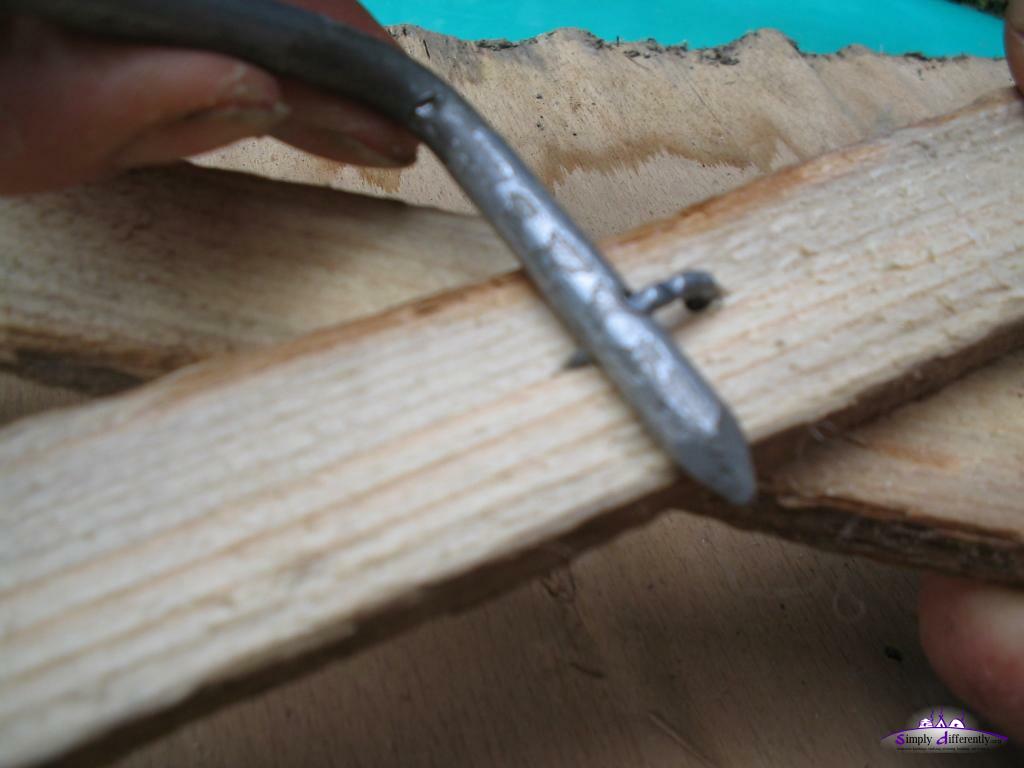
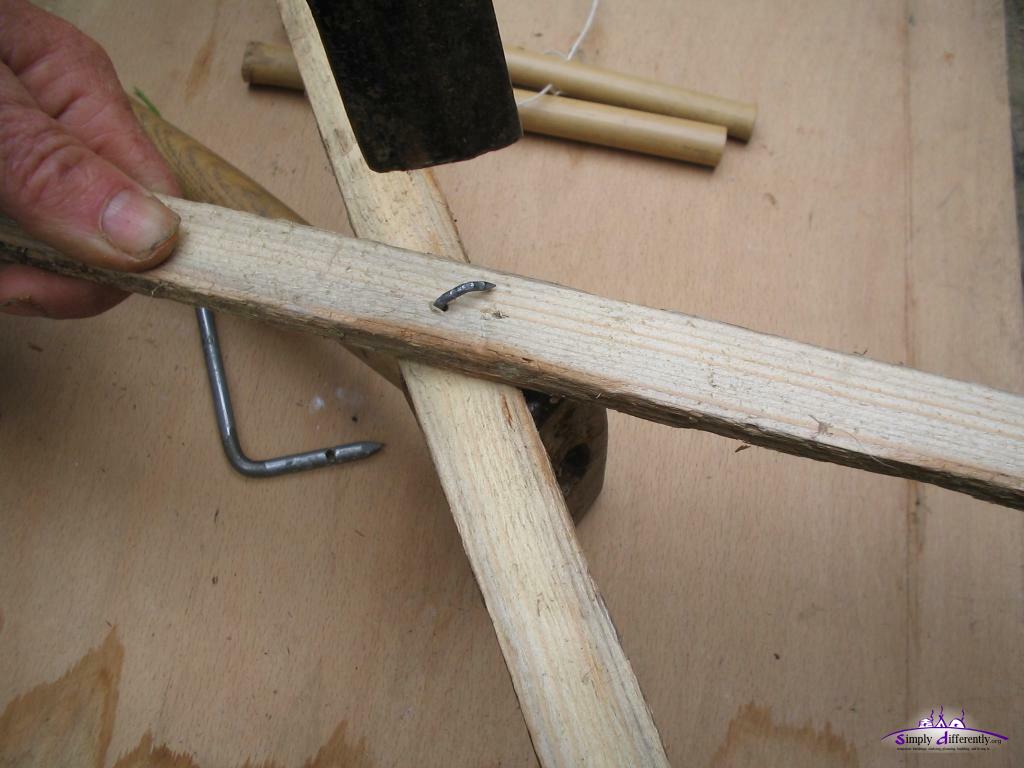
Bent Nail
As you can see you need a special homemade tool, a thick and strong nail where you drill a hole which you can use to bend a smaller nail then.
The bent nail is then hammered back into the wood, no cut.
Flat Timber Lattice Wall, with bent nail (1) 2006/09/07 08:09
Flat Timber Lattice Wall, with bent nail (2) 2006/09/07 08:10
Flat Timber Lattice Wall, with bent nail (3) 2006/09/07 08:10
Flat Timber Lattice Wall, with bent nail (4) 2006/09/07 08:10
Flat Timber Lattice Wall, with bent nail (5) 2006/09/07 08:11
Flat Timber Lattice Wall, with bent nail (6) 2006/09/07 08:11
Flat Timber Lattice Wall, with bent nail (7) 2006/09/07 08:11
Flat Timber Lattice Wall, with bent nail (8) 2006/09/07 08:12
Other Options
Cord, make a small hole in order to pull the cord through, and make two knots
Screw and nut, very solid but becomes pricey
Termination of Wall Sections
The termination of a khana-section you use a single lath (making 1/2 twin or roof pole junction), and cut the overextending laths and flip them (according the illustration), and shorten them a bit - this way you have almost no waste of laths or requirement of extra laths. The amount of laths nlaths from the calculator gives extra laths for the ending and junctions of the khana-sections as if you did not reuse them according the illustration, e.g. in case you choose another joining method for the khana-sections.
The calculator gives you the opportunity to define the length of the sections of the wall / khana, those sections (e.g. 4 - 7m long) make it easier to handle.
In case of bamboo khana I made mine 10m long per section, still possible to lift by one person.
The way you separate and bind it together also does affect the counting, e.g. you count the lattice top junctions (twins), there the roof poles / uni lie on (unless you put the roof poles / uni on the top wall rope and not on the khana junctions direct, then simply ignore the rest of this section), two methods:
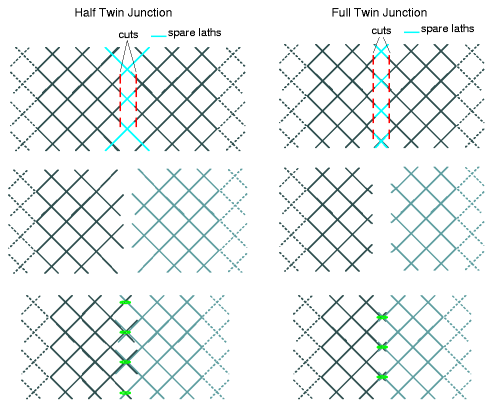
Khana Section & Junction
You may split the ongoing (while you build it) khana according this illustration. Later bind the separated khana sections with a waiste belt, cord or klett belt, depending if you plan to put up and take down the yurt frequently.
Half Twin Junction: You split two twins (top junctions), and put the next top twin together; the khana sections are (n+1/2) + (m+1/2): it's ideal when you require an odd amount of (twin) junctions where the poles lie on.
Full Twin Junction: You cut away one junction entirely, and put the next lower junctions then together; the khana sections are n + m: it's ideal when you require an even amount of (twin) junctions where the poles lie on.
What may sound a bit complicate, here three examples:
64 poles yurt, 3 poles wide door, 2 khana sections: (64 - 3) / 2 = 30.5 poles each khana section. Since I have 30 + 1/2 per section, I may use the "half twin junction" to put the two together; or I do 30 + 31 per section, and use "full twin junction" then. My first yurt was 64 poles, 3 pole wide door, and two sections, and for sake of symmetry I used 30 1/2 and 30 1/2.
64 poles yurt, 4 poles wide door, 3 khana sections: (64 - 4) / 3 = 20 poles each khana section. For this case I use the "full twin junction" and keep the top junctions intact for all sections.
64 poles yurt, 3 poles wide door, 3 khana sections: (64 - 3) / 3 = 20 + 21 + 20 junctions per khana sections, you could also make 20 1/2 + 20 1/2 + 20.
A slight advantage may have "half twin junction", as there is one junction more to bind, and may provide a bit more stability - but I won't consider this really a main advantage. You may also say, the top junction you do anyway with a solid cord or screw to keep it stable, and you prefer "full twin junction" in order not to split apart the top junctions when taking down the yurt. As mentioned, for sake of symmetry I did 30 1/2 twice, to have the junction of both sections exactly the opposite of my door.
The profile of the khana can be 2-4cm width, and 1-2.5cm thick, and the lkhana long as given by the calculator.
Wooden laths (cheap "roof lath" of fir for house construction), others prefer hazel sticks, or also bamboo sticks but those tend to split when exposed to sunlight unless you paint them bright so they don't warm up with the sunlight. Bamboo provides strength at light weight, and may be most cost effective if bought by a wholesale source.
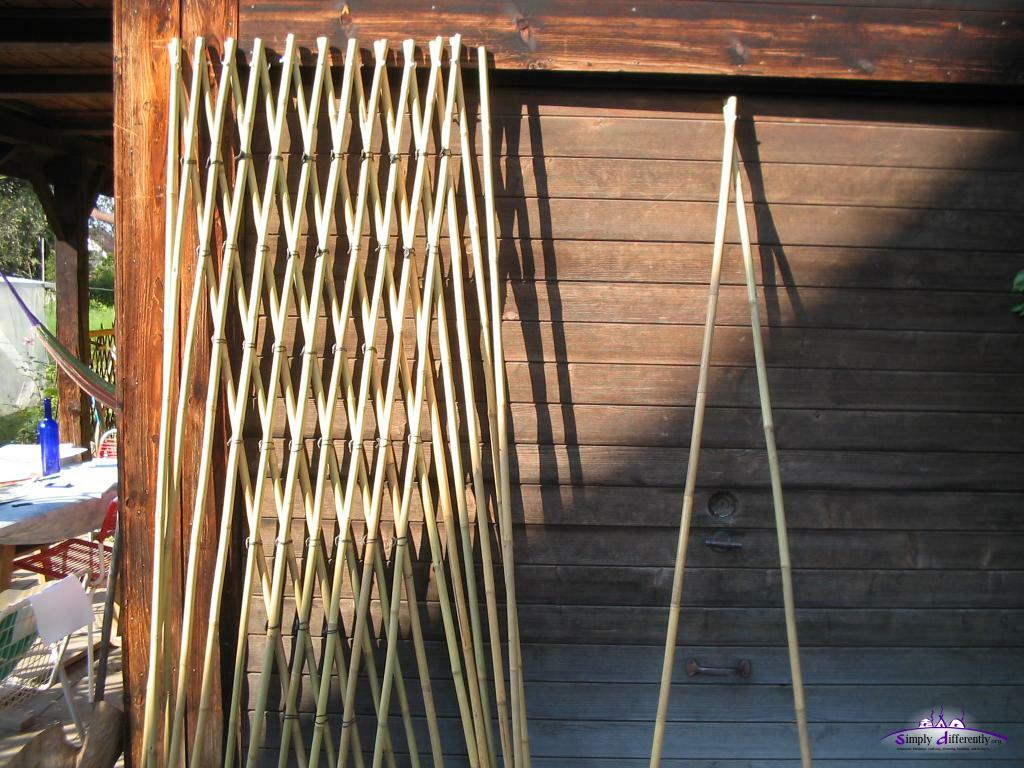
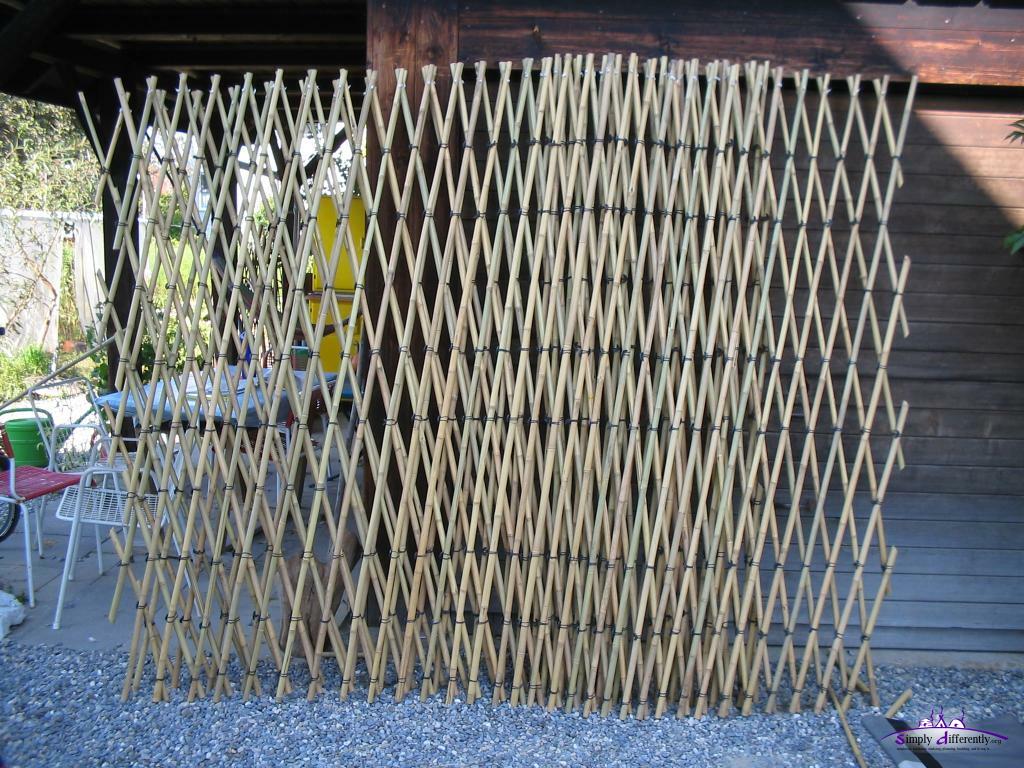
The way I did the wall / khana, with bamboo:
Drilling holes on the top, the rest of the "holes" using rubber binder as connectors 2005/09/20 13:21
Closeup rubber binder 2005/09/20 13:21
The rubber binder 2005/09/21 08:57
Closeup khana, binding vertically - much easier 2005/09/22 15:03
Adding twin poles individually 2005/09/22 15:04
Finished khana, two sections, twice 30 1/2 total 61 junctions for poles, the door will be 3 poles wide 2005/09/23 13:04
Door / Khaalga
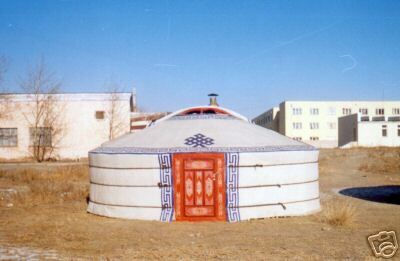
Traditional Yurt / Ger (courtesy UlaanTaij Ltd)
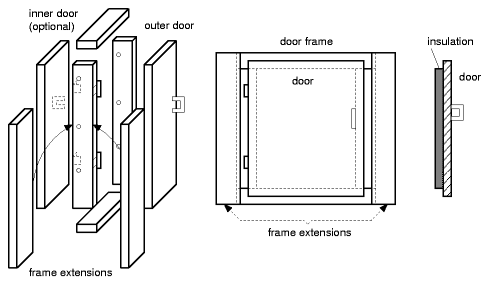
For the wintertime a real wooden door aka khaalga is recommended, and I also did a solid wooden door, with door frame / nars and some insulation against draft within the door frame.
The door isn't considered in the yurt calculation, best you take the resulting w, and decide how many poles will lie on the doorframe, e.g. three poles, which means it's 3 times w wide. As mentioned in the previous chapter, subtract those roof-poles from your khana junctions.
Yurt Door Example
Attach the door as illustrated, make "full twin junction" endings fit the doorframe. Attach the khana tightly to the door - be aware little to no pulling should occur as the main khana rope going at the top bar of the doorframe which holds the khana (with the door) all together; and rather do not attach the rope end on the doorframe, unless you know the doorframe can withstand the force which is applied by the final yurt roof pushing on the khana and the rope then. I tie this main rope at both ends together so the doorframe isn't under any mechanical stress.
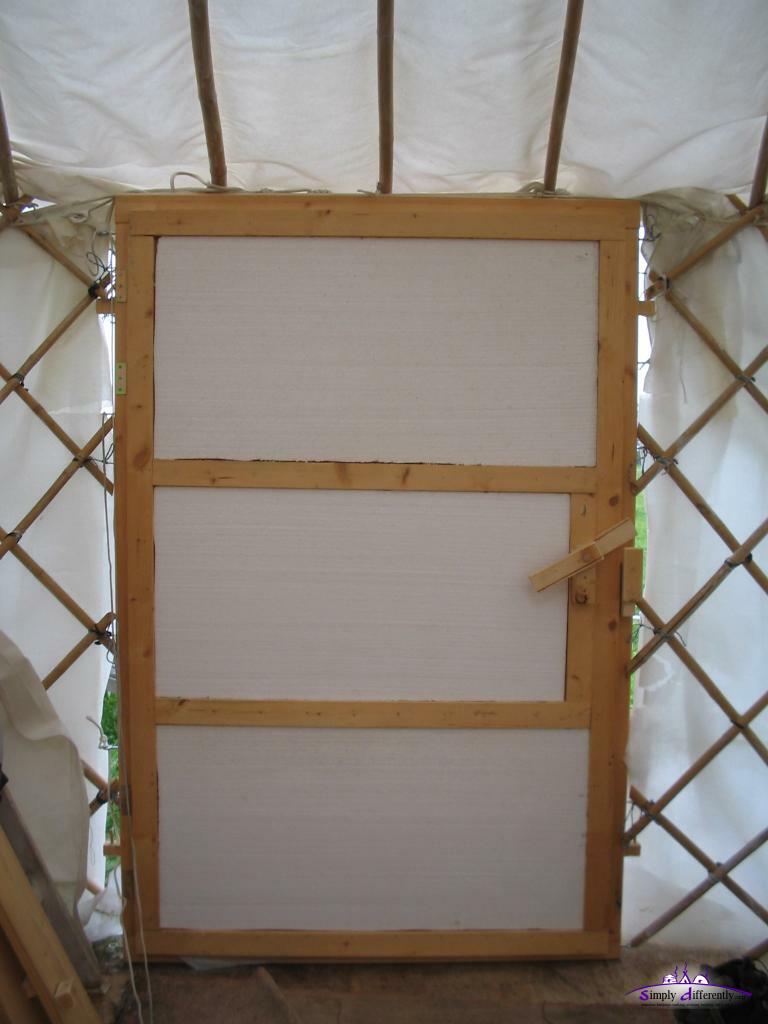
Door Construction
Khaalga / Door Construction Example
Either put together a door with some laths, or get a solid one piece wood plate for the door, or even use an existing door and shorten it. Traditional mongolian doors have two doors, one outer which opens to the outside, another inside, which opens to inside - for insulation.
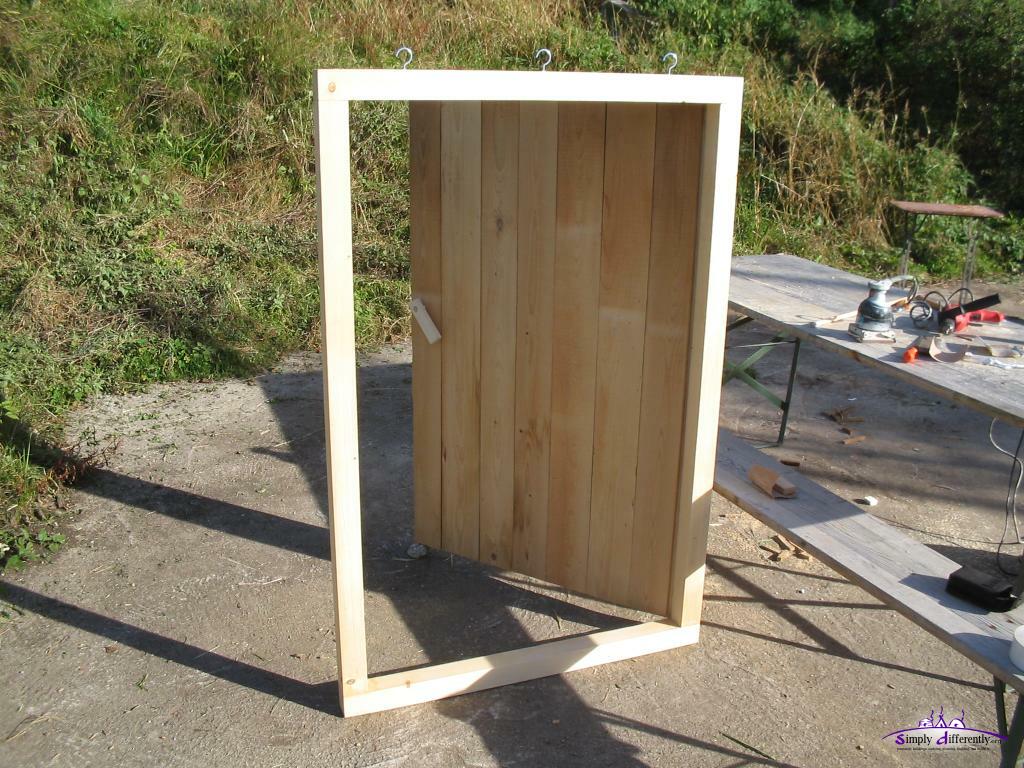
Here a vertical laths based door as I did for my yurts:
Door Construction 1) - 4)
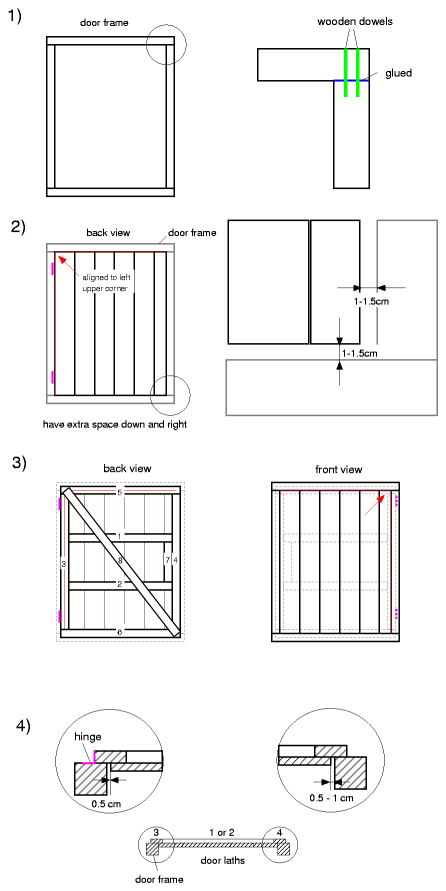
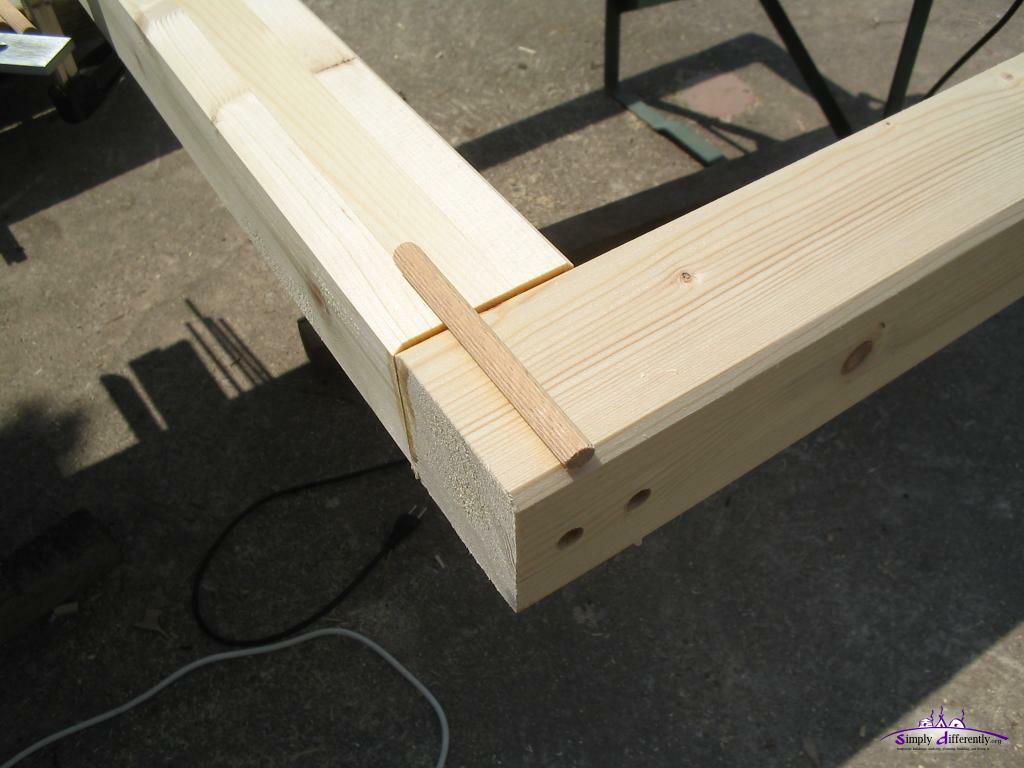
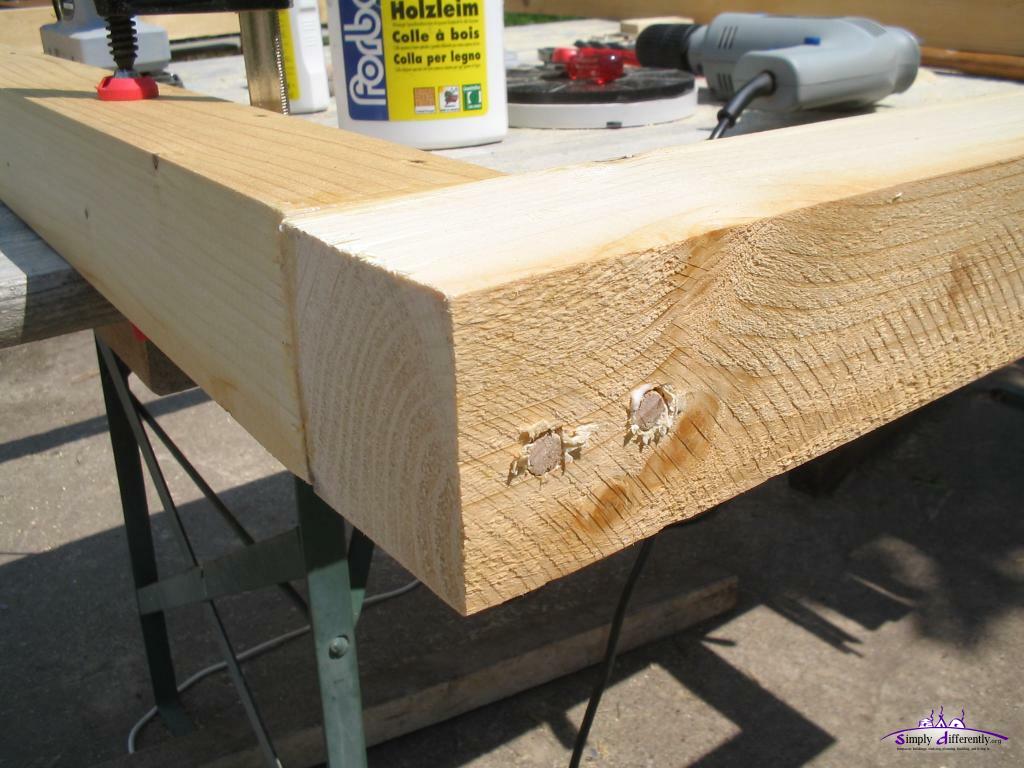
1) Door Frame:
First make a frame, I suggest the horizontal timber the full length, in case you plan to attach the main rope on the frame; then no tension will apply to the vertical timber.
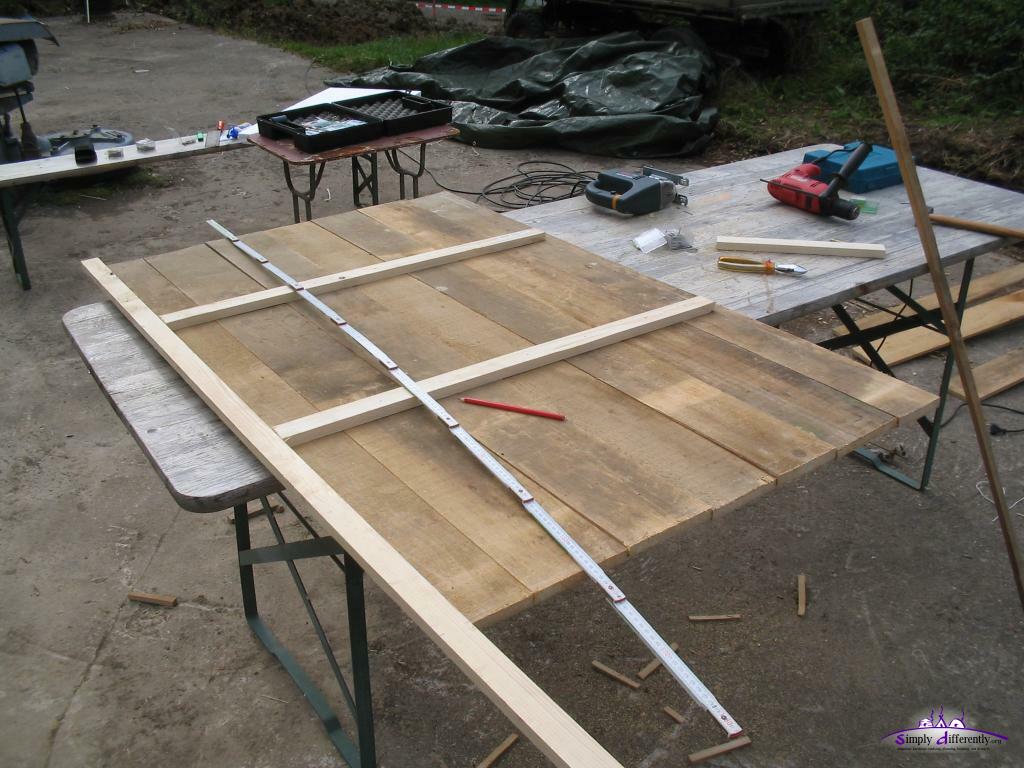
2) Layout of Laths:
Lay the finished frame down, horizontally (e.g. on a table), and lay then all laths into the frame, and align all laths to the upper left corner, and leave extra space at the right and at the bottom. 1 - 1.5cm is good space, as when you attach the hinge later, those aren't exactly and the finished door with its weight will lean to the right and bottom, and the space you have there will be used, e.g. 0.5 - 0.75cm.
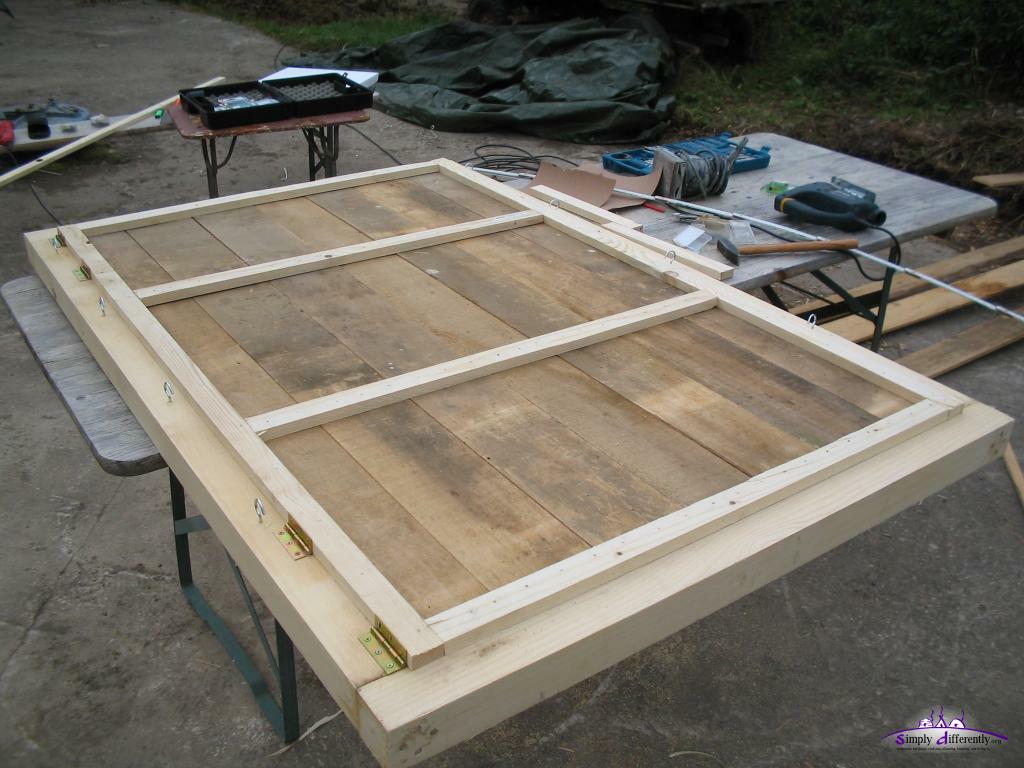
3) Fixating the Laths:
While the laths still lay within the door frame, attach fixating lath 1 and 2, glue and nail it, and make sure the alignment and the spacing remains (it might move while you glue and nail) - this part is the most crucial and important step in building a door.
Then remove the frame, and glue and nail the remaining fixation laths 3, 4, 5, 6 on the vertical laths. At last I usually put another lath 7 to it, which gives me a strengthened area where I can drill a hole for the doorhandle then.
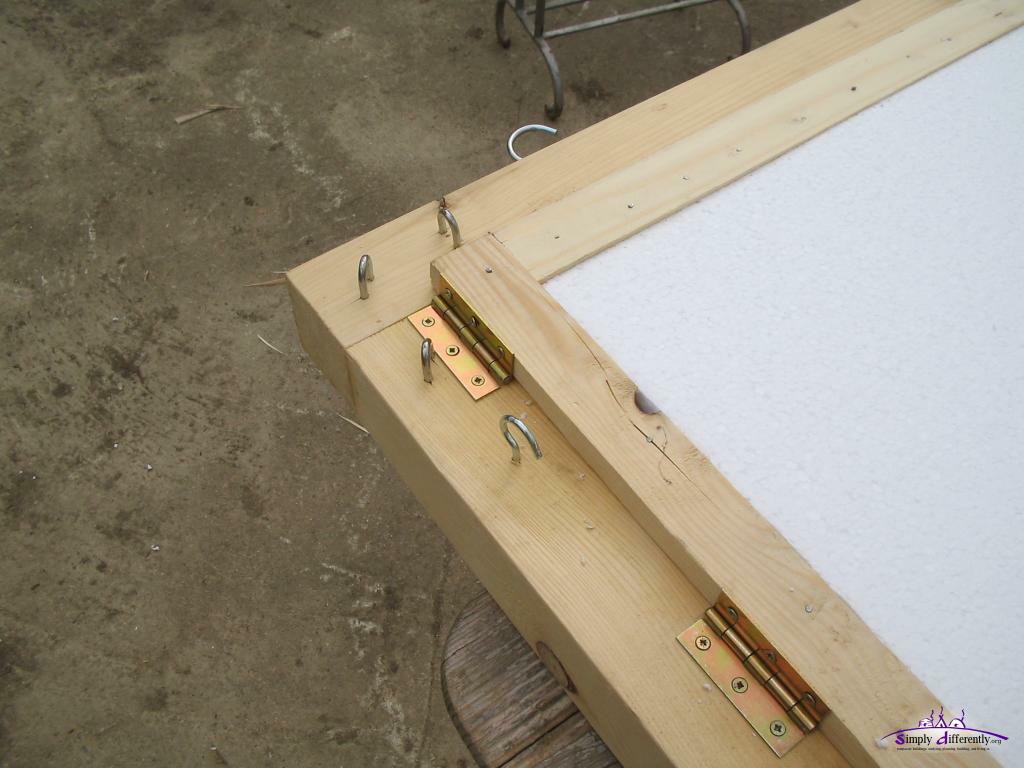
4) Attaching of the Hinges:
Once the fixation laths are fixed (glue dried), put the door on the doorframe again, this time the frame below, and the door on top, and orient the door again that way you have sufficient space when the door with its weight leans the opposite side of the hinge . . and then attach the hinges, I usually use four hinges instead of just two.
My door construction (different photo series):
Door frame with dowel 2006/06/13 13:01
Door frame with wooden dowels, detail view 2006/06/13 12:51
Door construction: laths vertically 2005/10/22 11:56
Complete door with hinge 2005/10/22 13:05
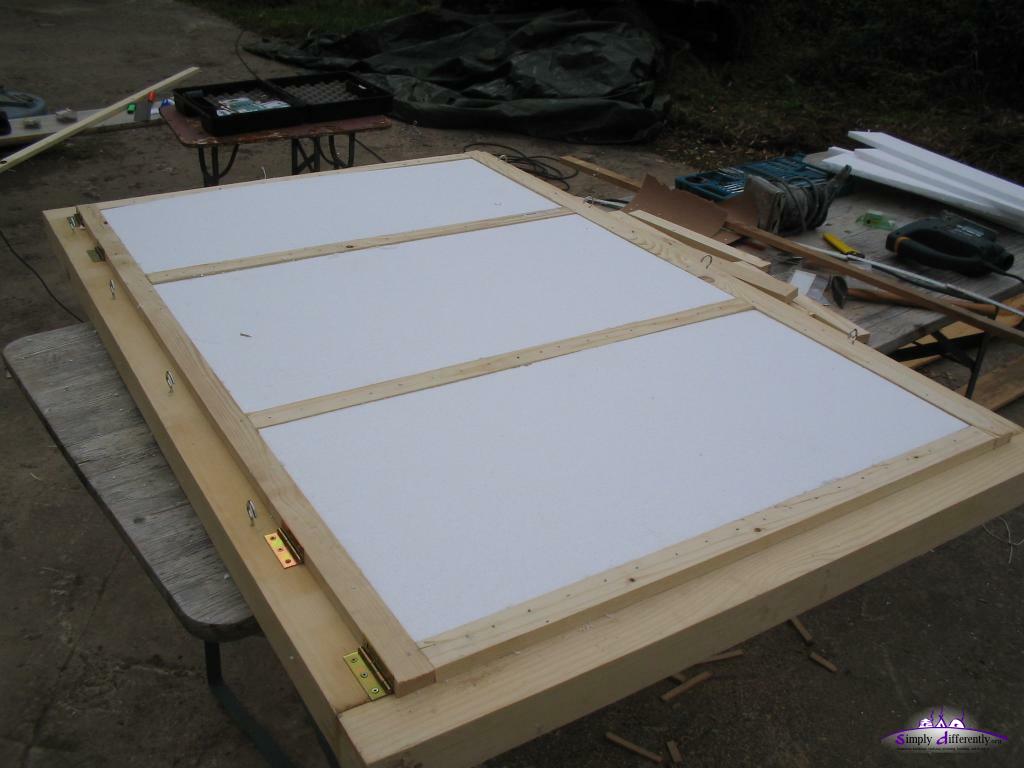
Sagex in between for insulation 2005/10/22 13:20
Door closeup: where the main wall/khana rope goes through 2005/10/22 13:31
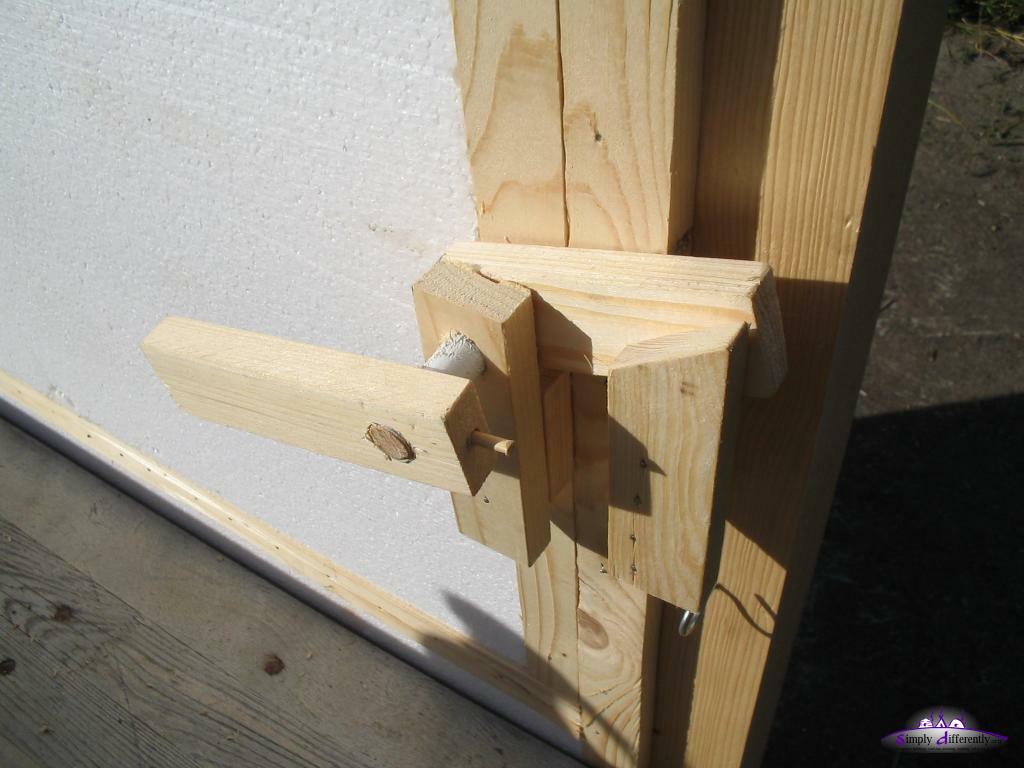
Simple door closing/locking mechanism 2005/10/26 14:17
2005/10/26 14:18
Traditionally the door / khaalga and the crown-wheel / toono are carved and painted colorful with spiritual symbols, as the yurt / ger isn't just a nomadic house, but also a metaphor of the creation itself with each of its parts, such as the toono and the doorframe / nars, etc. I may later add also some of the spiritual consideration of the yurt / ger in the mongolian culture, as well some of the general spiritual perspectives of nomadic or alternative living in modern times.
Insulation
Depending on the climate, I recommend to separate the functions:
rain cover
thermal insulation
interior
Some add over the rain cover an additional cover for protecting the rain cover from UV radiation, e.g. I use PE for the rain cover, and I will consider to add another layer over the rain cover, but this will decrease the sliding ability of PE.
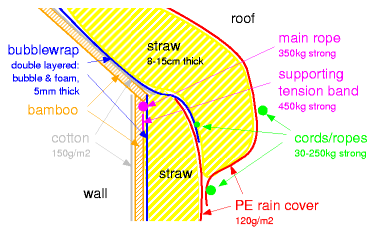
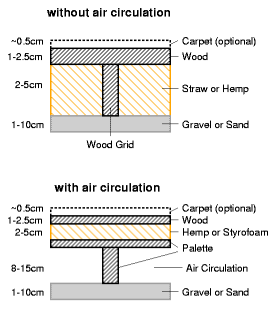
Examples of Insulation Layers of the Wall
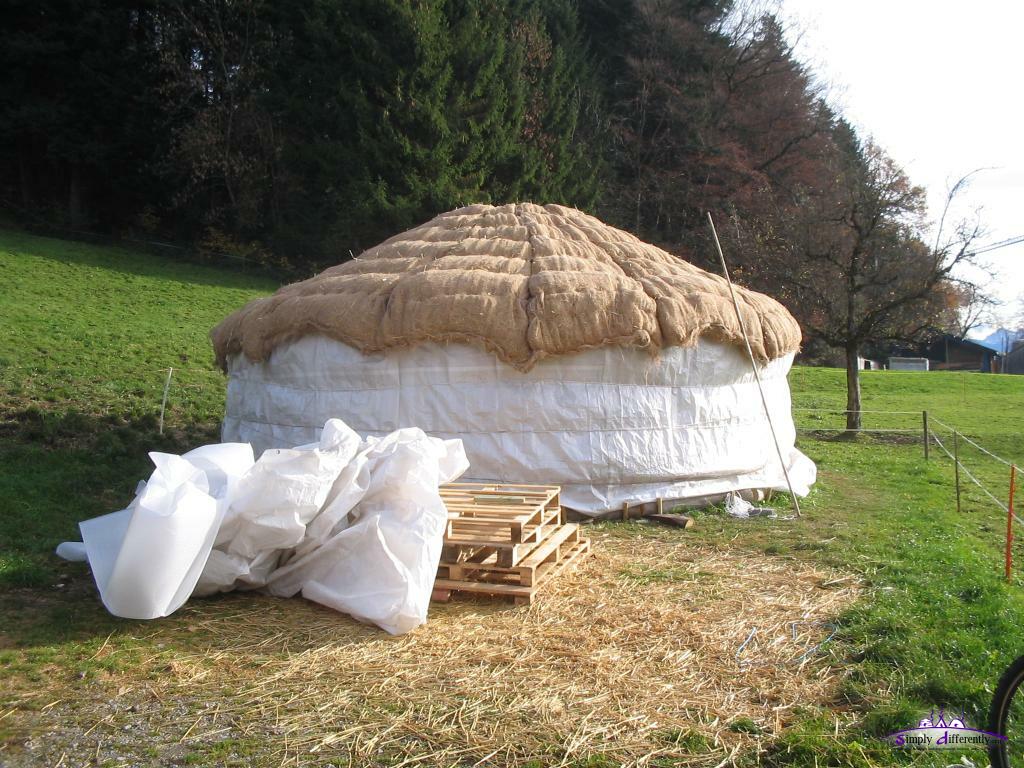
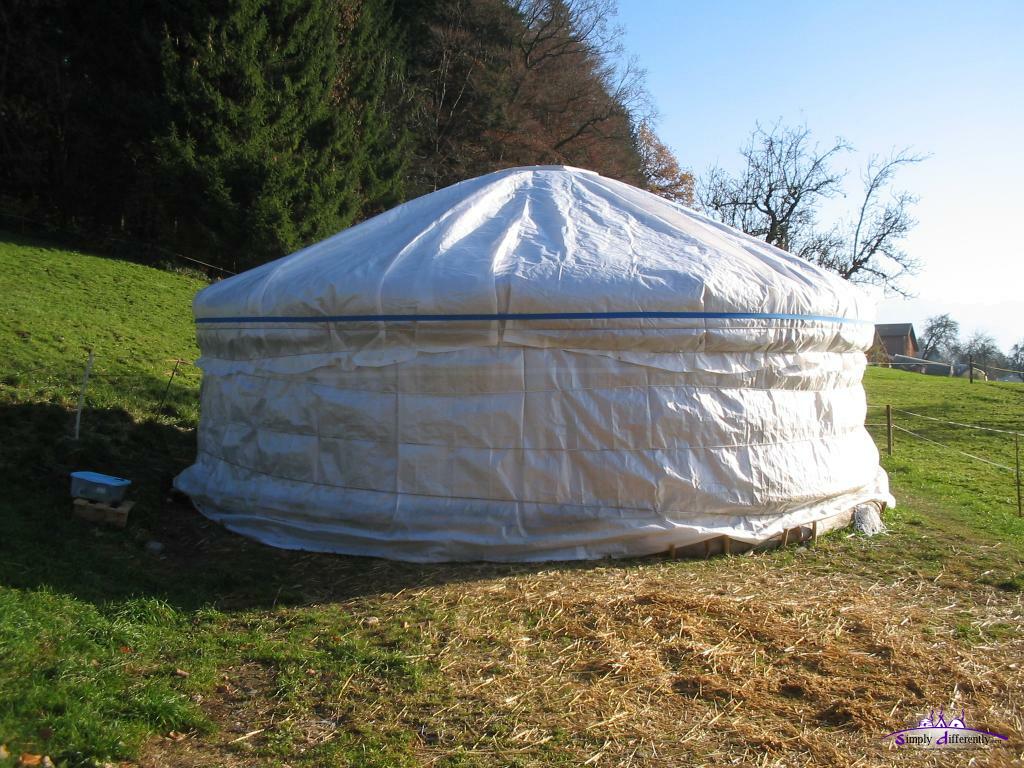
Rain Cover
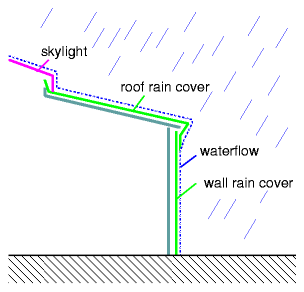
Waterflow of on the rain covers
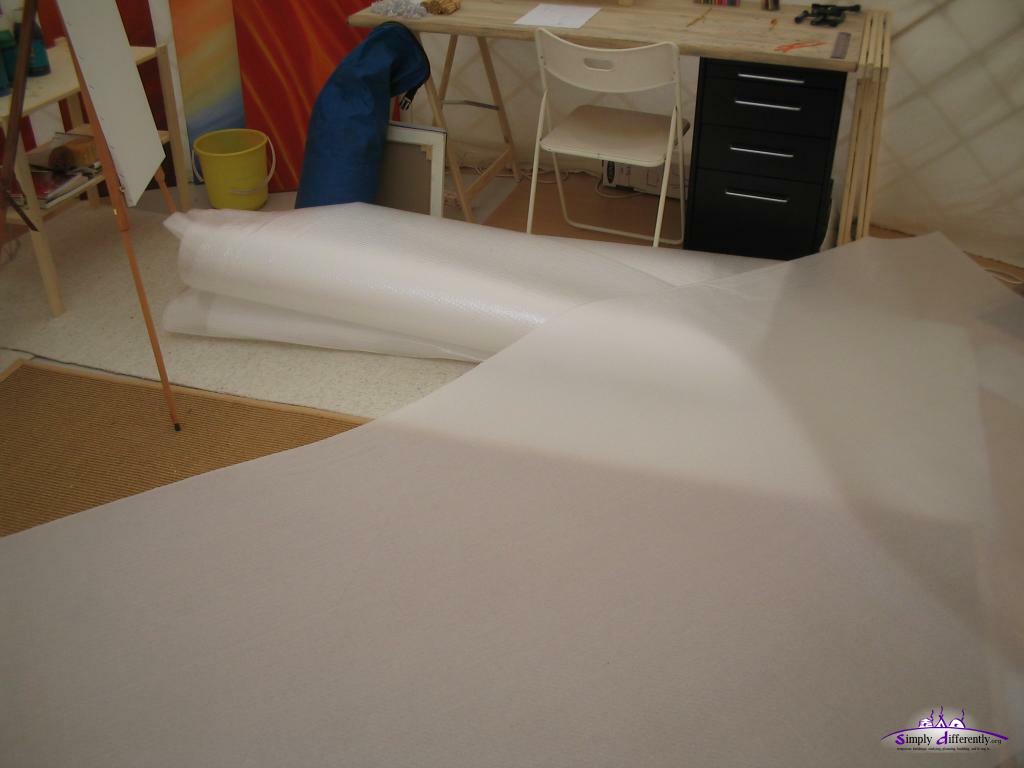
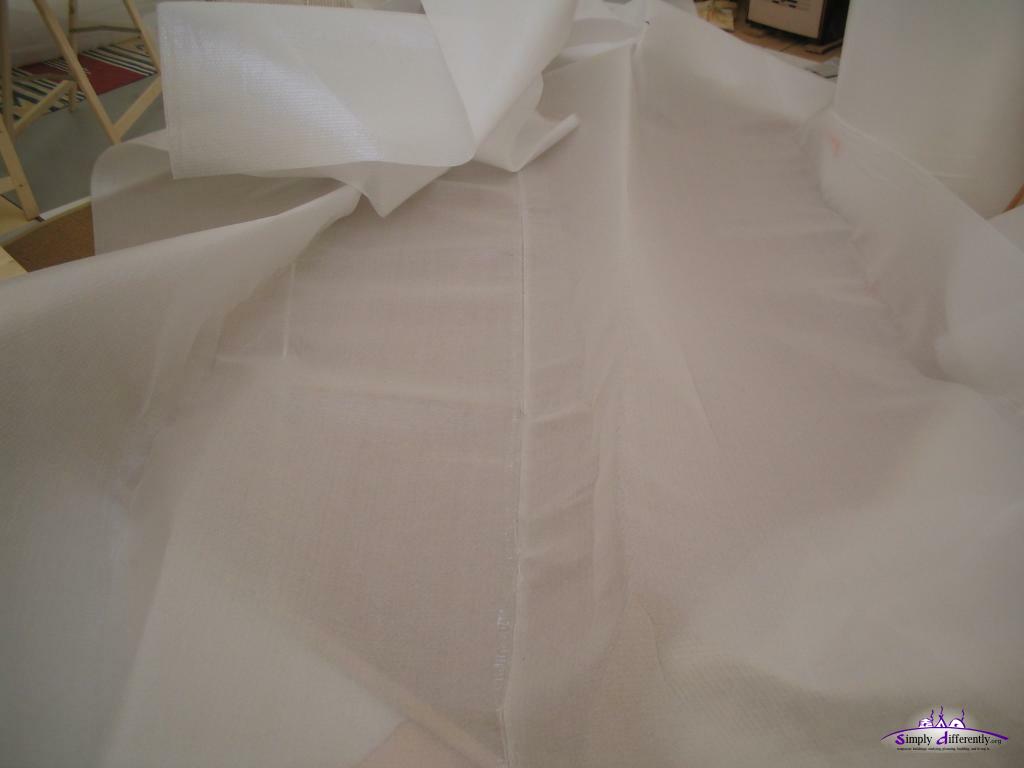
I used light (180g/m2) Polyethylen (PE) as rain cover, it has limited longlivity under UV radiation (up to 3 years), so it might require some protection with nylon or a thin cotton cover. You can also use heavy PVC as used for truck trailers, those are 600g/m2 and last 30 years under UV radiation.
On the left you see the overall setup of the rain cover setup, skylight reaching over the roof rain cover, which again goes over the wall rain cover.
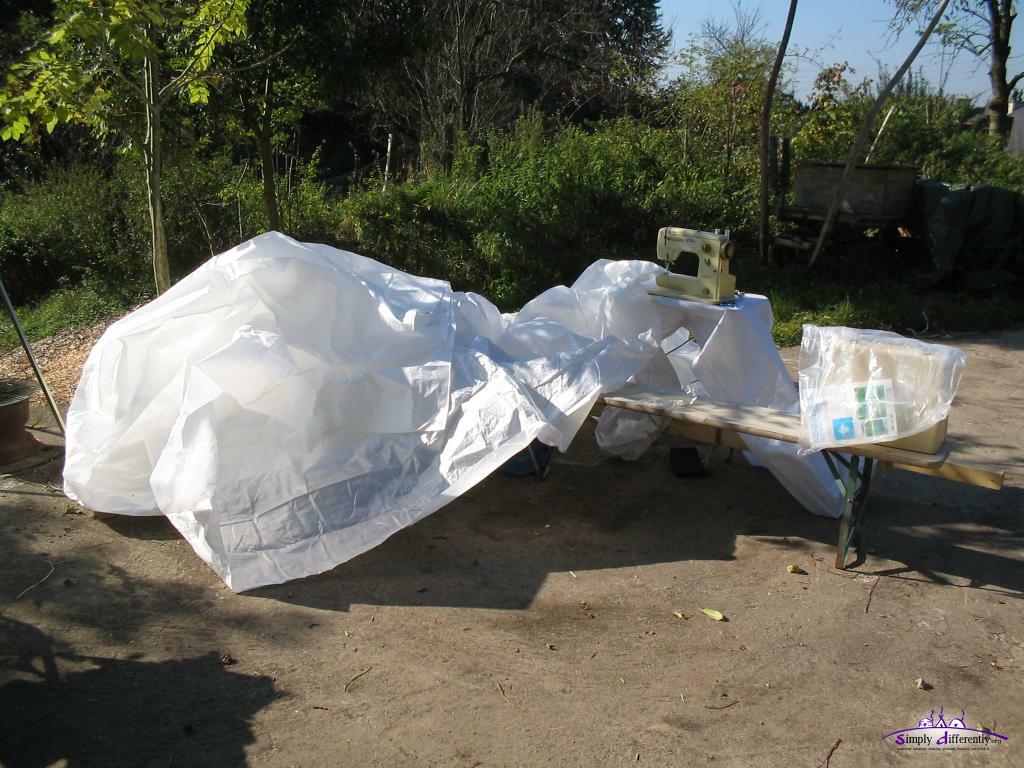
Sewing the roof canvas/cover 2005/10/13 13:40
Roof cover and toono/crown-wheel 2005/10/13 15:01
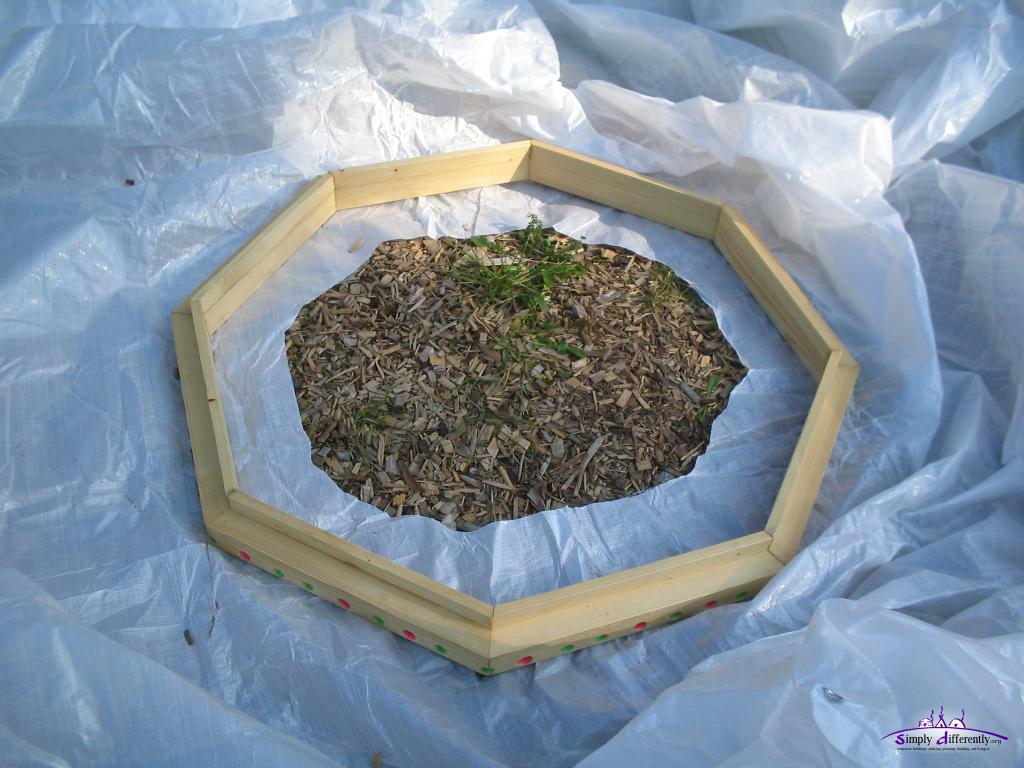
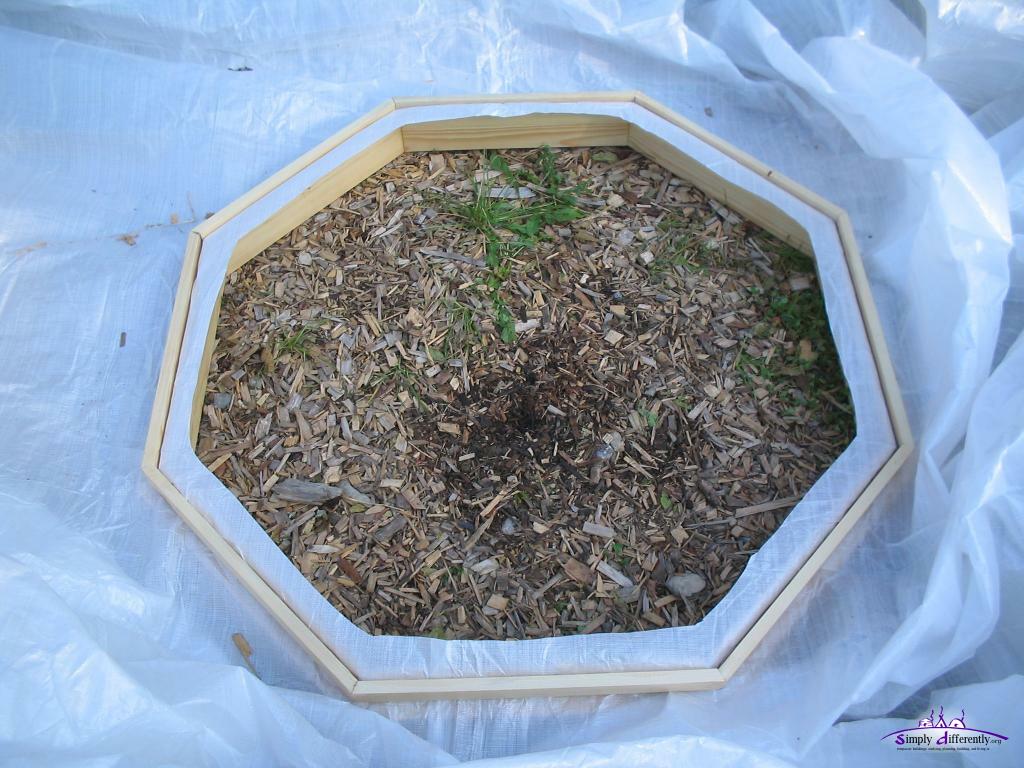
Cutting hole into roof cover 2005/10/13 15:11
Final roof cover cut, 3-4cm left to the toono, sewing then a seam with cord 2005/10/13 15:22
Cotton/polyester canvas is heavy and difficult to sew together, industrial sewing machines required - it's also pricey, but it may be the best choice regarding ecological and longlivity I think.
Thermal Insulation
Felt is surely the preferd heat insulator for a yurt, as it's the traditional insulator. But in western world felt isn't a byproduct but rather industrial manufactured and cleaned beforehand, it also looses water resistance, and only suits as heat insulator, and here in Switzerland industrial felt is pricey. You can make felt yourself out of (moderately) washed raw wool (links how to do this follow), it can be quite a time-consuming undertake.
There are other insulation materials available, best choose one which comes as roll, is bendable, and maybe some heat reflectors build in - those seemed to work best.
Quiltet Blanket Insulation
Claudius Kern, an austrian yurt developer, has made experiences with tree bark split or flakes put into large bags or blankets, and sewed into small compartments (aka quilted) so the flakes don't move and end up at the bottom of the blanket; this way a blanket of 1-3m long, and width of the height of the wall (e.g. 1.5m) are made, and leaned and tied at the top behind the wall / khana. Aside of tree bark also other natural insulator can be used (e.g. hemp, straw, reed), and I'm thinking using straw. It might be necessary to protect such a blanket from receiving moisture, e.g. insulate the blanket inside against water before it's filled, I consider to use bubble wrap in front and behind the blanket as moisture blocker.
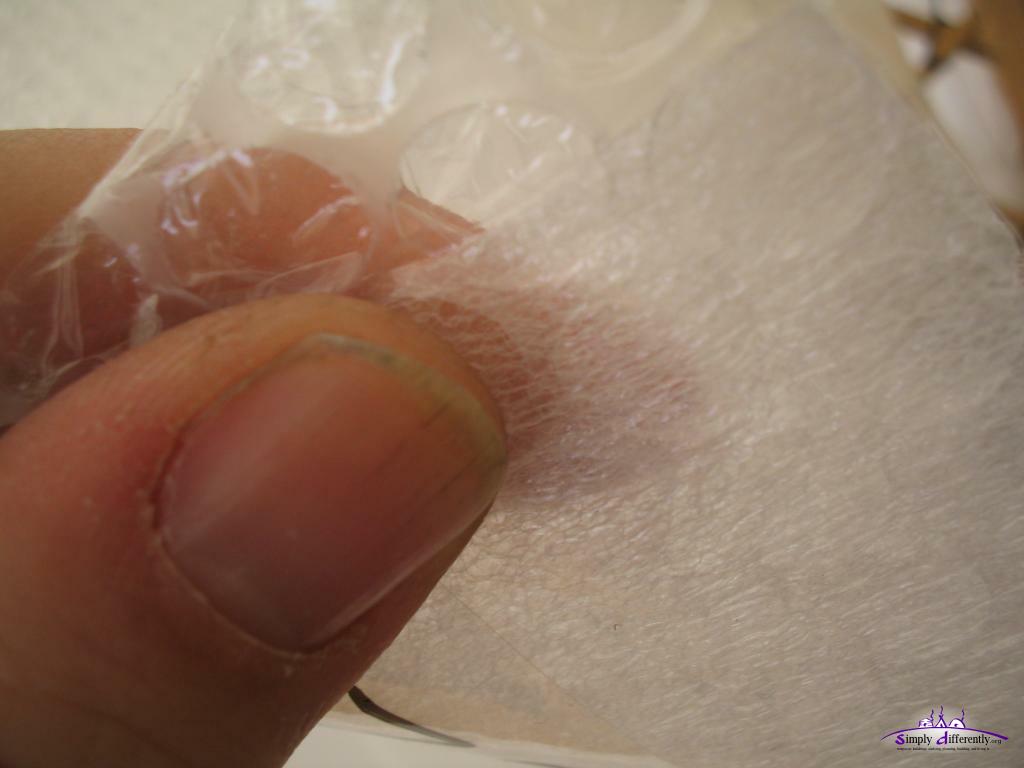
Double Layer Bubble Wrap
Anyway, for my first yurt (fall 2005) I ended up using bubble wrap as insulator, first two layers each 0.5cm think, but later added two additional layers, so totally 4 layers. It's 1.50m wide, my wall height, for the roof I patched multiple lanes together with clear tape.
Cut lanes to compose the circular layer (patched) - piled up 2006/01/07 11:07
Patching the layers together with clear tape (might be better to simply sew them together, might be more stable) 2006/01/07 12:05
-->
As you can read in my yurt diary the insulation isn't sufficient truly for winters with temperatures below -5°C, and more and better insulations required. A big advantage of the bubble wrap is that it lets the yurt remain daylight bright at the day with the translucent wrap, but for the cost of insufficient insulation for winter time.
So, I personally make another test with truly thick bubble wrap (3cm large bubbles and 1.5cm thick a layer), and also have thermal insulation inside the lattice wall / khana, and then the cotton most-inside, this way the air between the khana laths operates as insulation layer too.
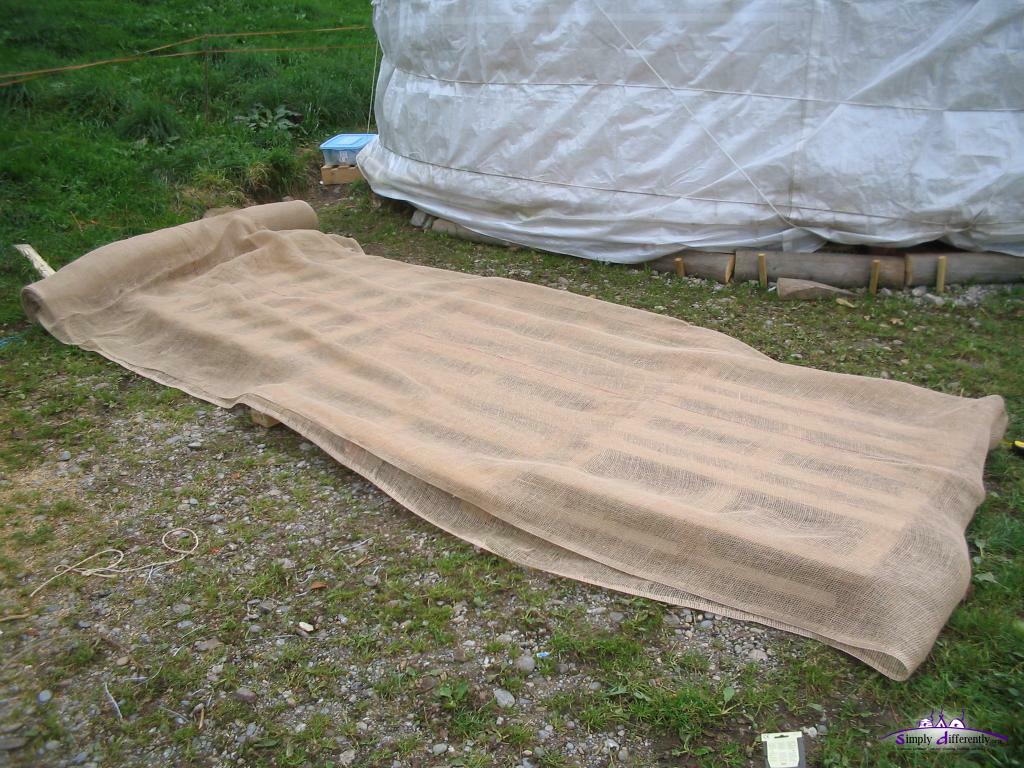
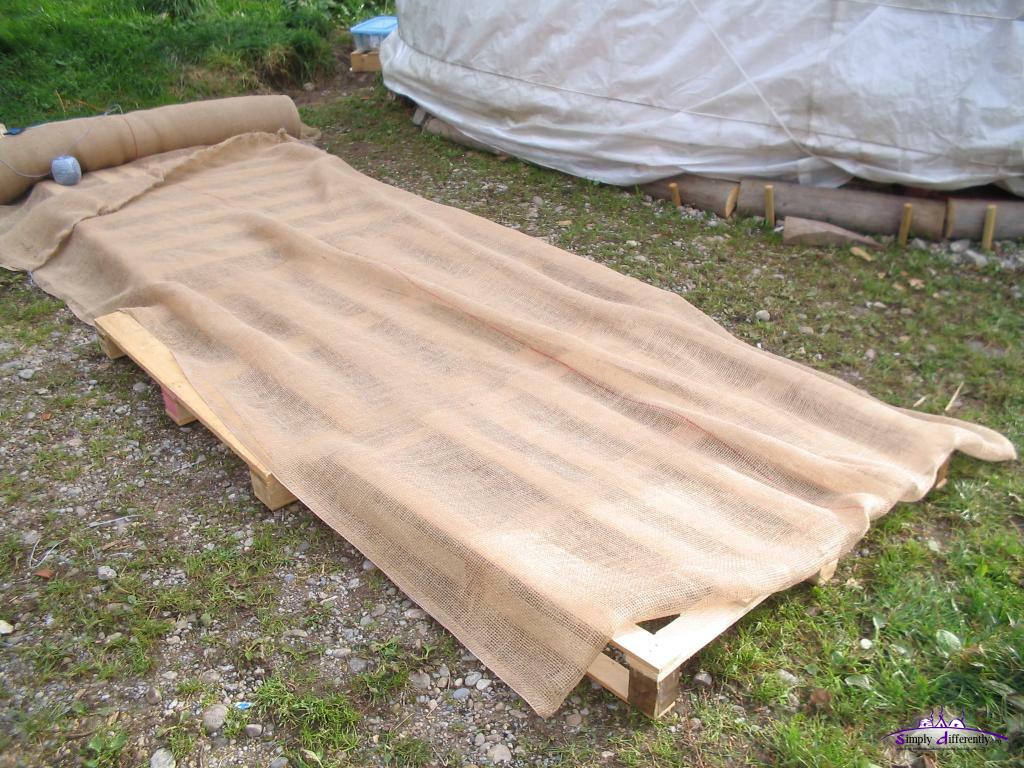
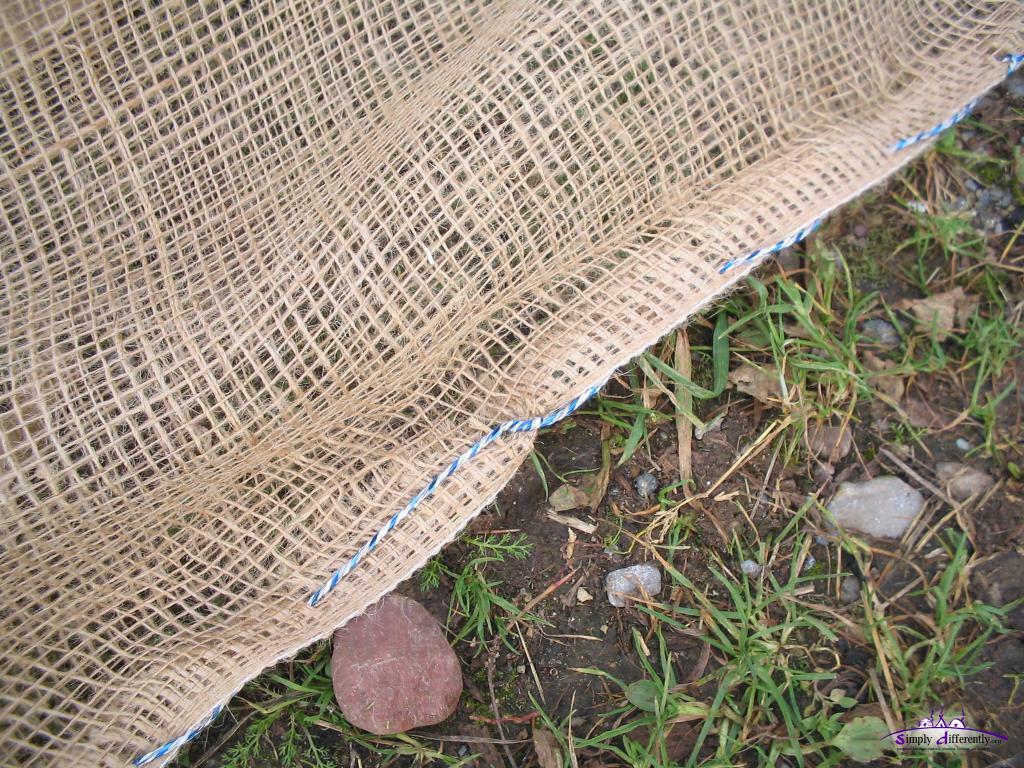
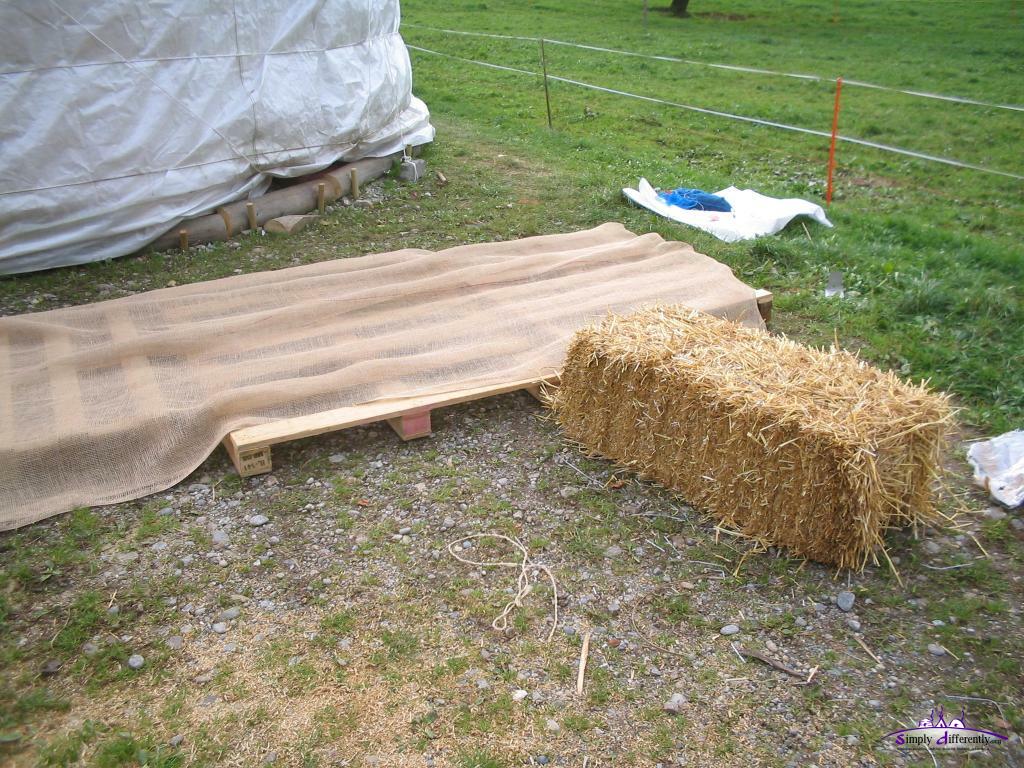
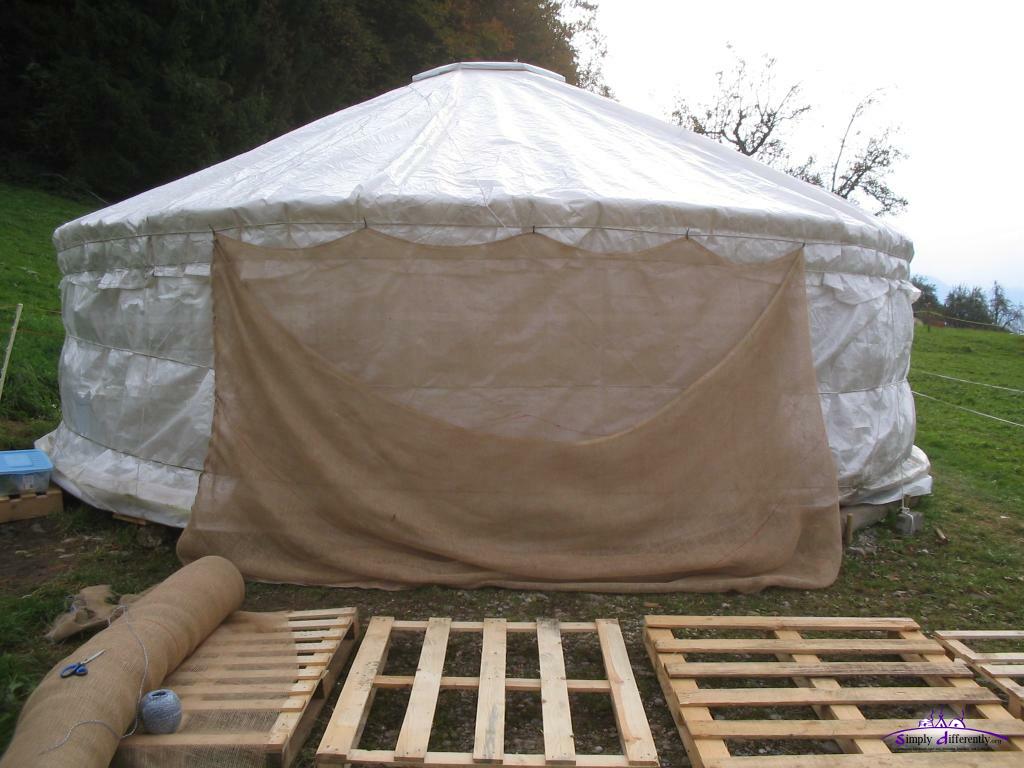
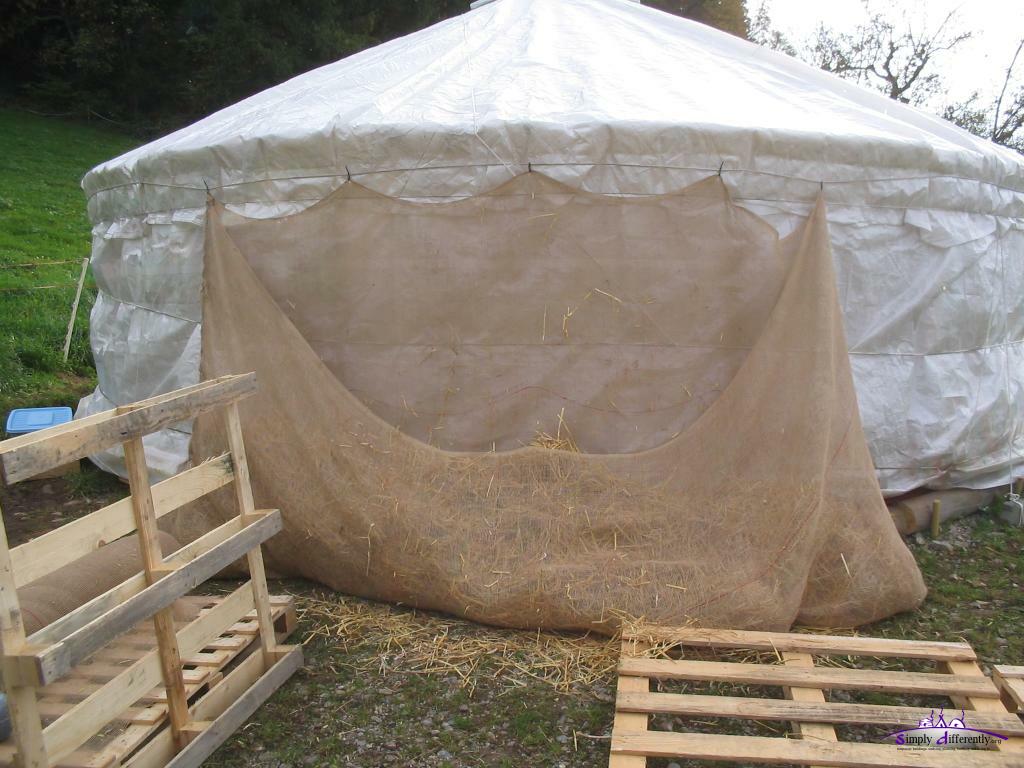
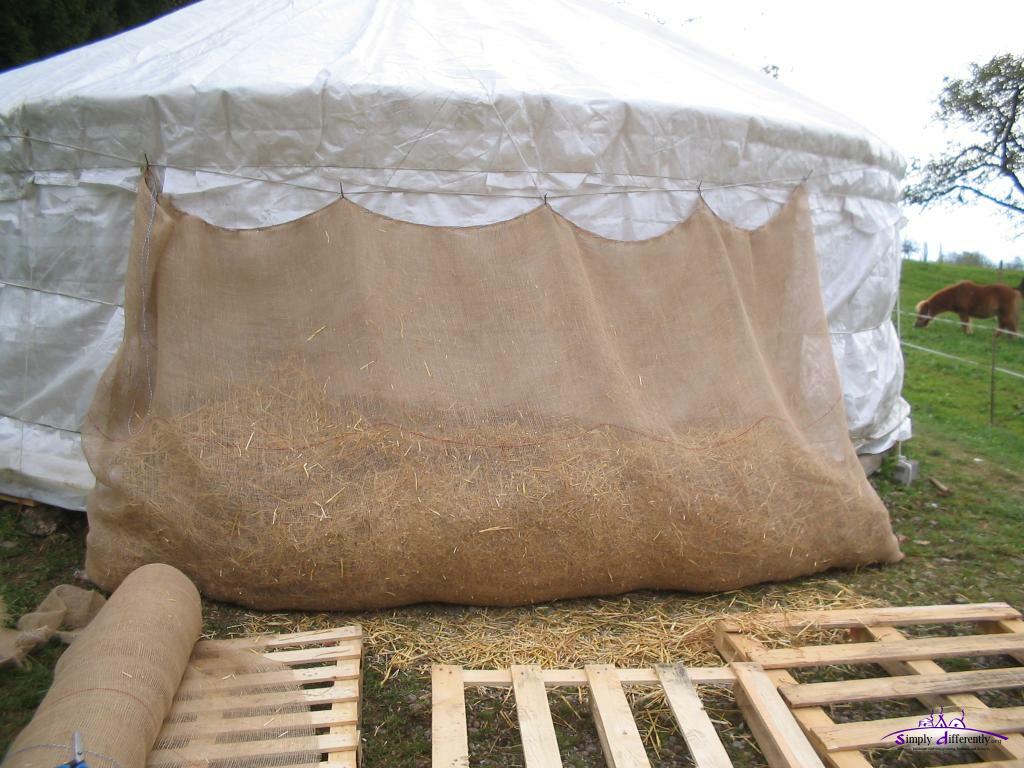
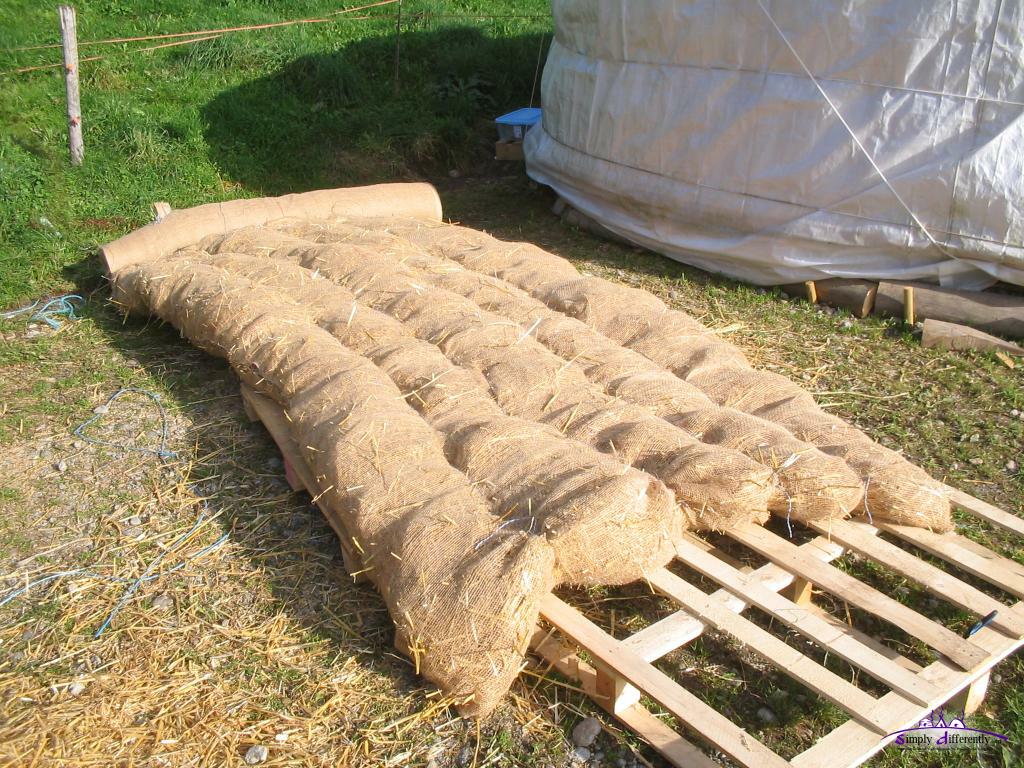
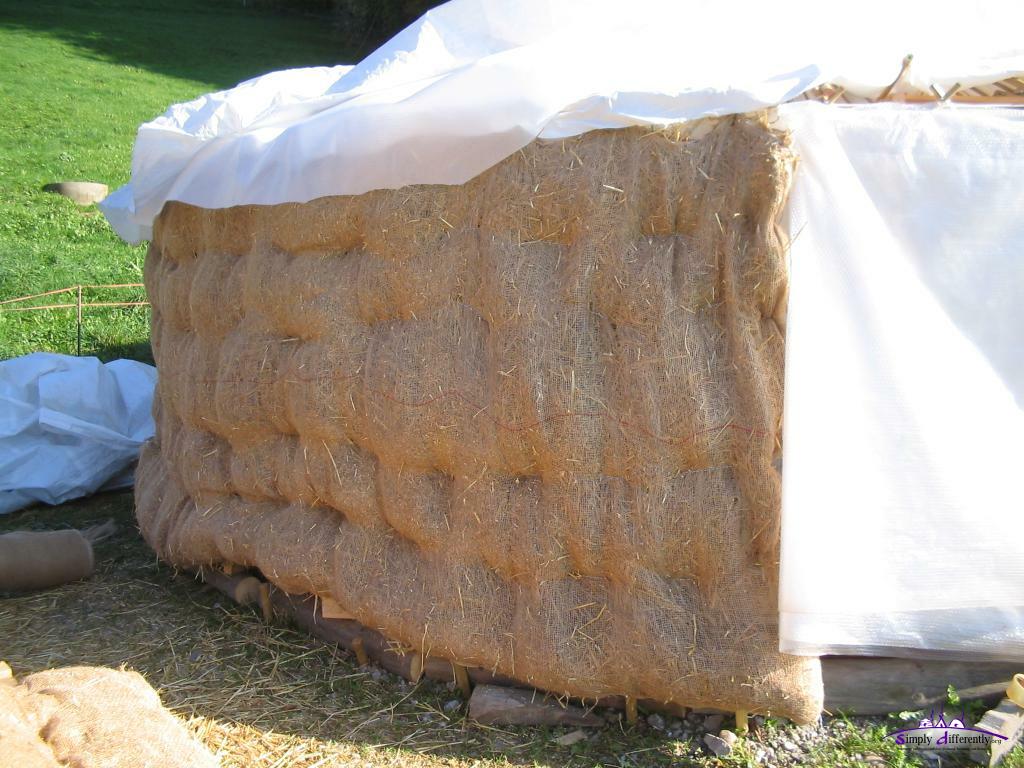
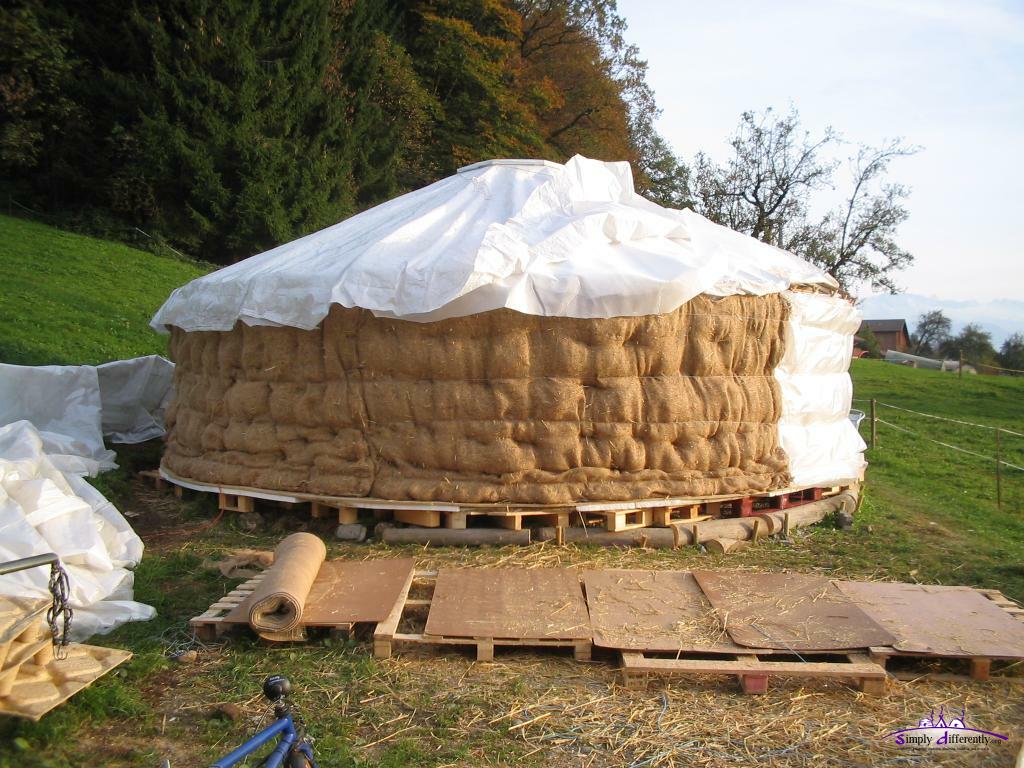
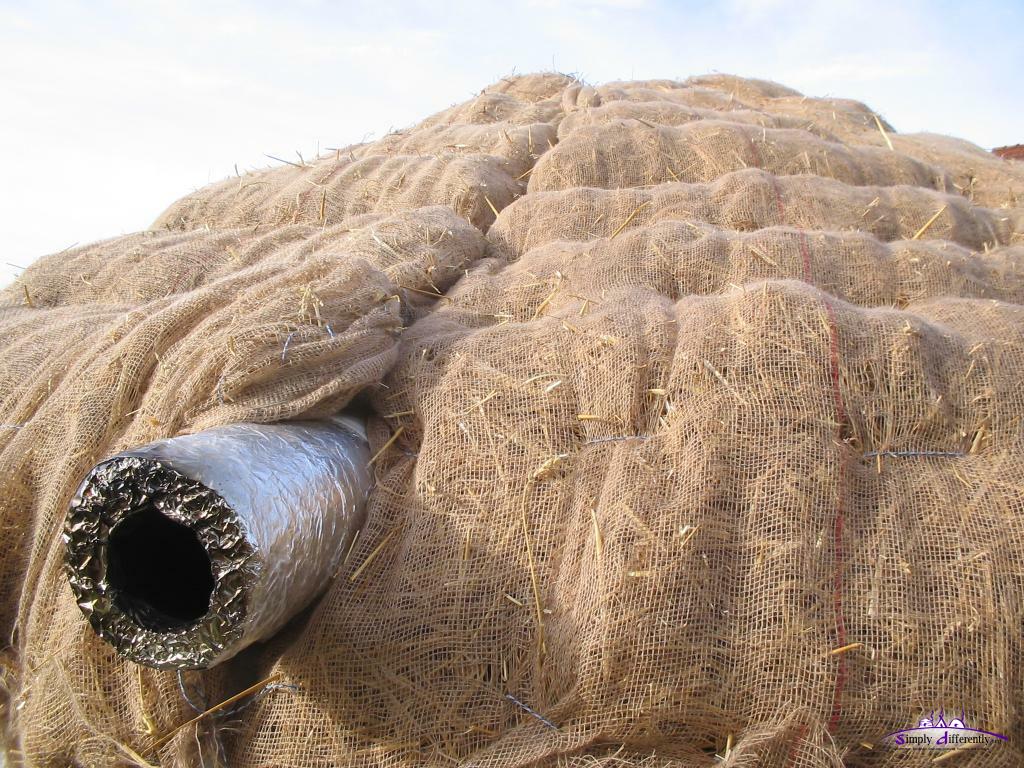
For the winter 2006/2007 I use straw filled jute blankets:
prepare a wodden needle (apprx. 25cm long) with a 3mm hole at the end - to sew with 2mm cord
sew two sides, one side is folded, one side remains open (e.g in my case 340cm x 180cm)
hang up "bag", and fill with open straw, for now one bale of straw, close bag by sewing last side
lay on the ground and distribute straw evenly as possible (320cm x 160cm)
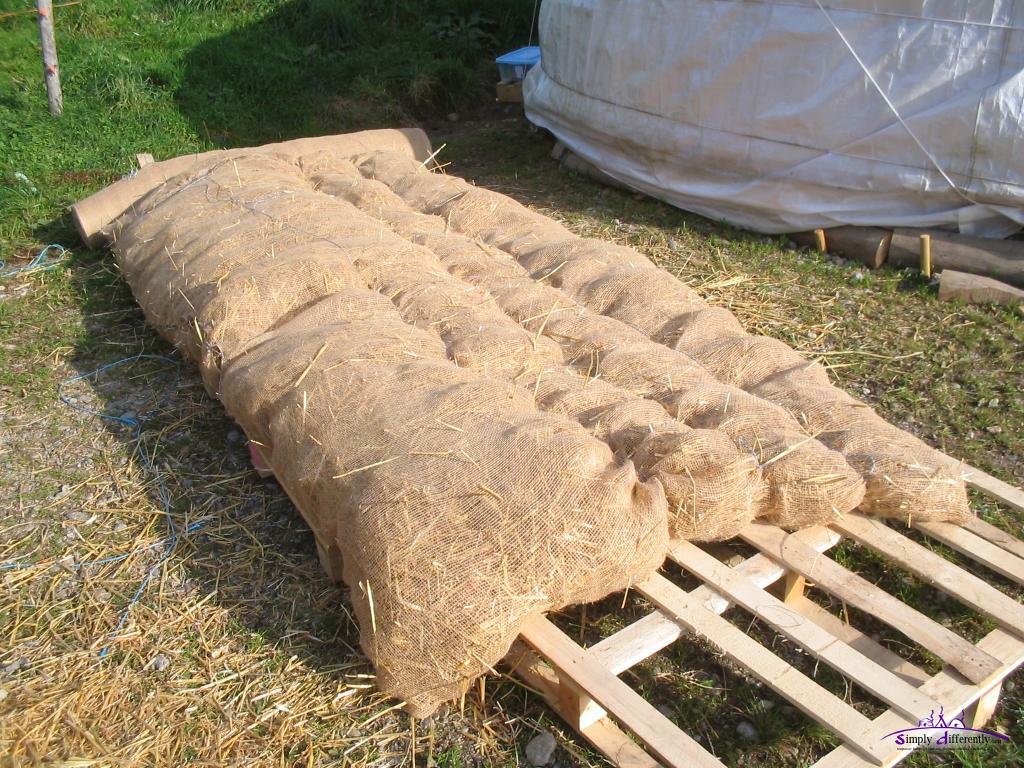
start to sew lanes (lengthwise compartments), 4 lines per 160cm width (each apprx.35cm) as I don't really need horizontal compartments since I hang the blankets, only vertical move prevention. Detail: interwave quilts apprx. 10-15cm max, and finally pull on cord tightly before ending it.
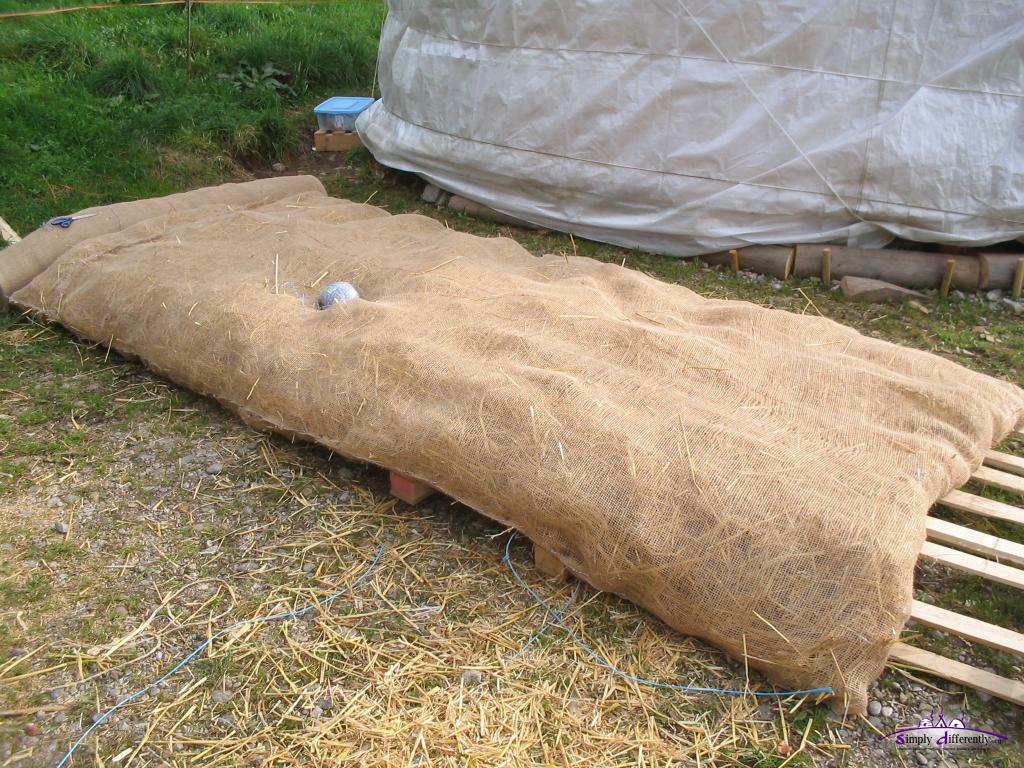
Laying out the jute, aprx. 350cm x 180cm, folded 2006/11/03 08:45
Handsewed bottom and other short side, leaving one side open to fill straw 2006/11/03 09:17
Handsewing with 2mm cord (Closeup) 2006/11/03 09:17
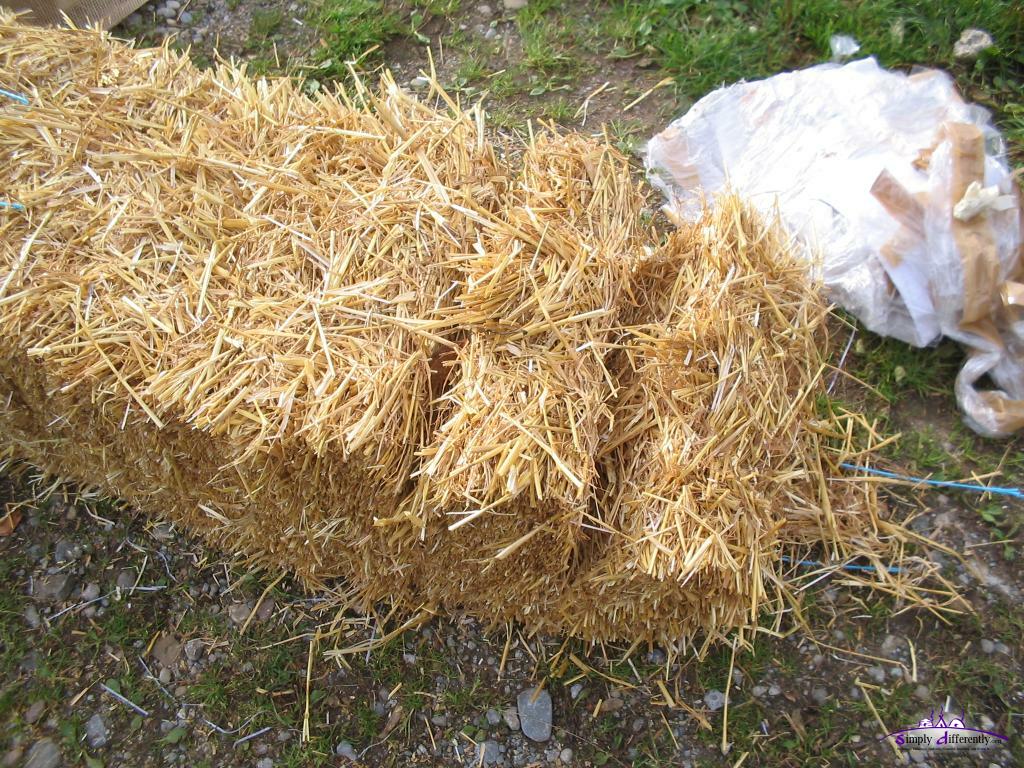
Strawbale 2006/11/03 09:30
Strawbale slices 2006/11/03 09:31
Hanging up the blanket to fill straw 2006/11/03 09:34
Filling in straw 2006/11/03 09:38
Done filling one strawbale, sewed top 2006/11/03 09:50
Laying down the blanket and distribute straw as evenly as possible 2006/11/03 10:47
Handmade wodden needle with 2mm cord 2006/11/03 10:47
One strawbale (apprx. 100cm x 45cm x 35cm = 0.15m3 compact straw) opened gives 10cm thickness of 5.28m2 which makes 0.528m3 (an increase of 350% of volume when straw is opened), flat from 6.3m2, width and height decrease of apprx. 20cm.
I intentionally did 160cm height (extra 10cm) to my 150cm wall height, to have some left-over.
I reduced the yurt diameter by 20cm to have 10cm spare for the new thermal insulation, this caused the roof be steeper, an advantage when for snow on the roof likely slide easier than before.
In late springtime I will remove the straw blankets til next winter season.
Reusing Bubblewrap Summer/Winter
Winter 2007/2008 I realized to narrow the bubblewrap section, since the much lighter part 1/4 of the roof didn't push down as much as the oposite side of the roof, which made the crown-wheel tilt, not much maybe around 5cm but this meant also the directional force from the roof poles applying unwanted vertical tension on the crown-wheel, and in case of a storm not good at all.
So I decided add two more roof segments and leave one segment as bubblewrap - to achieve almost perfect balance on the entire roof, and this way reduce vertical tension on the crown-wheel.
In USA & Canada it's quite popular to use a foil which is thin and reflects heat radiation, achieving good "R" values, yet being 2-5mm thick at maximum.
I recommend you use such foil which passes moisture, e.g. "Reflectix" is name of such a product among others.
The interior layer doesn't provide that much insulation, but rather is for decorative reasons, e.g. raw cotton canvas, light enough to handle it easily. I prefered the have the roof canvas above the roof poles, but the wall canvas inside and covering the lattice wall - you still see the wall a bit.
Case Rating 1: Bubble-Wrap & PE Rain-Cover
Brightness
It's extremely bright, as long the sun is out no lights are required.
Thermal Insulation of Cold
With 4 layers of 0.5cm bubble-wrap only 10-15°C can be insulated.
Thermal Insulation of Heat
During summer-time the inside gets very warm, even hot - door and skylight needs to be opened, but if you are away and have to keep all closed it can reached over 20°C plus outside temperature, e.g. 30°C in the shade, can reach over 50°C inside. I used bamboo as wall and roof poles, and due their brown color they got warm, maybe 40-45°C and increased the probability to crack/split length-wise, which per-se does not compromise their stability.
Summary: Ideal as spring to fall approach, not suitable for below -5°C as too much heating is required. It is highly recommended to use UV resistant bubblewrap otherwise it won't last long, max. one summer season only.
Application: working room, living room from 10°C without heating source, down to -5°C with heating source
Case Rating 2: Straw, PE Rain-Cover
Brightness
It's completely dark, with apprx. 10-15cm thickness as I tested there is no sunlight reaching the inside of the yurt anymore.
Thermal Insulation of Cold
With 10-15cm open straw filled in jute blankets very good insulation is achieved, e.g. 1°C drop per hour when outside is 10-15°C colder than inside. So heating with stove til 22:00 up to 22-24°C still let's you have 12°C in the morning, at 0°C outside temperature.
Thermal Insulation of Heat
So far the insulation of heat is alike, but no summer season has been yet tested with this setup - so expect an update on this aspect in April/Mai 2007.
Summary: Straw filled jute blankets are an very cost-effective approach - thermal insulation is good, humidity absorbtion seems good as well - expect update within the next month on this as well.
Application: living room, working room for winter seasons.
Case Rating 3: Hemp Boards, Cotton/Polyester Rain-Cover
Brightness
It's completely dark, with apprx. 4cm thickness there is no sunlight reaching the inside of the yurt.
Thermal Insulation of Cold
With 4cm hemp boards they insulate moderately to good, not as much as expected. Faster temperature drop after no heat source is available. More details follow.
Thermal Insulation of Heat
???
Unknown, expect update
Summary: too early to tell, but expect update soon
Application: dito
Case Rating 4: Open Wool, Cotton/Polyester Rain-Cover
Brightness
It's completely dark, with apprx. 10-25cm thickness there is no sunlight reaching the inside of the yurt.
Thermal Insulation of Cold
With 10-25cm thickness of open wool quilted in jute blankets
Thermal Insulation of Heat
???
Unknown, expect update
Summary: too early to tell, but expect update soon
Application: dito
Stove
For the wintertime a stove (and preferable also useable as cooking stove) is an option to heat the yurt.
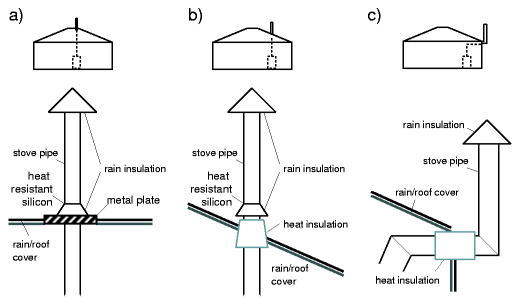
Stove Pipe Variants
Traditionally the stove pipe is coming through the crown-wheel / toono; but you may also position it on the side.
a) Stove in Center, Pipe through Crown: The traditional way is the pipe through the crown-wheel / toono and using a metal-plate to protect the roof canvas and crown-wheel / toono. Have the pipe long enough so the fire-sparks die and don't fall on the roof while still being hot.
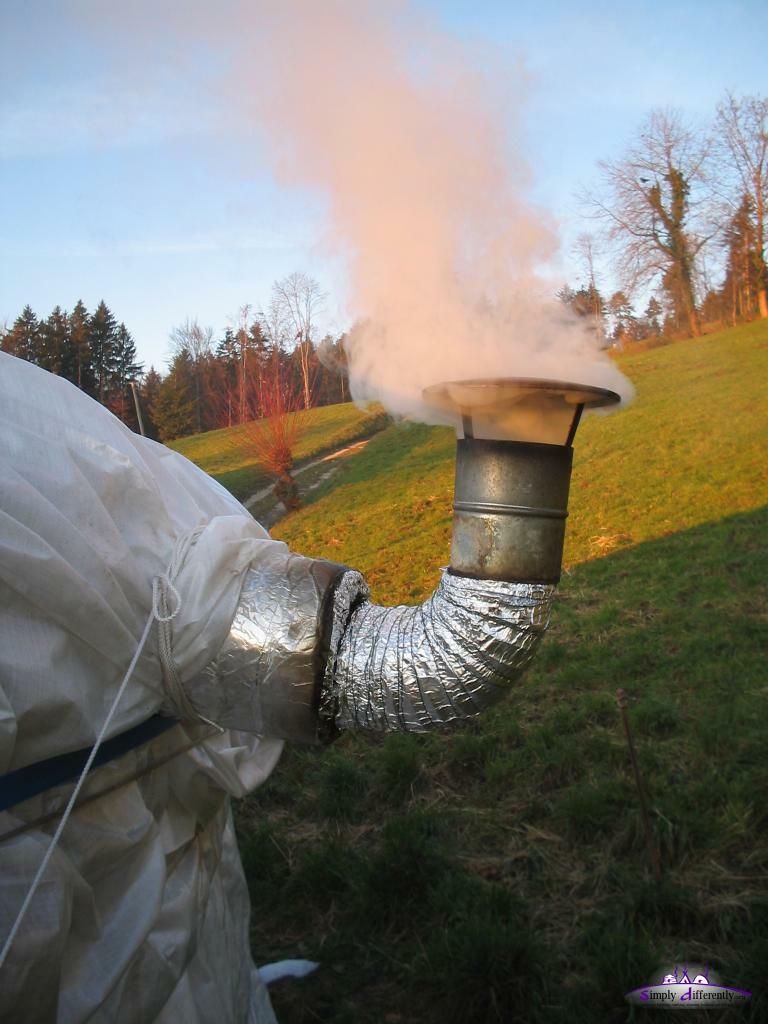
b) Stove on the Side, Pipe through Roof: an additional hole for the pipe of the stove is required, and good insulation to the layers of the roof canvas (e.g. ceramic flowerpot) as the pipe can become very hot. Also, in this case the pipe should extend as high as possible from the top of the roof as a too short pipe will cause firesparks still falling hot back to the roof and burn holes into the roof canvas. Thanks to Andrea Weibel from Jurtendorf.ch for the hints for this variant.
Jurtendorf, stove pipe through the roof (2) 2005/07/26 13:10
Jurtendorf, stove pipe through the roof (1) 2005/07/26 13:10
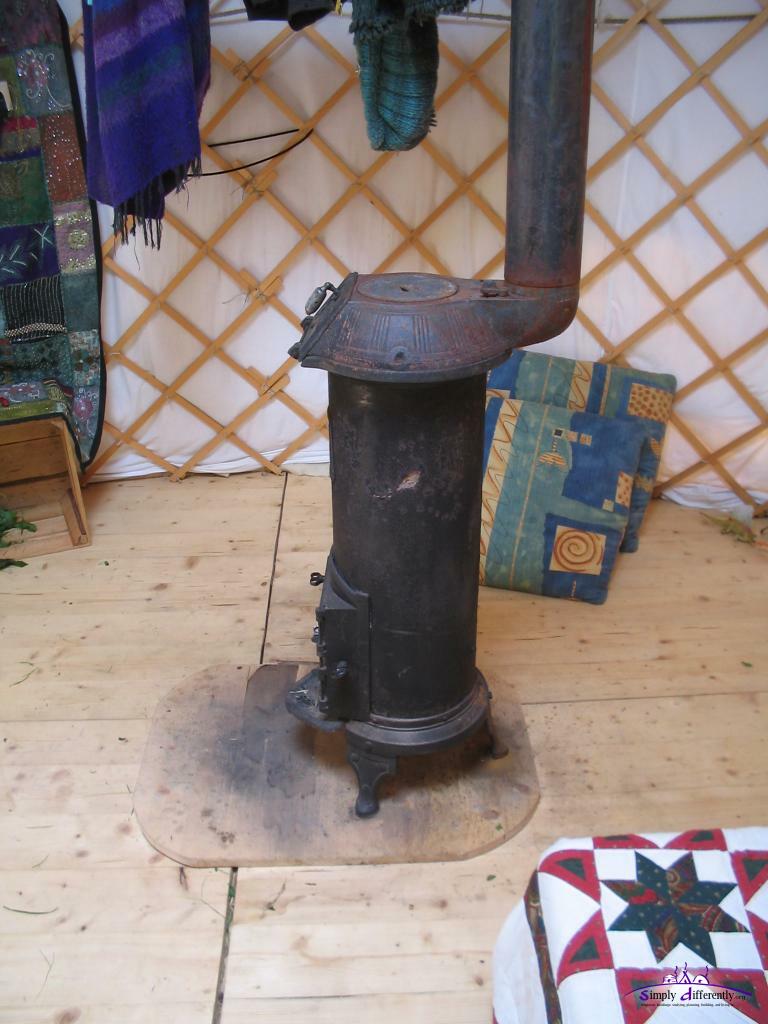
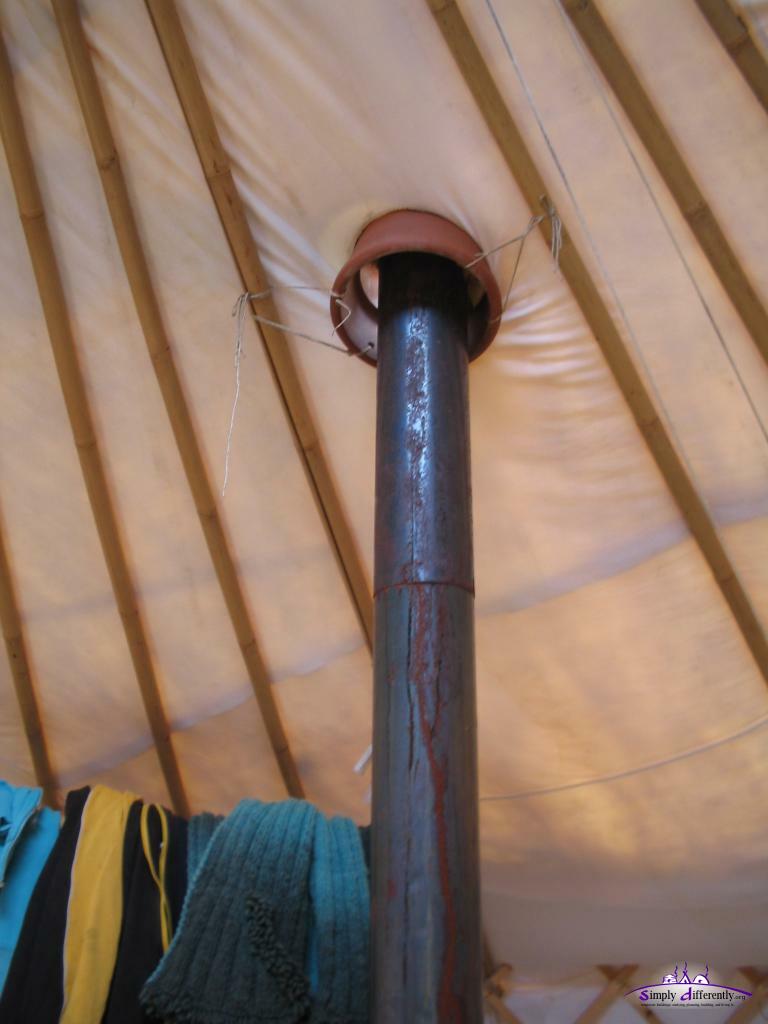
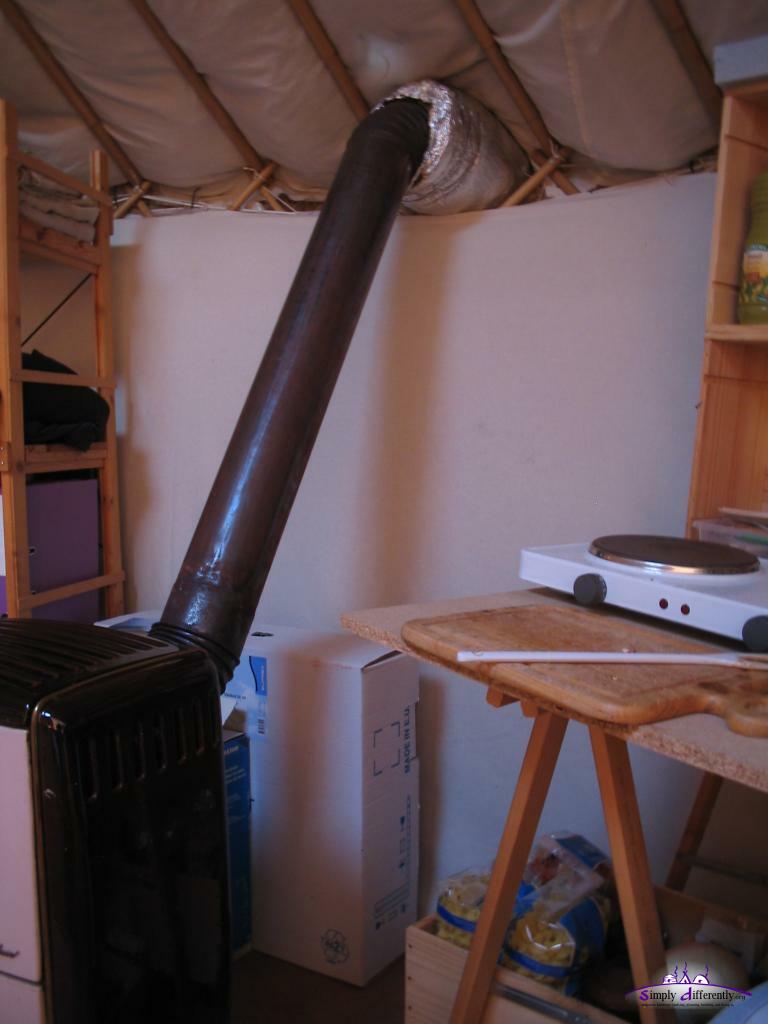
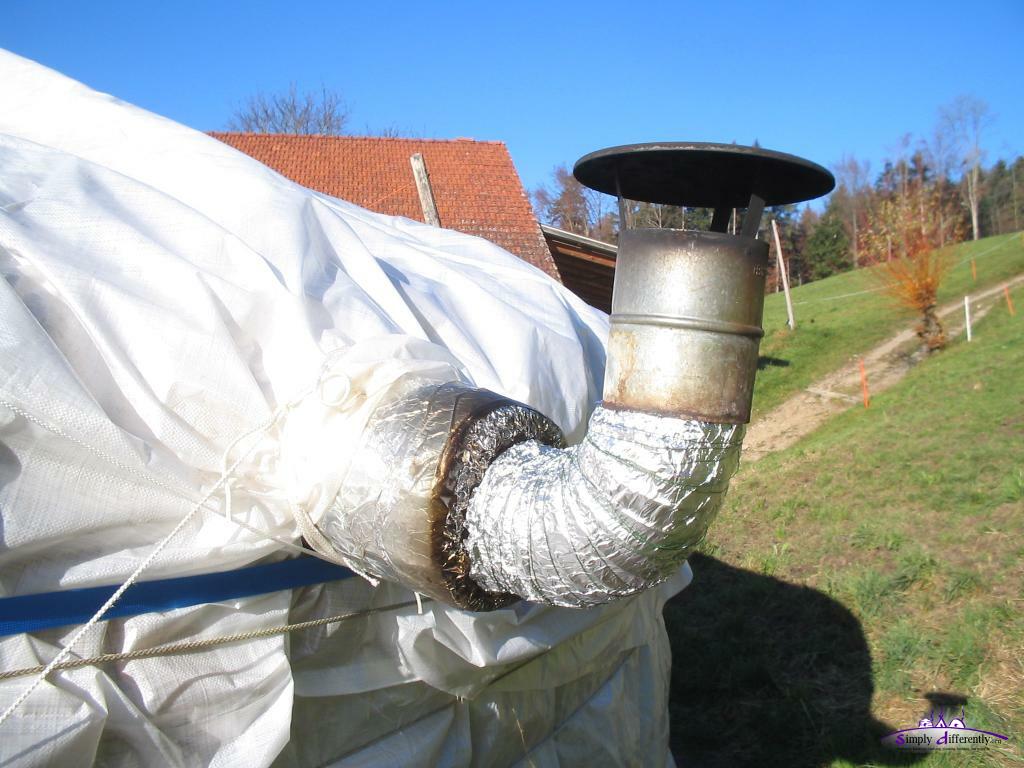
c) Stove near Wall, Pipe through Roof/Wall Junction: I personally put the stove pipe where the roof junctions the wall, there no hole as such needs to be cut - and the thermal insulation may be sufficient and no additional rain insulation required.
Put the exit of pipe to the opposite of the common wind-directions in your area in order to avoid fire-sparks hit roof or wall.
You may consider to look also what angle the lattice wall has, e.g. 90° gives more space than 60° lattice walls for the exiting pipe.
For insulation I used glasfoam, apprx. 2cm thick, and wrapped it around 3-4 times, fixated it with a wire, and then tin foil around, 3-4 layers and then taped it - Note: test if this setup actually is sufficient and if necessary use more glasfoam.
2006/12/13 15:10
2006/12/13 15:11
As you see on the last two photos above I positioned the stove on the side near the wall, not just for sake of having the stove pipe leave outside between roof and wall cover, but also to have the center of the yurt free and makes the room in the yurt more grand, that's my personal experience.
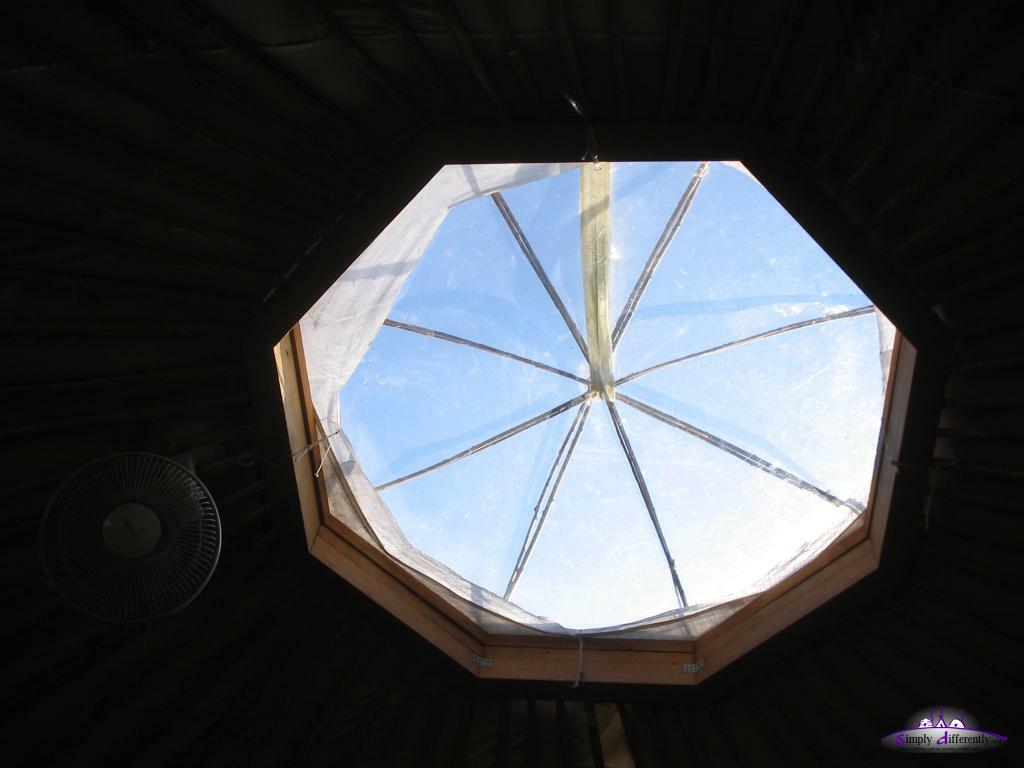
Fan
Fan mounted between roof poles
I also suggest to use a fan, a desk fan mounted between the roof poles to push the raising hot air down to the floor and mix hot and cold air. Without a fan you can have essentially two separate layers of
cold air (5-10°C) from floor to apprx.30-50cm height,
and hot (35°C +) up to the top, not very healthy. So I made good experiences with a fan using 10-20 mins an hour when I fired the stove.
Floor
The floor is a very important aspect of the actual building, which often isn't covered in all details by yurt making handbooks. Insulation for the floor is as important as the yurt insulation itself.
Floor Layout
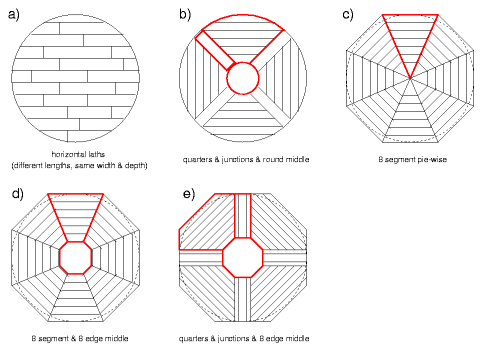
The floor calculator gives you the amount of pieces and the left-overs, you may subtract the left-overs from the total amount in case you gonna reuse the left-overs. Also, play with the geometry, the smaller the pieces the better a circle can be patched together, the less left-overs happen area-wise, e.g. also switch width and height of the pieces.
Each lane given by the floor calculator has the length of the lane, and the left-over in braces, center the pieces of a lane in order to get symmetrical layout of the final pieces (red line in the illustration). Also, the illustration gives you an impression of more left-overs to be reused to decrease the amount of pieces further.
Of course there are other layouts for a circle floor, a few examples.
Other Floor Layout Examples
The red outline indicates segments as whole pieces or segment to handle by a single person (to put up and take down). The first example a) requires a lath grid underneath so the laths can be put on - so personally consider d) most elegant.
Floor Layers
Floor Layer Examples
For summer only yurts it may be sufficient for just a wooden floor, but for the winter time you may consider to do a multi-layered floor, alike the yurt walls/roof are multi-layered. Usually the floor is a bit above the actual ground, 1-2cm, then some wood and/or insulation above, then the actual floor, and maybe a carpet on top of it.
In case you choose straw as insulator you may require a grid creating chambers which you fill with straw or hemp, and hold the laths. Some other more complex layouts provide small enough chambers for straw insulation.
Attached Room
Attaching new rooms (with or without thermal insulation) is an easy way to extend the space, e.g. for a storage room.
For extending the living space I would rather suggest to build an entire new yurt and connect them with a tunnel, see the front page about this option.
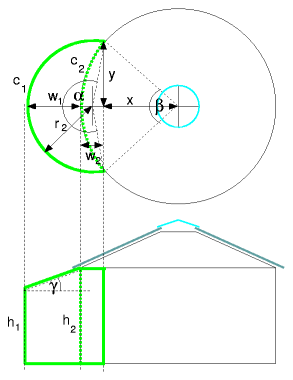
'C' and 'Cc' Attached Room Option
I distinct between two ways:
'C' shaped: only the outer wall, c1
'Cc' shaped: with inner wall , c1 and c2
Either way, it is obvious to use a lattice wall as well.
h1 = h2 - tan ( γ ) w1 (whereas γ = αyurt, e.g. 25°)
h2 = hyurt (e.g. 150cm)
Calculator
I implemented a simple calculator, you may use a smaller angle than αyurt for γ in order to have h1 not getting too low.
For a storage room, which was my first thought for this approach, preferable has a seperate door outside.
If the attached room is WC or shower, the room would be thermal insulated and have a door to the inside of the yurt.
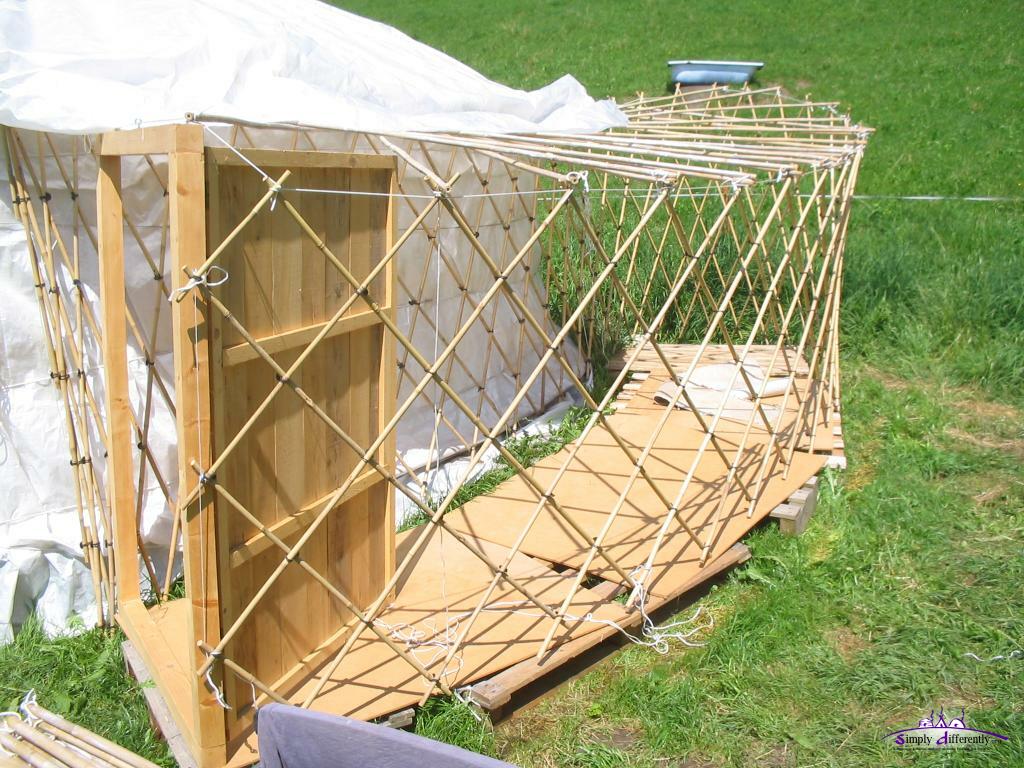
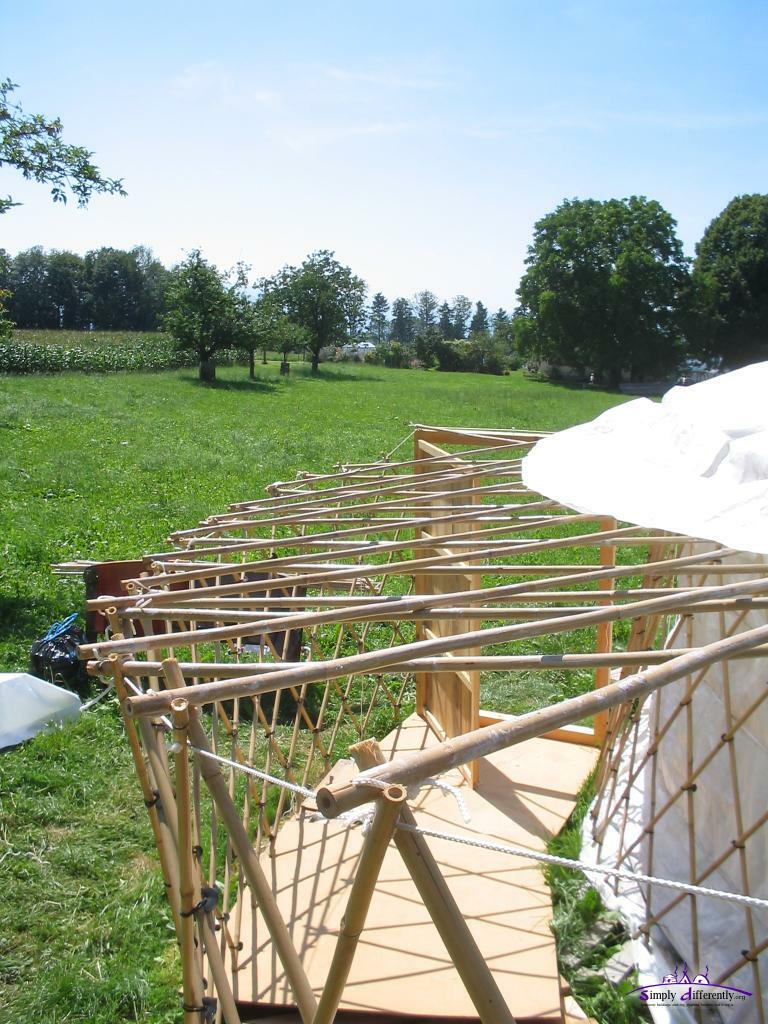
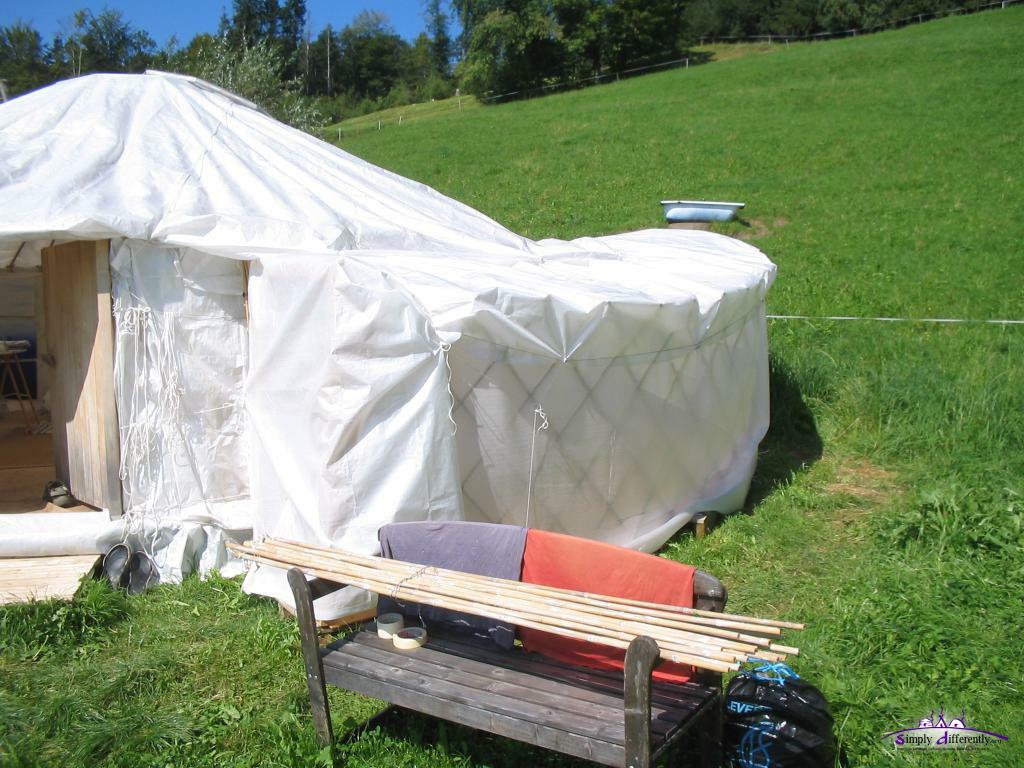
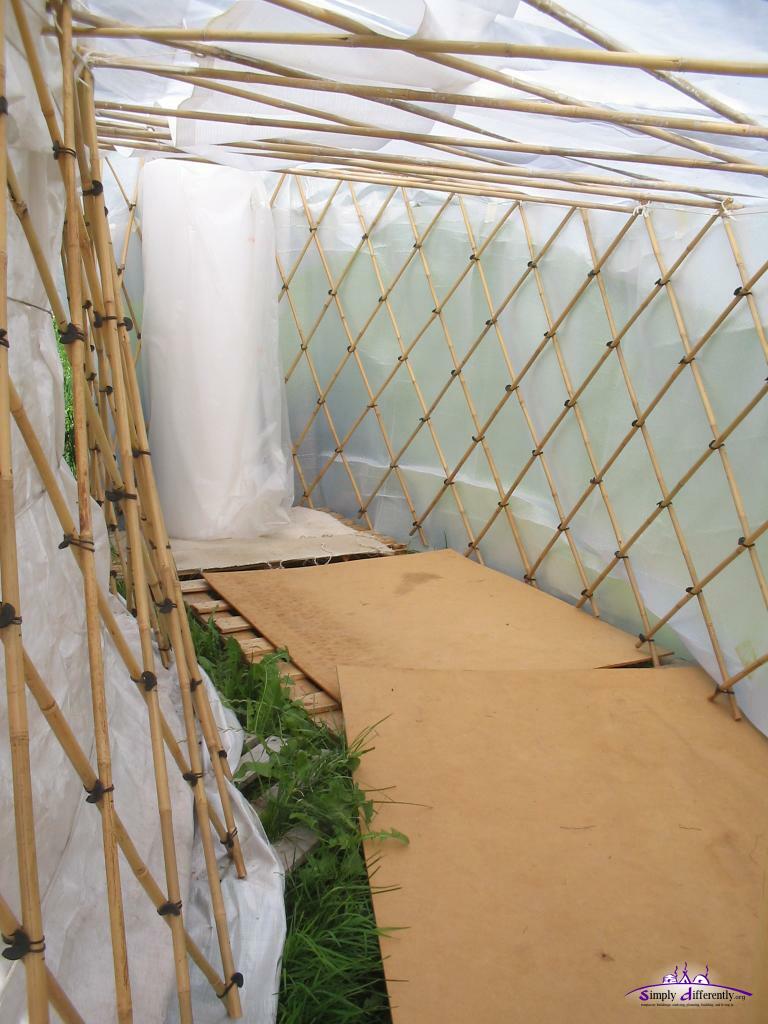
Example
An external room using lattice wall of a smaller yurt (4m in diameter) without using the above calculator:
2007/08/04 12:34
2007/08/04 12:35
2007/08/04 13:53
2007/08/04 13:57
and covered it with PE left-overs. The floor I did with 'one-way' palettes, with some cardboard covered.
Modern vs. Traditional
The modern yurts disregard some of the tight restrictions of the traditional yurt, such as the roof poles / uni lie on each lattice wall / khana junction; the modern approach put the roof poles on the main wall rope which binds the khana together. Advantage is that the khana can be build and produced independent of the size of the resulting yurt, disadvantage is that the lattice wall does provide more stability than the rope, so the rope often is a steel rope to carry the weight of the entire roof.
Especially US yurt makers have shown new aspects of its beauty when it's large (>10m) and bright inside with translucent walls, which of course only works in mild climate zones.
Standard vs. Non-Standard
I had a conversation with a yurt builder strictly following the standardized yurts, e.g. 68, 81 and 98 amount of roof-poles/rafters, spacing of lattice wall junctions 23cm - this is pretty much a preset.
Although I have not followed the lattice-wall to roof-pole/rafter to crown-wheel definition chain, it is worth to quickly ponder on this issue.
The standardization has one big advantage, it gives a common ground, a manufacturer quickly comes up with some standardization, even myself after my first yurt and working on three more yurts realized I like to exchange and replace door frames, lattice-wall and so on, and also looking that roof poles available I don't need to cut too much away or at all, so also creating or adapting partially other standards.
On the other hand the non-standard approach, as I primarly do with providing the Yurt Calculator in these notes here, gives you the opportunity to set your amount of poles/rafters, set your own spacing of the lattice wall junction (w), and so on. For me it's clear in order to handle such vast amount of options, one requires to study and understand the yurt - and ironically I think the Yurt Calculator itself provides some understanding how everything at the yurt is related to each other, the crown-wheel, the roof poles, the lattice wall and all involved angles, there is almost nothing truly independent.
It is obvious due such wide range of options, and also due economic consideration, having parts from one craftsman to another, from one village to another be exchangable and standards make sense.
How to Derive a Yurt Standard
The most obvious is to set a spacing of the junctions (w) constant (e.g. 20, 25 or 30cm), and then decide how long a lattice wall section is, e.g. 10, 20, or even 30 poles a section (in mongolia 15 poles longs lattice wall sections are typical according Paul King), by having multiple lengths of sections more options of yurts are possible compared if you just use one kind of length of a section.
As next take in account 3 or 4 poles width (w) is the door frame, e.g. to make the door 90-120cm wide.
So, in order to derive a standard, substract from amount of poles (and circumference and therefore diameter of the yurt) the door width in amount of poles, and find a way to compose those amount junction with lattice wall sections:
E.g. I use w = 31.4cm, diameter in meter / 10 = poles, therefore for ~1m wide door, there are 3 poles laying on the door frame.
Since I personally prefer to make harmonic amount of roof poles:
so with 10, 12 and 13 junctions long lattice wall sections it's achievable, but it's already some work to find those, especially if more sizes or total poles are considered.
It looks much better when the door is 4 poles wide (just as a comparison):
so that makes some of my prefered amount of poles work with 10 and 12 junction lattice wall sections.
Anyway, you may get my point, it leads to make the amount of lattice junctions harmonic, but sacrifice the harmonics of the total amount of poles - which was what I didn't want and the Yurt Calculator deliberatly didn't follow therefore - but it's obvious for yurt and particular lattice wall section makers they come up with something like this:
36 + 3 = total 39 (3*13) = 3*12 + 3 (door)
48 + 3 = total 51 (3*17) = 4*12 + 3 (door)
60 + 3 = total 63 (3*3*7) = 5*12 + 3 (door)
72 + 3 = total 75 (3*5*5) = 6*12 + 3 (door)
84 + 3 = total 87 (3*29) = 7*12 + 3 (door)
etc
which means, you can compose with 12 junction long lattice wall section all of those yurts, but as said, the total amount of poles aren't harmonic, e.g. multiple of 12 (2, 3, 4 and 6) anymore, but even prime numbers in some cases.
I find it not a good choice to sacrifice those harmonics of the total amount of roof poles or rafters just for the sake to use one kind amount of lattice wall section length.
To sum up, it's harder to start with total amount of roof poles / rafters and derive an economic suitable set of lattice wall sections, than starting with lattice wall sections and then having the total roof poles / rafters following as consequence, but worth the effort I think.
Closing Thoughts on Standards
One thing I'm although very convinced, that we should have more influence of the buildings we live in, giving us options we can choose from, as I wrote in the About-section, to live in rectangular spaces due to solely economic constraints and simplicity to build such habitats is a lack of options.
To follow or even define yurt standards which solely focus on one kind or length of lattice wall section, and by it obmit many options of total amount of poles / rafters isn't the spirit in which yurts or anything should be made.
Erect the Yurt
Here a brief description how to erect a yurt:
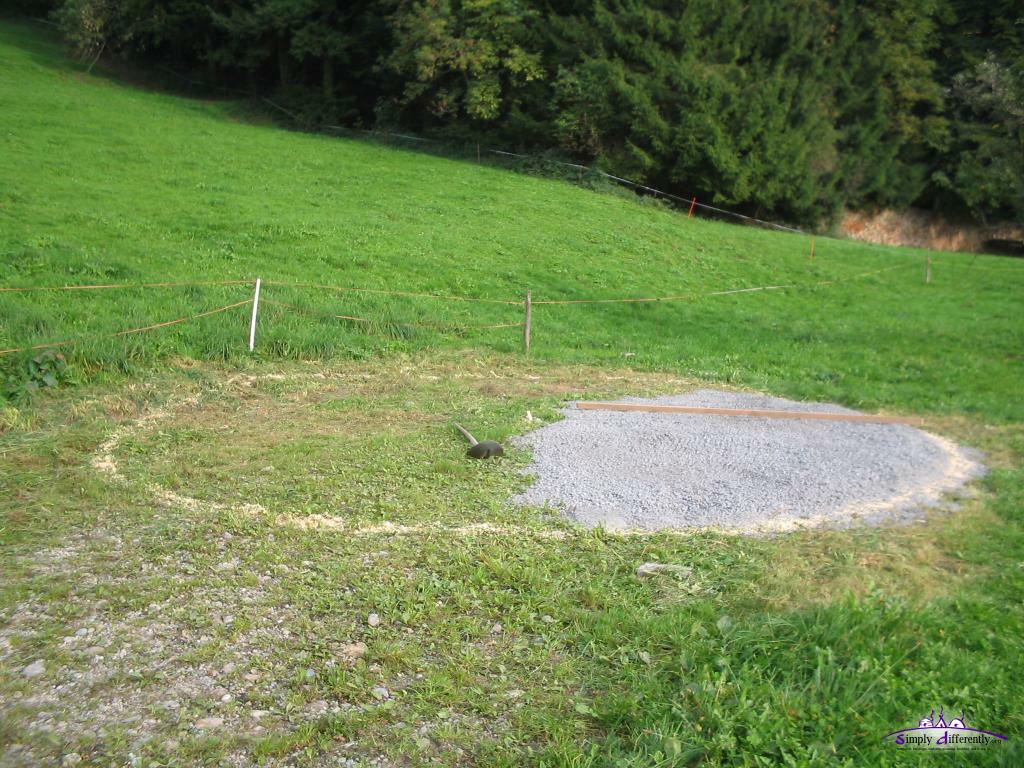
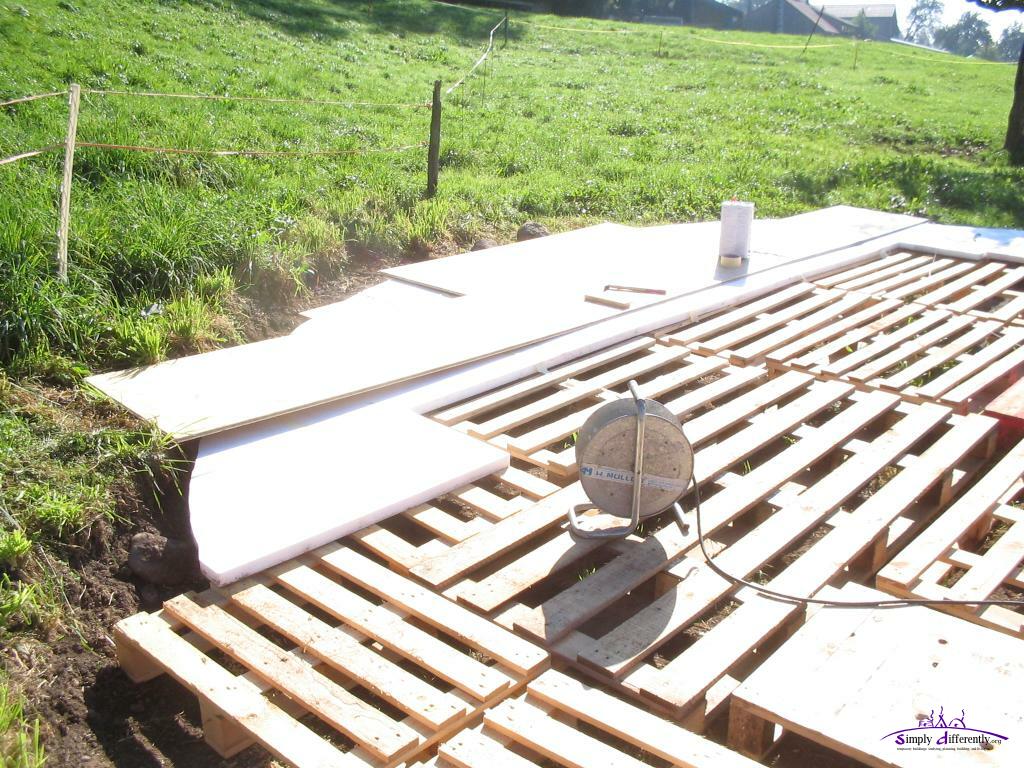
Preparing the Ground
Adding some gravel to level the base
Depending whether this is just a tent-like or a lasting erection, more or less ground preparation is required. Consider to read Selecting & Preparing the Site as well.
As next use a small stick to define the center of yurt, use d/2 as radius for a cord which at the end you have a marker, and then walk around the circle to mark the circle to the ground.
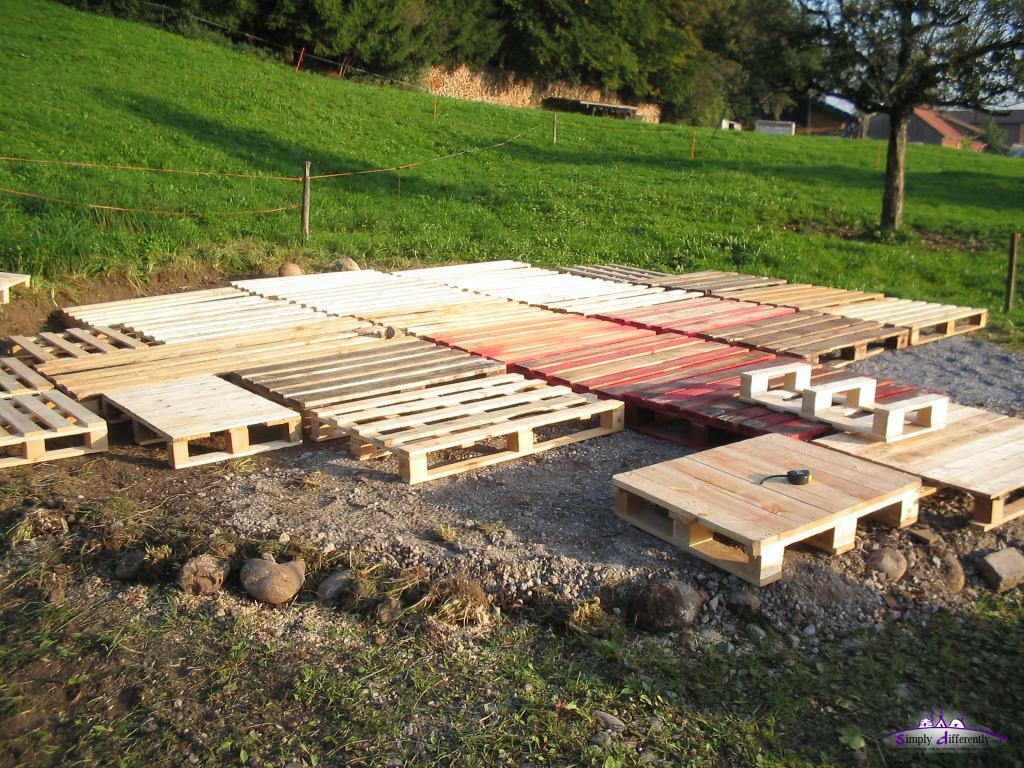
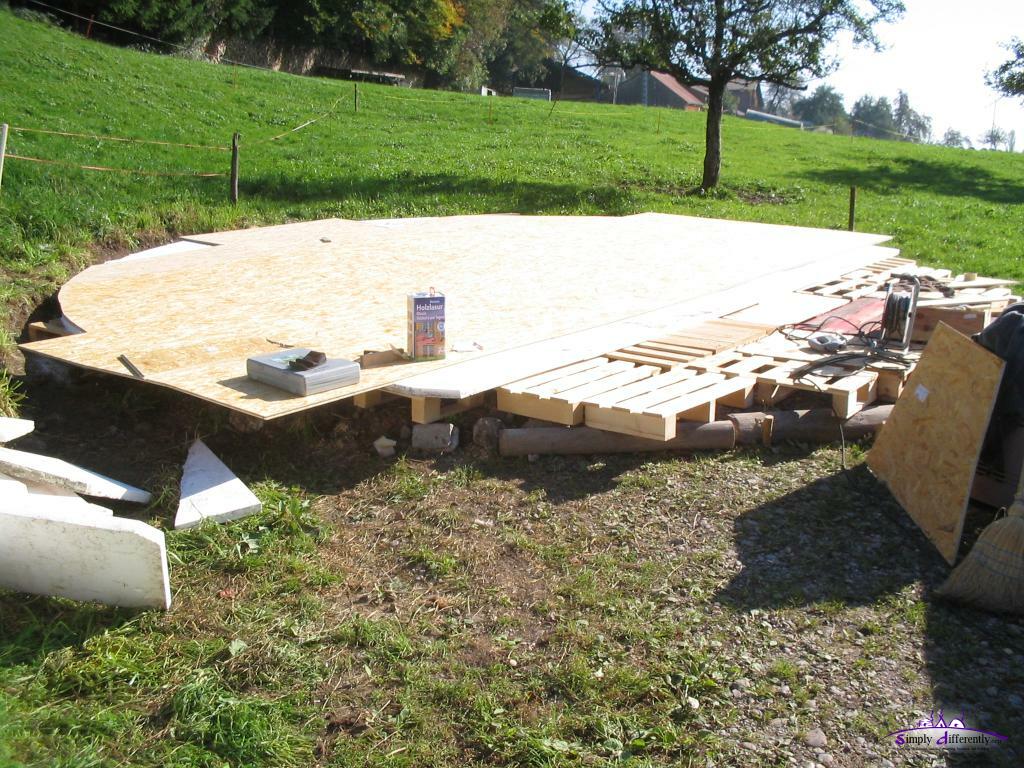
Floor
Put up the floor, have it 10-15cm larger than the marked circle, but not more, the reasons:
depending whether you use thick thermal insulation (e.g. which adds 10-15cm)
at heavy wind your yurt might move, have it have some extra space
make sure the rain cover reaches over the floor, maybe even to the ground, and it should be 100% waterproof in order to avoid rotting in humid climate.
2006/10/12 15:25
Adding OSB planks on top of styrofoam 2006/10/17 09:53
And so on ... 2006/10/17 12:47
Depending whether the base level of the floor is elevated or not, consider to extend the rain cover on the ground for another 10-15cm to keep that area dry in case of raining.
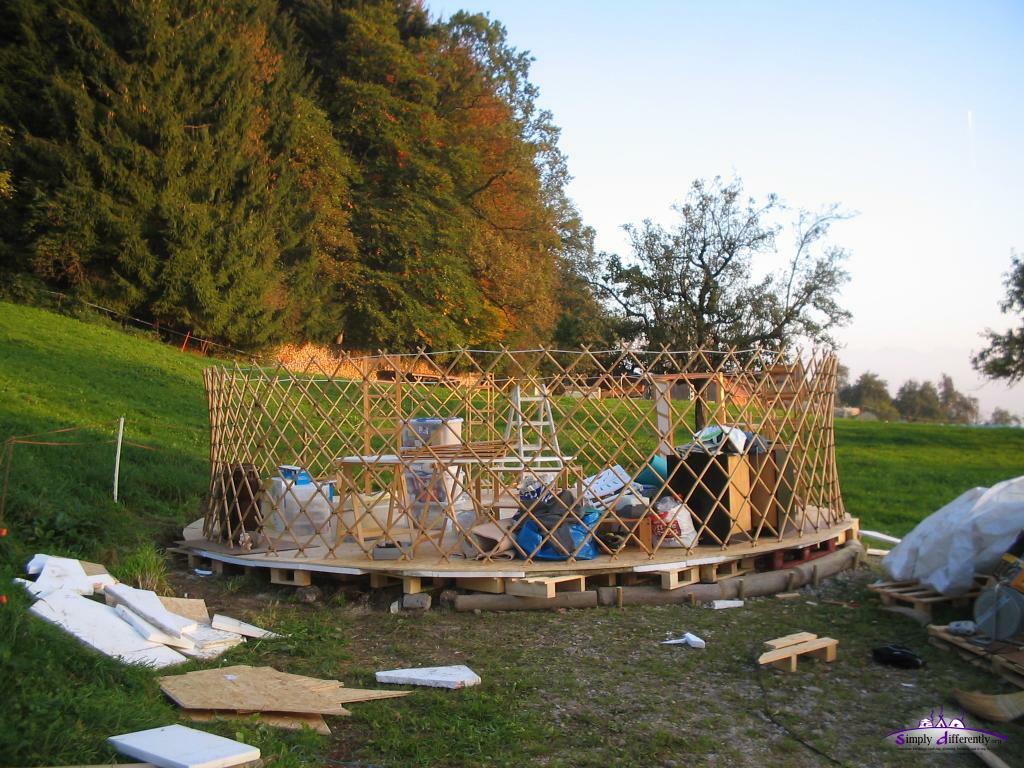
Lattice Wall
As next use the lattice wall / khana and extend it the full length. Position the lattice wall to the mark you did, maybe redo the marking since you put up the floor now.
Keep in mind where you want the door positioned, for cold and humid regions avoid to expose the door side to common wind directions; for hot areas it might be wanted.
Take your door frame, and insert it between the open lattice wall, bind and fixate it.
Then use the main rope and put it above and under each top junction of the lattice wall, that rope requires to keep the max weight of the roof (incl. possible snow), so use either a PP rope with 750kg minimum, or a steel rope with 1000kg strength, more the better.
Once you waved it over and under each lattice wall top junctions, make a loose knot end to end - you might like to attach each end one of the sides of the doorframe, yet I won't recommend that unlike other yurt-builders and books recommend, my reasons (pointed out already in the Yurt Notes) but here again: attaching the main rope ends to the door frame poses stress unto the frame, unless you are really certain it can handle expected stress (incl. winds unto the roof) then do it, otherwise tie the ends of the main rope together as I recommend. A detailed knot description follows.
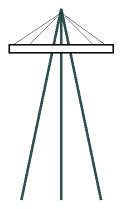
Crown-Wheel
Yurt Wheel Tripod
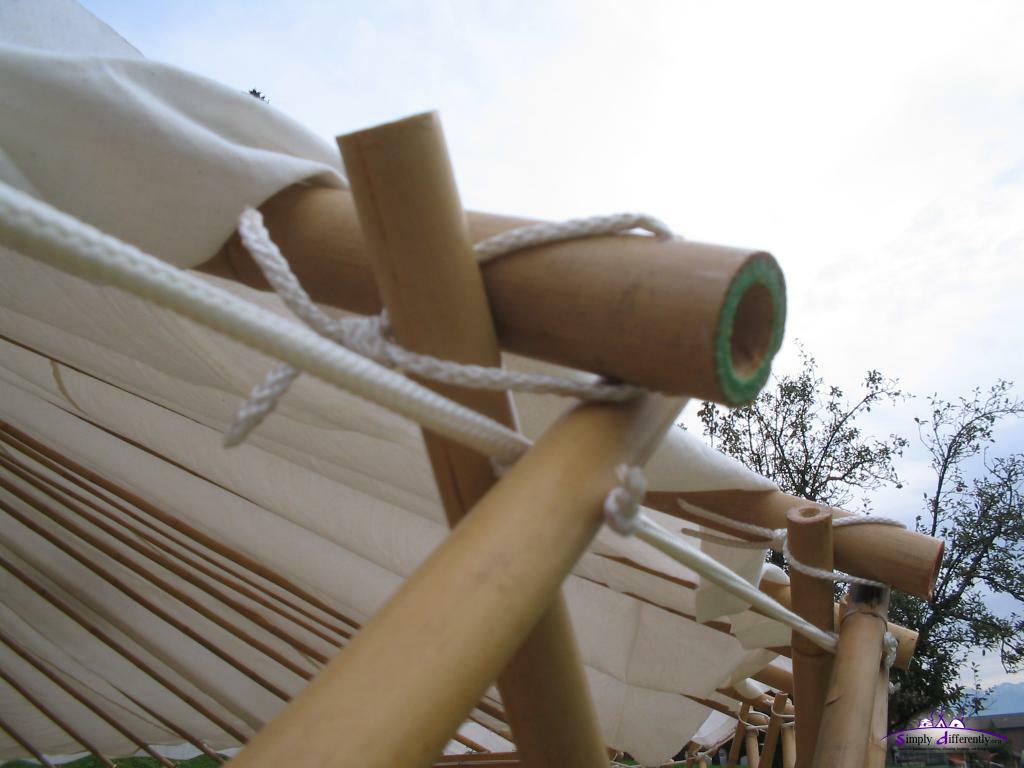
As next lift up the crown-wheel / toono at the height as calculated, then insert at least three or better four roof poles, evenly distributed. It usually requires two person to do this, one holds the crown-wheel, another puts in the first roof poles. You can also assemble a high tripod, which has the crown-wheel on its top (maybe 20-30cm below the top tied with cords), this way you can erect even a large yurt yourself.
Then insert more roof poles, evenly distribute them, and insert the next one either the opposite side as 180° or 90° and so on.
The roof pole has either a cord at the end, which is put over the inner lath of the lattice wall junction; or the roof pole lies on the main rope of the lattice wall and not on the lattice wall junctions.
At that point you have the skeleton of the yurt put up.
Yurt Wall Positioning
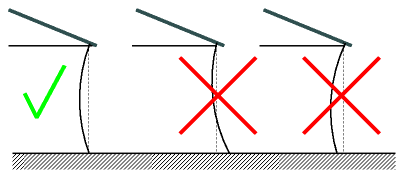
Now start to pull on the main rope, to have the exact diameter of the yurt reached. For lightweight yurts with light crown-wheel and roof poles you can do this by yourself; don't rush here, this adjustment is most important to have the exact diameter: it will reveal whether crown-wheel, roof poles geometry and lattice wall geometry truly fit. Make sure the overall lattice wall is vertical, and does not bend outside or inside on the ground.
Why is this part important? When your lattice wall is not vertical, but leans inside or outside at the ground, or the main rope on the lattice wall is loose - the next wind or storm or heavy snow will crush your yurt. I have seen people not paying attention and have their yurt just not work. The yurt is very stable, but only when the stability is able to work, means, when the lattice wall is vertical, and the diameter on which you built the yurt based-on is applied.
You can extend the diameter (flatter roof, lower wall) or narrow the diameter (steeper roof, higher wall) - just be aware to pay close attention the lattice wall being vertical and not lean to inside or outside after you adjusted the yurt diameter.
You may also consider for that reason a 1-2cm high and full diameter large ring on the floor, in which you attach the lattice wall and prevent from moving; this is recommended in case you have a high floor from the actual ground to provide the lattice wall on the ground some stability.
Layers
As next you attached the layers of wall, of the lattice wall and roof:
put interior canvas on the roof
put interior canvas outside or inside of the lattice wall
put insulation layers on the roof and the wall
put the rain cover on the wall and then on the roof; have the roof rain cover reach over the wall rain cover.
Note: the wall layers you hang either on the lattice wall junction themselves, or the main rope on the lattice wall, a hinge or sewed cord (interior cotton layer), or tape (bubble wrap layer) will do it depended how heavy a wall layer is.
Then bind the wall with 3-4 ropes, and maybe 2-3 ropes over the roof reaching the ground, and tie it like an anchor to the ground - recommended at places with heavy winds or expected storms.
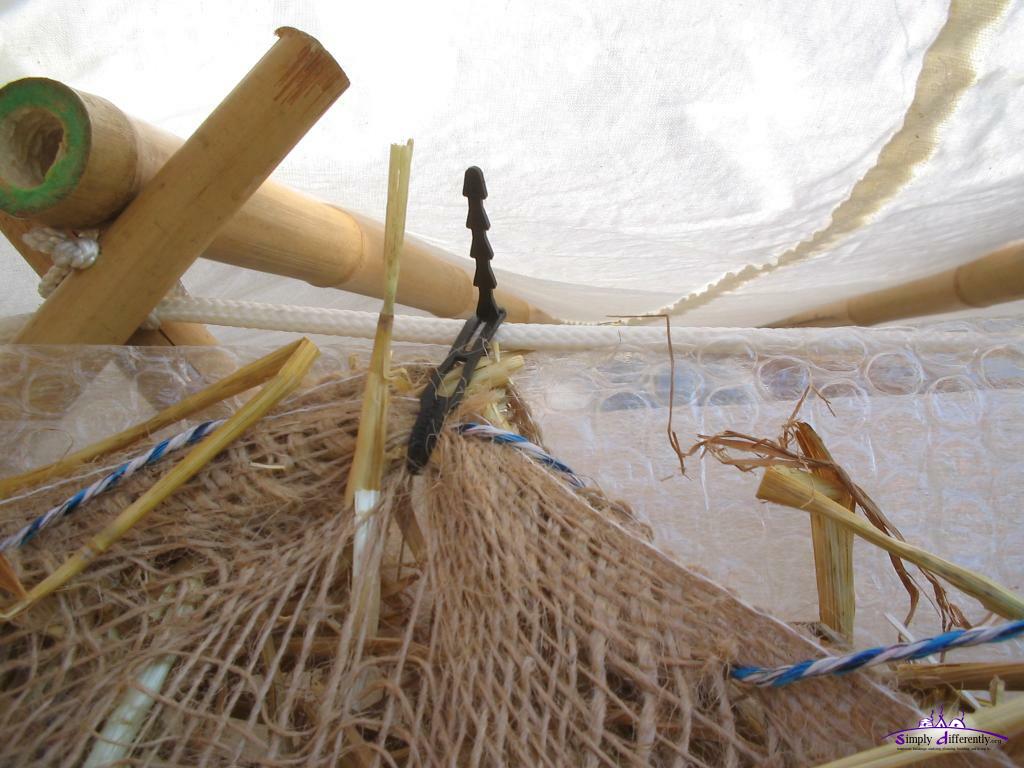
First straw filled jute blanket 2006/11/04 11:42
Fixation binder, very useful (Closeup) 2006/11/04 11:42
Starting around the stove pipe, wrap it around 2006/11/25 10:16
All 13 segments put up ... 2006/11/25 11:59
Finished straw insulation with new PE rain cover 2006/11/26 12:59
Pipe ending 2006/12/03 11:16
Ropes & Tension Ribbons
There is a way to tighten the roof / wall connection:
use the main rope or tension ribbon on the top junction of the lattice wall, or one junction below
tighten that main rope, e.g. before you put up the roof poles / rafters
optional 2nd rope or tension ribbon, place it below the roof pole / rafter at the top junction of the lattice wall
use it to tighten and release tension of the main rope, e.g. when you need to replace it
distribute tension and pressure from the roof to two ropes or tension ribbons
put up all the rest, incl. rain cover
rope or tension ribbon to fixate the rain cover reaching over the wall, it will support the main rope even further, if you tighten it further than the main rope makes the other ropes get loose and replaceable
Especially when you have a heavy roof, e.g. material, thermal insulation or general heavy material of the roof poles or rafters, distribute the force with 2 or 3 ropes or tension ribbons that way - it makes working on the yurt while erected easier and one is more flexible than having just one rope keeping the yurt in shape.
For a more detailed construction, not just erection, of the yurt, see my yurt diary as well.
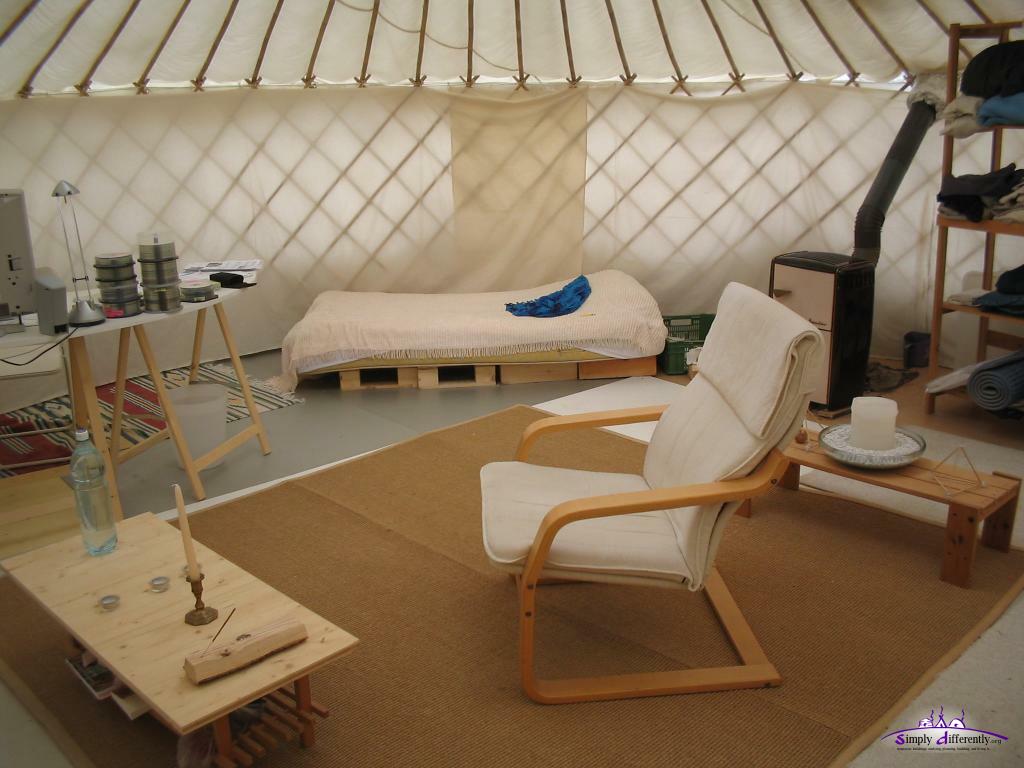
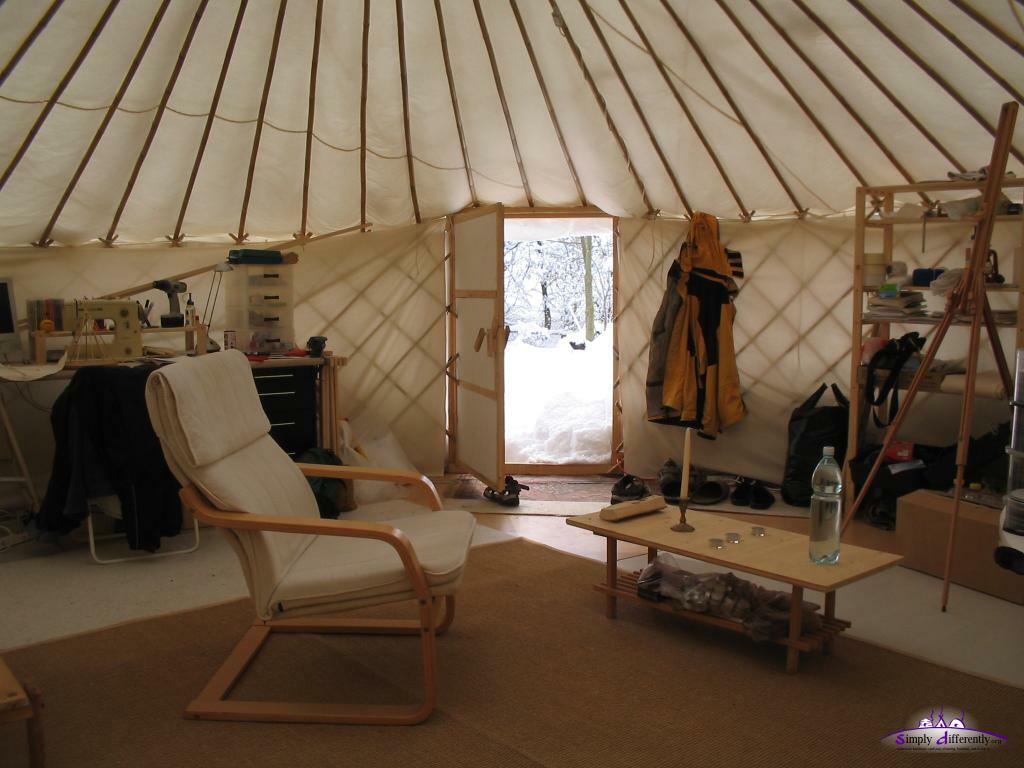
Interior
I put most of my stuff around the wall, and kept the center free. Also the stove I put aside and used a fan to distribute the heat which was usually 30-40cm above the ground and not mixing with the much colder air on the ground.
It is of course personal taste to either do it alike the Mongolians and put the stove in the center, and have the heat radiation be optimized this way, or put the stove aside. I noticed to keep the center free makes the yurt appear grander.
Storm Preparation
While living in the yurt experienced 2-3 strong storms, at my site up to 120km/h I would estimate.
I'm kind of a slow learner at first as I had to fix and fasten the yurt while the storm was underway as I often hoped the ropes I used were sufficient, and experienced they were not.
It's worth noticing, the storms affects the roof mostly, no impact to the wall as I noticed, me using 90° lattice angle and bamboo, with stretching the rain wall cover below the floor and use one rope on that height, almost on the ground, all around to fasten it (as seen on a photo above already).
Some people put some small laths on the floor to fixate the lattice wall on the floor, or screw the door frame on the floor, both which I didn't do.
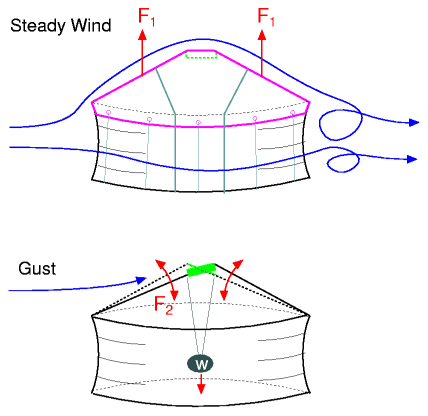
Steady Wind
Winds on a Yurt
The force F1 in the illustration is the same force occuring on an airplane wing, the wind goes faster over the roof, creates a lower airpressure, and pulls the rain cover up. Usually the ropes around the yurt a bit below the wall roof junction cannot keep the roof cover sufficiently, but using cords to pull the roof cover down on the ground does it usually - or ropes going over the entire roof.
Usually behind the yurt some whirls occur, I have noticed it quite well at heavy winds the smoke from the stove whirling behind the yurt, and even sometimes forward against main wind direction, but it's also because I'm close on a slope of a mountain, where the winds create a whirl on the entire slope along with the nearby forest. In a way, it showed at strong winds the nearby environment can create large whirls as well.
Gusts
The F2 indicates a swinging force of a gust, pushing down the front roof, and then releasing it and counter balance by going up - there the risk of roof poles falling off their holes in the crown-wheel.
I was told by mongolian woman that in her homeland they use a tub full of water or a heavy stone hanging from the crown-wheel, to add more stability to the roof and limit these swings - I would not recommend to fasten it with a cord direct on the ground, but rather have a floating weight able to give in.
References
"The complete Yurt handbook" by Paul King, ISBN 1-899233-08-3 Covers traditional mongolian yurt, good as a start


 , background information and illustrations